Zharoznizhuvalny for children is recognized as a pediatrician. Allegedly, there are situations of inconvenient help for feverish women, if the children are in need of giving innocently. Todi dad take on the versatility and constipation of fever-lowering drugs. How can you give children a breast? How can you beat the temperature of older children? What are the best ones?
Mobile attachments have already reached our life. Now Lyudin doesn’t see anything without a smartphone or a tablet. The great popularity of annexes is based on the "Android" operating system. Qia OS has been broken up by the Google company at once into the market of namespaces. IOS is from Apple and Windows Phone there is not a lot of presence on mobile markets, partly with "Android". However, as and all the technology, attachment on the platform may be the power of "glitch". Development of systemic diseases - type of rice whether it is an operating system. I wouldn't stick it in a bullet. It is often the case that the device will be asked again. But I do not know everything, how it is possible to do without such radical visits. Also in any gadget for Android є Android System Recovery 3e. How can you kill him? Let's talk about it.
What is it for the zvіr?
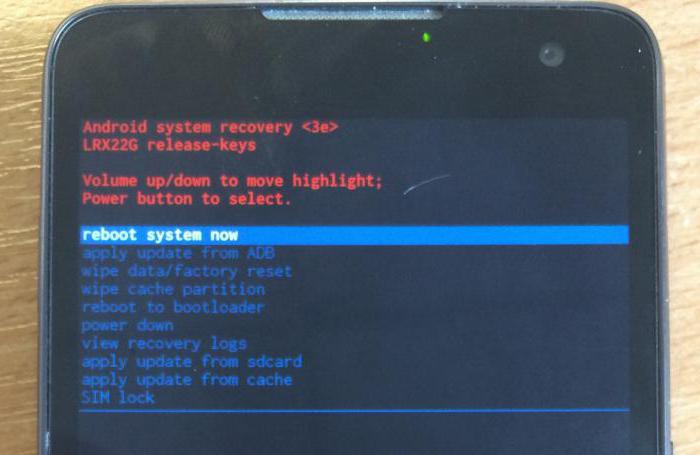
What does Android System Recovery 3e mean? Tse Svєrіdniy Bios mobile annex. Be yak operating system maє svіy BIOS - the basic system of introduction-vivedennya, which is good enough to navigate with the basic OS. Inodi BIOS is not similar to the standard one (yak, for example, in Android devices). It serves to ensure that the brand newness of the smartphone or tablet is updated, for the critical update or for removing the factory settings. The Android System Recovery 3e menu can be used without any items, which can be displayed as such. Ale bida in that which is written in English... That is a lot of things, and the nobility does not know how to correct the recovery.
Itself is written qiu article. Android System Recovery, instructions until what is needed, by a forceful tool for adjusting and reanimating a smartphone. It is necessary for all the nobility about those who like to be a criminals' rekaver in order not to waste pennies on maystrіv. It’s simpler and cheaper to make everything yourself. We can choose from the menu item of the menu to recover everything that is possible. Now, let's fix it.
Yak to escape to the recovery?
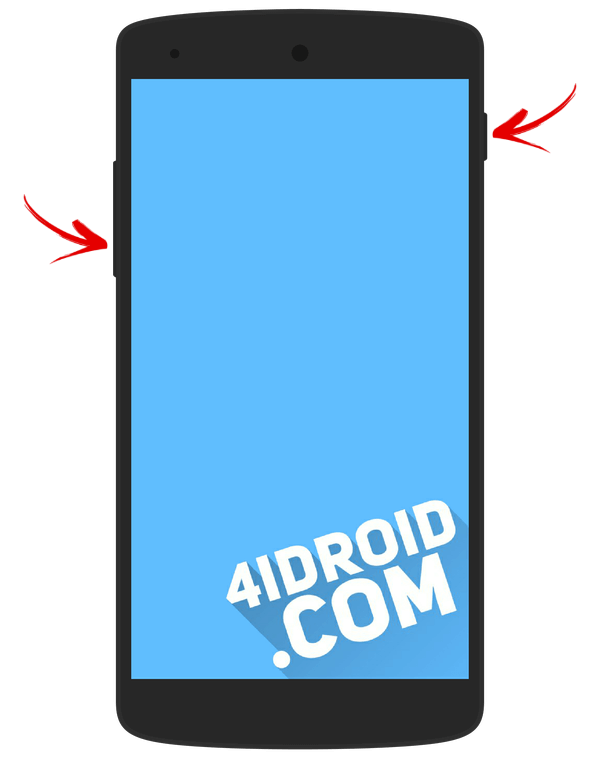
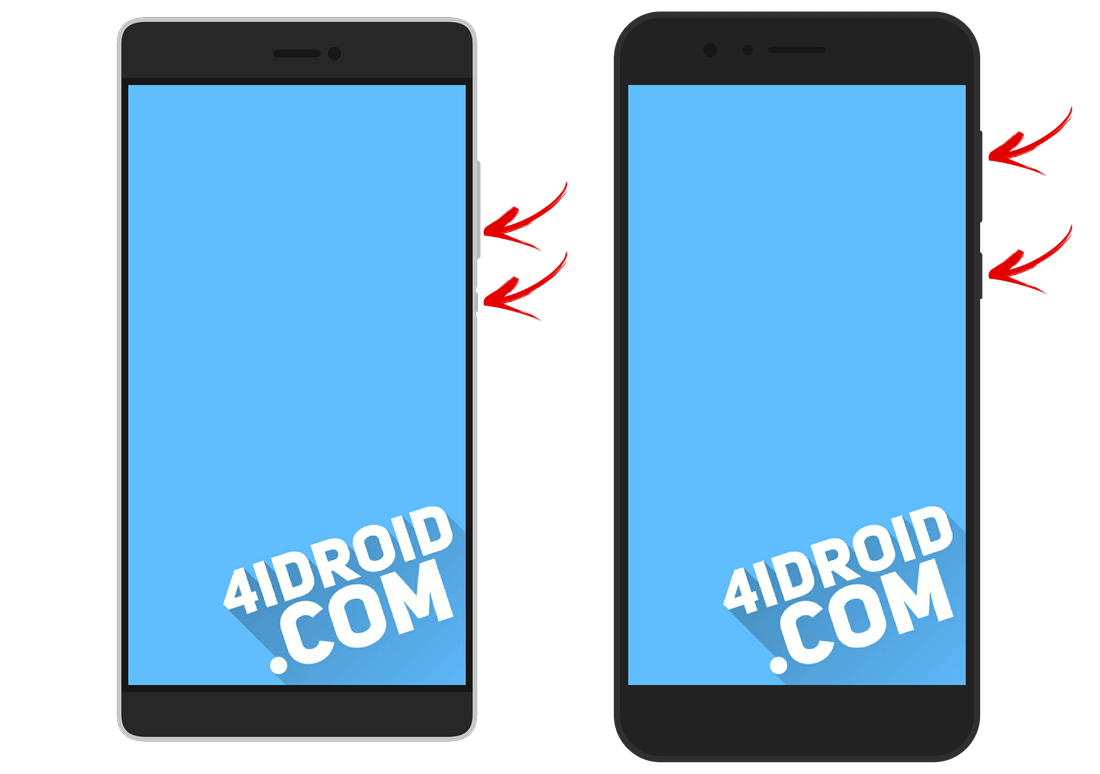
Tse stale vid specific models attachments. For some devices, it is necessary to press the button to turn on the button "Guchnist +". But smartphones are being used, which have been forgotten. Older models with a mechanical button "Dodomu" are pressed against the pressure of the button. Deyak_accessories vimagayut one hour onslaught of buttons included and "Guchn_st". Є. The price of being deprived of the original annexes of the type of virobniks.
Ale є also and the door to the "Chinese" gadgets with an imperceptible operating system and a "crooked" shift. Standard methods for entering the recovery from the fall can and spratsuvati. Here є kіlka options. First: vivify the documentation of the smartphone (yaksho won є) and know the need for a combination of keys. Ale tsei option is not for everyone. The majority of such attachments, either, are not included in the documents, or in the documents there are not many Russian documents. Another option: to know the need for a combination of shorts after the last onslaught of all buttons. And now let's move on to the points Android menu System Recovery 3e.

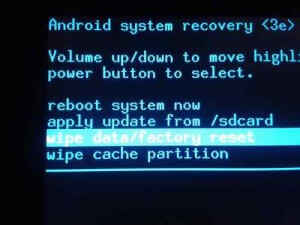
Reboot system now
Tsey menu item to the vison is outside the rewiring of the annex. By sending a choice of options to a smartphone to lock the standard operating system "Android" without any changes. Call the tsey point to pick up after the completion of all the manipulations at the recovery. But for that vipadku, as well as the vypadkovo tsey regime. If you want, it’s possible to do it in a vipadkovo - unavoidable way. Yak bi was not there, Android System Recovery 3e, instructions for the operation of which just life is necessary for the coristuvachev, there is such an item. First of all, you should be honored.
The menu item is required to be victorious at the end of the day. So, if all the operations of the viconany, all the components have been updated, the factory settings have been removed and the firmware has been installed. In tsomu є the essence of redeployment: I will give an attachment to the zastosuvati of all the corrupted snakes. Of course, for some of them, the smartphone might not get bogged down. Ale tse vzhe zsіm іnsha іstorіya.
Apply Update from External Storage
The whole menu item allows you to store the update on the memory card. Until the speech, through the whole point, install new firmware in the same way, as the main OS does not vantage. Є A number of menu items Android System Recovery 3e. How to flash a new OS? For the whole it is necessary to go to dan menu Then select the Choose ZIP from SD Card item, which is the firmware for the ZIP format. It's just an update file, then vibrate Apply Update From SD Card. It is the very same to be stitched to be a device for an additional recovery. It is enough just to copy the firmware file to the root of the memory card, go into the recovery and vibrate the required item.
At the same point є і інші підпочты, which can become stagnant in non-standard situations. You can convert the MDSUM to the firmware file. The option is to change the file for integrity, and it does not seem to be so, just because of the change. It is also possible to convert the firmware file to the consistency of the add-ons. Tse іnformatsіyni nalashtuvannya Android System Recovery 3e. Instructions as such were not required before. Yaksho є pardons, then put I will give the firmware not required. Axis and all information.
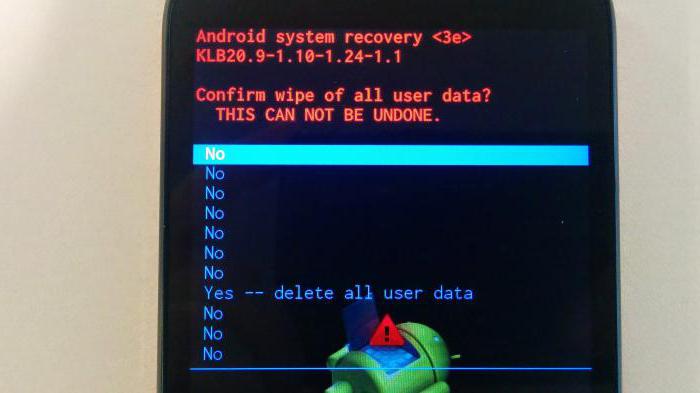
Wipe Data. Factory reset
This is another important point. Qia optz_ya zdatna vіdnoviti protsezdatnіst device without any firmware. Tsey tool will skid the operating system of the gadget at the factory. Surely, everything that was known on a smartphone will be visible: supplements, photographs, music. Zagalom, all those who were in internal memory phone. Android System Recovery 3e, the instructions for the operation of what you look at here, is designed for the very purpose of reviving the device without having to seriously rewire the firmware. The first option permits the viconatization of the operation.
Qia function is also victorious before installing any firmware. Before flashing, you need to skip the phone to the factory setting. The new operating system is very unstable. Alec not nighirshe. If you don’t turn to the factory settings, the firmware may not get up, and even if the koristuvach is going to remove an absolutely "dead" smartphone. Instructions in Russian language vidsutnya, ale that, well є, it’s clear that the Wipe Data & Factory Reset item is obviously required in front of the skin firmware attachment.
Wipe Cache Partition
One more corisna team in Android System Recovery 3e. Instructions before the recovery to talk about those that can be used in tandem with Wipe Data. As soon as the next point clears the internal memory, I will add it, and it cleans the cache. The robotic files of additional data are stored there. Zvychayno, as long as it is not torn before the firmware, nothing terrible will not happen. It's just that when new programs are installed, the cache will grow to newer sizes. For some reason, the smartphone will be even more successful. But it’s not so scary, oskilki є bezlich program for clearing the cache of Android OS. The stench is wonderful.
It is also recommended to vibrate the function if it has been canceled at the factory. This will help the smartphone to be "clean", which is positively in line with the quality of the operating system. Instructions for Russian Android System Recovery 3e recommends that you complete the procedure by itself. Before re-zavantazhennyam annex. Todi everything will be so, yak maє buti.
Wipe Battery Stats
The function of additional help is to add a battery to the battery. After an attack on a whole point of repair, the cache of the accumulator will be cleared, in which the flowing mill of the element of life will be recorded, its nominal range and parameters. Throwing off the statistics of the victorian accumulator battery, it will be possible to continue the life of the new firmware. I feel a lot of the "guru" of "Android" to be eagerly placed before the price of the option. Ale for the sake of justice, won’t be too Korisna. However, stasis is often not recommended. Tilki before flashing the attachment.
Mounts. Storage
There are elements of control over the internal memory of the smartphone. The whole point allows you to clear the memory card or to wake up the memory, to format it, or to bring it to the store without the need for recovery. Tsey razdіl can vikoristovuvatisya in that vypadku, if you threw the firmware file on the memory card, and rewrite the smartphone in the operating system of the dumb boot. In order to mount a memory card and attach it to a storage device, you need to select the Mount USB Storage item. Yak tilki z'єdnannya will be installed, the computer will install itself required drivers for robots.
For the establishment of the data, it is possible to work from the memory card everything that is available: format, clean, copy required files and so far. Open the USB flash drive, then vibrate on the smartphone screen in the recovery point Umount USB Storage. You can go to the other points of the recovery and carry out the reanimation with the help of the mighty forces.
Pomilki rekaverі
Inodі vinik so the pardon in Android System Recovery 3e has been expanded, as the installation of the firmware or the package has been installed. There are several reasons for this: the file with the firmware is incorrect, the information in the binary file is incorrect, or the firmware simply does not fit the device. Ale є і another option: before the firmware, there was no problem with the installation at the factory. Good, you can easily fix it at the very same recovery. And to that, there are a few ways.
So, as a matter of fact, blame the broken firmware file, after downloading it, connect the smartphone to the computer, go to the Mount & Storage menu item and vibrate Mount USB Storage. Writing it is possible to copy the firmware in the root of the memory picture. As soon as we started to zrobiti "wipe", then there is no simple thing, now it’s not changed to a little more than a single item of the menu. And from pardon Android System Recovery 3e Commands do not seem to be getting any worse. Vona will be deprived of that, if the koristuvach gets ready to stand up to the ADB update. Zazvychay, the whole method is not practical. As a matter of fact, there’s a pity. The same vikoristovuvati tsei method is non-ma senseu. All one nothing can be found.
Visnovok
Otzhe, pidib'amo pid bags. We tried to describe the functionality of Android System Recovery 3e. Instructions, which came as a result of the trial, in addition to helping the users of the cobs of the Android operating system, were able to see the performance of their smartphone with their own hands. It’s a good idea to broaden the horizons of that uncompromising economy.
We'll talk about those with the update mode ( Recovery Mode) on Android, just go to new models popular virobniks, as well as appearances on food, which is often wondered.
SHO TAKE Recovery (Recovery)
Recovery mode is the so-called Android system update mode. Zavodske Rekaveri, yake seen on the annex "out of the box", there is a lot of functional interconnection, but you can go to see it anyway.
With the modification of Recovery (abo) there are a number of new functions, in the middle of the possibility of rejecting rights, backups systems and updates from backups, as well as a list of options about such updates in the okremiy state.
Yak go to Recovery: instructions
You need to spend some time in Recovery on Android devices, you need to get some of the hardware, and then you need to get the keys to light up the screen. It's a pity, you can not see one single combination for an additional one, and you can go to the menu Rekovery yak on smartphones Samsung, so і HTC, LG, Xiaomi, etc. To this we have chosen the following instructions for the new models.
(!) Shkopravda, є three practically universal ways - the report on the skin is written on the basis of the statistics:
- Having connected the Android attachment to the computer, you can switch it to update mode via the command row windows, vikoristovuchi ADB.
- Special programs allow you to go to Recovery menu from the system.
- Through the Terminal, having entered the command (required ROOT rights).
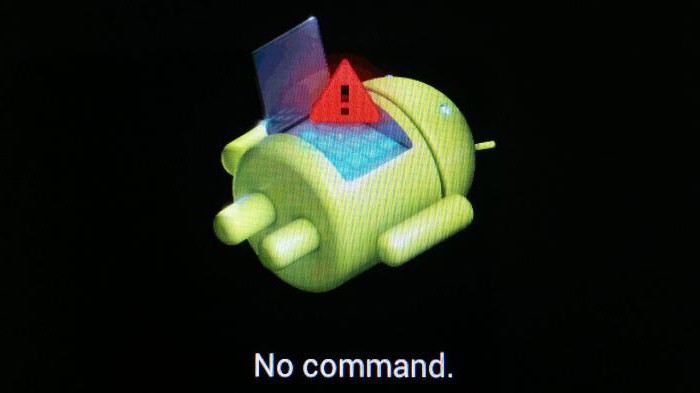
(!) In the same place, you will know the information, how to work, if the recumbent Android appears on the screen. sign to the hail at the belly it is written "Command dumb (No command)".
(!) Also, all smartphones and tablets have Recovery. In such a case, it will happen that it is self-sufficient (as well as a custom recovery for this model) - according to the instructions.
Change according to the menu, use the keys to improve and change the food, to use the button to change / block. With new CWM outlets, the stock recovery can be touch sensitive.
Lenovo
On vimknenomu Lenovo smartphones zatisnіt and tame it out at once:
- Guchnost "+" and "ON"
Yaksho did not spratsyuvalo, vicorist:
- Guchnost "+", Gucci "-" at once from the live button
Nexus
As long as you have a tablet and a Google Nexus smartphone, you can log into Fastboot mode, and even go to the recovery. Schob tse zrobiti, tune:
- Guchnost "Down" + included
With the help of the buttons for regulating the purity, switch to the "Recovery mode" and vibrate by pressing the button to turn on / off.
Htc
Get victorious on the following day:
- Volume "Down" + launch

For the deyakykh (have a drink at once in the Rekaveri):
- Volume "UP" + launch
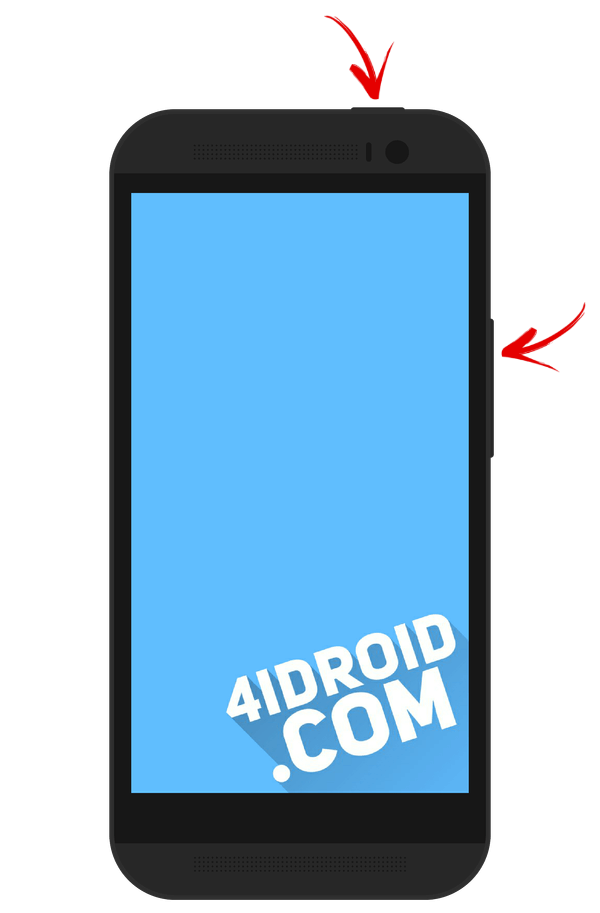
On most HTC attachments, you can use the Bootloader, and later, for the additional key, you will need to go down to the Recovery item and go to the new one by pressing the power button.
In the Bootloader menu є the item "Factory reset", which will show you for dropping all the parameters in the phone to the factory ones.
All the lucky ones Samsung models To enter recovery mode, use the following combination of keys:
- Button "Dodomu" + customization + included
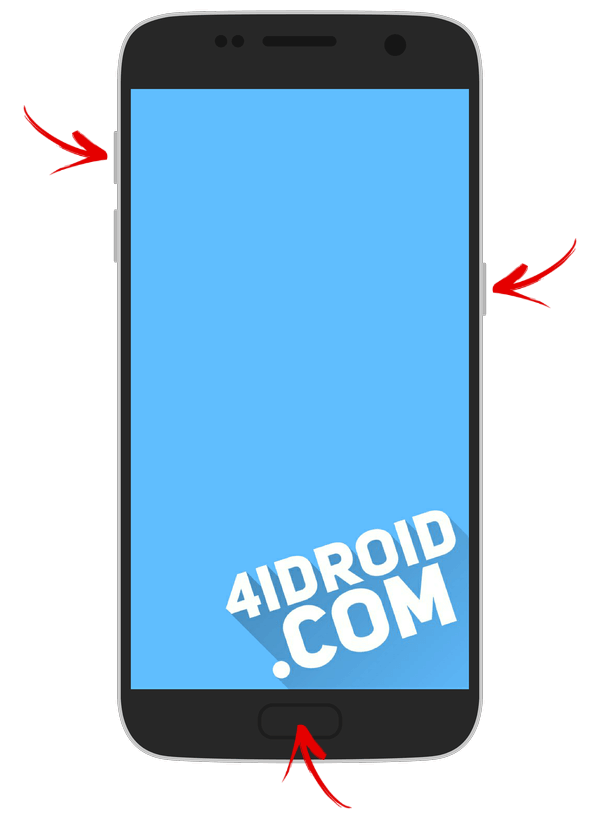
On old machines:
- "Dodomu" + included
On old Samsung tablets:
- Improvement of food + improvement
Meizu
Have smartphones Meizu vidsutnya recovery, ale there є menu, from which you can install the firmware, or throw off the adjustment to the factory ones.

Drink up to the next one, pick the following combination:
- "ON" + Volume "UP"
Lg
- Trim the keys "Change of Guchnost" and "Zhivennya" before the LG logo appears.
- Let us quickly admit them and stifle the knowledge.
- Check out the pre-set menu.

On vimknenomu phones Xiaomi Trim the tsі klavіshі:
- Guchnost "Plus" + included

The recovery menu from Xiaomi is available with a number of movs and at the entrance you will be prompted to vibrate one of them. Let's go to the main functions.
Sony
U bagatioh Sony phones not set stock photo Recovery(To get to put TWRP - check the FAQ є on the cob of statistics) and only in some models. You can go for an additional one with a combination (try it out):
- "ON" + change of food
- "ON" + shortly the pressure of Guchnost "Vgoru" until the SONY logo appears, then more times more Guchnost "Plus"
- "ON" + change of foodiness + improvement of foodiness
Huawei
For phones and tablet PCs of the Chinese Huawei virobnik:
- Volume "Down" + Power
- Volume "UP" + Power
Motorola
- Stiffen down and tone down the key of the liveliness and Guchnost "Down" 2-3 seconds, and then let it go.
- Wee wait until Fastboot Flash Mode. At help volume"Down" / "UP" remember the option for "Recovery Mode".
- Confirm vibration with the live button.
Fly
Set it aside until the "Fly" logo appears, or select one of these combinations - to lay down one of the singing models:
- Volume "Down" + on
- Volume "UP" + included
Asus
- Strengthen the key to liveliness and Guchnost "+" (another option: lively and Guchnost "-").
- When you select, let the button to open, continue to work until Recovery appears.
Translatable to adjust the recovery mode via a computer: universal method
Connect your Android device to your computer via USB,. Launch ADB and enter at the command row:

Press "Enter", for which the device will be re-enrolled in Recovery mode.
Vikoristovuєmo korisnu program
To run special programs zavdyaki yakim in one click, you can translate the prist_y Recovery Mode. For example, Boot Droid. The list of options has enough vibration "RECOVERY", and then confirm your vibration by pressing "YES".
![]()
Login to Update Mode via Terminal Emulator
Download Android Terminal and type the next command:
Natisnit "Introduced", sign up for root access, please.
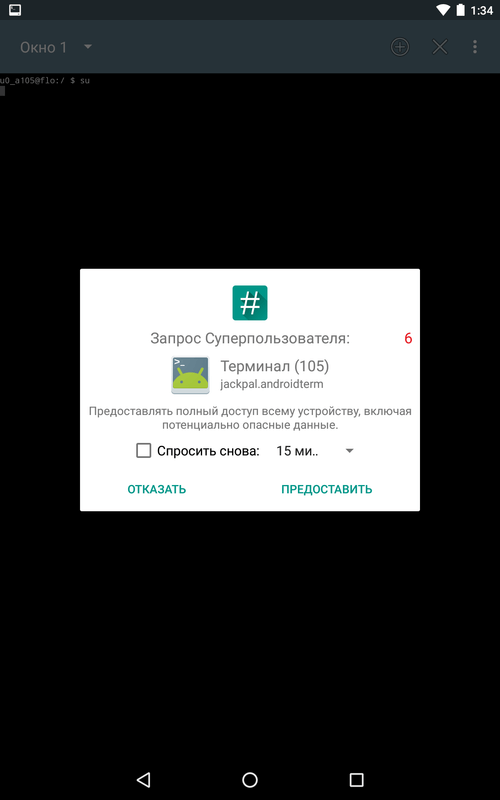
Then enter:

I know to press the "Introduce" button, and the phone will be able to re-enroll in the Renewal Mode.
Write "The command is dumb": how robiti?
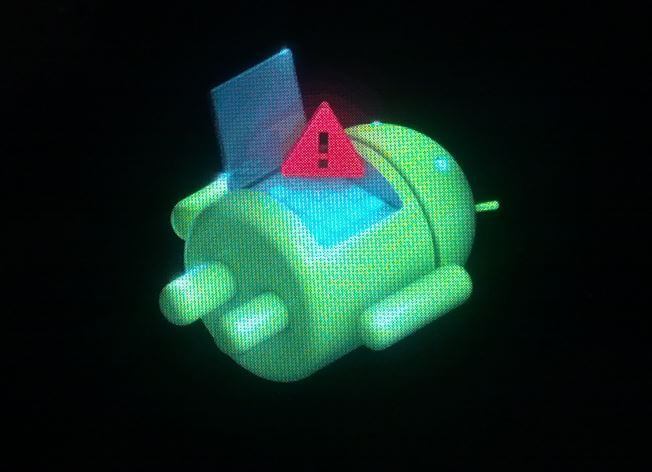
As soon as on the screen there is such a written and lying Android, try to quickly press on 2 buttons: "ON" and Guchnost "+". Let the menu appear Rekaveri.
When buying a tablet or a smartphone, it’s a lot to fix the functionality at once with the instructions, in which the term Recovery Mode is often used. Let's try it out for this mode, and Recovery Mode is most needed for your Android device.
As a rule, the mode of renewal is used by the retailers or engineering. Yogo well-known: the installation and adjustment of custom (factory) firmware, or restore a copy of the operating system (including all information and adjustment of the smartphone). Likewise, inodi Recovery is a vikoristovuyt for repeated discount adjustments to factory values.
Remember the Recovey Mode in Android system without having to attach a warranty to your smartphone. Entering the android renewal mode is not an unfailing procedure;
How to enter recovery mode (update mode)?
Visually, the input mode can be seen, but the principle is the same on all smartphones. In addition, for a person it is necessary:
1. Vimknuti smartphone;
2. Zatisnut clavishu keruvannya guchnistyu (zbilshennya);
3. Do not let go of the sound of the Home key;
4. Do not let go of the two in front of the keys, onslaught;
5. Check-in for the android zavanazhennya in the update mode.
How to use the update mode in Android
In Recovery Mode, navigation (relocation) on the menu is displayed for the additional keys of Keruvannya (top / bottom) and Confirmation (Home) or the key of Liveness.

As a rule, the bugs have a virobnik mode of learning, rather than a head change of presence:
apply sdcard: file.zip - add the installed file to file.zip, which needs to be added to /mnt/sdcard/file.zip;
wipe data / factory reset - to retrieve the cleared data and cache portions of the internal memory of the device, as well as clearing the android_secure system folder. For the cleaners to rely on respect for the vision of all established documentsі to see the reduction of systemic adjustments;
wipe cache partition - read the cleaned cache partition (distributed from any program to save its information).
DYAKUUMO YOU FOR LIKE GIVEN STATTIES!
-

For the first time, we will talk about the Recovery menu, some more details about the installation instructions from the firmware and Android upgrades, transfer the songs from the Recovery menu.
So also Recovery?
Recovery (recovery) or in the English language - Update mode - I will add a special lock-in mode, for which it is possible to update the system or to install the update. The emergency mode, which is necessary for the updating of the working station of the mobile device in case of malfunctioning programs, the result of which was the inclusion of the add-on that is unavoidable in the normal mode.

For the additional Recovery mode, you can:
- Reload tablet or smartphone.
- Zrobiti skidannya nalashtuvan.
- Reinstall.
- Nalashtuvati and install the firmware.
- Zdobuchi Root-rights.
- See your own specialties and know how to be in the system.
- Update the operating system that is very rich.
Remember, the wrong things can be used to create a shkodi system. I have written on your tablet important information more beautifully to save time on this annex.
Before the resignation of the renewal regime, you should familiarize yourself with the instructions. Skin tablet service menu Seemingly, for those who go to the Recovery menu on their tablets, they need an individual message.
Yak to go to the Rekaveri?
Skin recovery mode mobile annex Seeing visually, while logging in, it is practical to depend on one principle. In order to log into the Recovery system, you need to add a number of steps:
1. Get the tablet. Likewise, the battery will be charged again, or the tablet will be plugged in.
2. Go to Recovery mode by pressing a combination of buttons. Oskilki rіznі tablet computers to smell the new "hot keys" by pointing out a few combination keys, which are most often used to enter the menu of the recovery.
The main combination of keys for entering the Rekaveri:
- overnight jamming of both clavish "guchnost" and clavish "vimknennya";
- one hour overcrowded one of the keys, the sound and the keys included;
- one hour squeeze one of the clavish of guchnost, Home buttons that will be added to the annex.
Press the keys until the update mode appears on the display.
On some Chinese devices, there is no Recovery mode. This time you have the chance to re-flip the tablet.
Yak oversaturated menu Rekaveri?
There are a lot of attachments for transferring the menu items behind the additional buttons of Keruvannya Guchnistyu. The button enables the servant to vibrate the required menu item. Deyaky attachments can be victorious in their clavis.
As the keruvannya is sensory, it moves through the points and vibrates the required point with a finger pressure.
How can I go to the Rekaveri, how can I use my tablet on the tablet?
As soon as you get on your tablet from the daytime clavs of guchnost, speed up with such delights:
1. You can try to escape to required mode, having tightened the buttons of the live and Home one hour. Another option is to press the “Dodoma” key, press the live button and let the “Dodoma” key. After showing the screensaver, press the "Dodomu" button again.
2. You can go over the menu by connecting the USB keyboard via the OTG cable or by speeding up the sensor.
Yak Vidomo, Operator Android system Nada koristuvachev is a magnificent functional, as it is possible to realize all the potential of your smartphone. Fixing from the inserted settings for help engineering menu that ends let's recap factory nalashtuvan at Android help System Recovery 3e. As soon as you are in the menu with your smartphone, you should be aware of the statistics.
Tsi mode nalashtuvan buv designations for robots z system files the parameters of the system. With this help you can activate or block practically all functions of the annex Android controls... Here you can create such folding manipulations, yak outside cleansing for updating the system literally for a few clicks. Through those menus that show an important role, it’s not so easy to eat it all the way down. You don't want to be nice to your attachment, you need to know the point of the mode, їх meaning in Android System Recovery 3e and how to work for good health quietly.
Launching mo Android System Recovery 3e
Yak bulo said vishche, launching the whole menu is not so simple. In order to have a meal here:
- Vimikaєmo gadget;
- One hour a jammed goydalku of guchnost, the button "Dodomu" and the button is turned on.
It takes a few seconds for the Android logo to appear on the screen, and then the Android System Recovery 3e menu starts up. How to work in a new and meaningful menu items - let's talk about more details.
Appropriate points in the regime
The fastest and most important item is Reboot. Vin allows koristuvachev to restart the prit.
I will attach a yak to a memory card newcomer, USB connection, vibrate Toggle USB strage.
There is a robot with a CWM package. Win vikoristovutsya to install Vlasny Recovery on pristіy.Vibravshi "Instal from sdcard" ( establishment of CWM from the picture of the memory), find yourself in the parentheses with the points:
- The installation CWM Recovery, like zavanazheniya on the memory card - Choose zip from sdcard;
- Change the amount md5sum - Check md5sum a file;
- Diznatisya pidpis package CWM - Toggle Signature Verification;
- You can convert the CWM to the slickness from the attachments by clicking Toggle Sclipt Assert.
Yak koristuvatisya for reflashing Android mode System Recovery 3e? Vikoristovyte deprivation of the inversion of functions, in which you are reasonable!
- throw off all the data of the smartphone - Wipe data / factory reset;
- Wipe Cache will allow you to clean up the CACHE;
- Wipe dalvik cache vikoristyutsya for cleaning Dalvik-KESH;
- Wipe battery stat;
- Format System will see more system files;
- Format Date format
- Format cache vidalyaє danі KESHu, ale files in new zalishayutsya;
- Clearing the danikh kernel CASH - Format boot;
- In order to increase the format of the setting, pick Wipe all partitions.
Before the speech, how can you use Android System Recovery 3e? Increase the value of the items in the menu, about how they are designed, will increase the identity of all gadgets in Android controls.
- The offensive section is one of those who have been found. Backup / Restore for backups and updates. Woo nyomu є point:
- Backup backup copy of the data;
- To update the factory firmware, serve as Restore;
- Advance restoration
- Advanced Backup can be used to copy files.
The upcoming item for converting formats in Android System Recovery 3e, how can you rob the menu? Here you can vibrate the image converting to EXT4 and EXT3. The axis allows the robustness of the distribution:
- Convert / change a backup; I will add the system to the converter;
- Victory Convert Data, convert data;
- Change one of you backup serve to transfer the backup files;
- Convert Cache to convertє cache;
- Wipe data / factory reset will be used for converting all razdiliv;
- System - format system, navpaki - format data; cache-format cache.
Dodatkovo menu

In the Advanced distribution, you can select the following commands:
- File System Check to correct the validation of system files;
- Print Partition Info bring log information to the display;
- Copy recovery.log for sdcard to save copies of the recovery log;
- View formats ext and ext2 on SD memory cards - Partition SD Card;
- No - save my fat32 partition! pinning the robot to the razdiliv;
- Vikoristovyte Fix Permission, correct the rights to / data / data.
І nareshty, stop point Power Menu. Yogo vikoristovuyut for keruvannya kharchuvannyam:
- Reboot Recovery zd_dysnyu reboot;
- For Bootloader mode, pick Reboot in Bootloader;
- Easy to re-enable Reboot;
- Power Off is very special.
With such a rank, for the additional menu, there is a great number of such functions, which are not available at the established visuals. If you have run out of food, see if you can put it in the comments!
Sergey
My recovery has no buttons for backup (backup and restore). There is also a menu:
reboot sysrem now
apply update from sdcard
apply update from cashe
wipe data / factory reset
wipe cashe partition
and everything. Yak me zrobiti backup firmware?