Antipyretic remedies for children are prescribed by a pediatrician. But there are situations of indispensable help for fevers, if the child needs to give faces negligently. Then the fathers take on themselves the resuscitation and stop the antipyretic preparations. What can be given to infants? How can you lower the temperature in older children? What are the most safe faces?
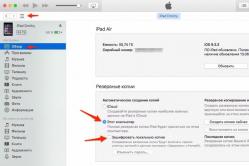
recovery mode(renewal mode) – a special mode of device acquisition, which allows the operation of dropping to factory settings, backup and other system functions.
Most often, yoga is victorious for, if there is no access to standard fittings systems. The procedure for entering Recovery is different for the skin dermatologist. For example, on Samsung smartphones it is necessary to press the life button + Home + goydala adjustment of the density uphill. On Nexus attachments - "on button + volume control down". Keruvannya in the recovery itself is used for the help of the buttons for adjusting the density and the buttons for life.
Respect! Recovery is not an unsafe procedure and does not allow for a short-term guarantee, but further down the road can bring up to various nasledkiv, you bear the responsibility for it.
Є k_lka vid_v v_dnovlennya mode: stock and custom. Let's take a look at their report.
Stock
The stock Recovery Mode goes at once from the attachment to the back and does not look like a special functionality. Most often, the new one has the following points:

For some smartphones running Android 7.0 Nougat, the following functions appeared in the Recovery menu:
- Reboot to bootloader (direct download of the mobile operating system to deny access to the recovery mode and start the normal robotic OS mode).
- (Reverification of signatures of all root files and their values).
- Mount/System
- View Recovery Logs (renewal logs).
- Run Graphics Test (start graphics test).
- Power Off (vimknennya I will add).

Customne
Custom recovery includes more features. The most common way to do this is to restore the image to restore the system (nandroid backup), it is also possible to open a wipe (clear) the okremі split, for example data, dalvik cache, turn the phone at cob mill without wasting data, restoring rights system additions and so far. The most popular are CWM and TWRP.

In these articles, we’ll talk about those that have Recovery Mode on Android, how can I go to different models popular picks, as well as for deeds of nutrition, which are often asked.
What is Recovery (Recovery)
Recovery mode - so-called recovery mode Android systems. Factory Recovery, like going to the outbuilding "out of the box", may have a functional area, but you can also get it from a new one.
With the modification of Recovery (CWM or TWRP) there are a number of new functions, among which the possibility of root is right, making system backupsі update from backups, as well as other options, about yakі mi rozpovіmo in okremіy statti.
How to run in Recovery: instructions
To spend in Recovery on Android devices, you need to turn off the device, and then press that button until the screen lights up. Unfortunately, there is no single combination for additional help, which you can see in the Recovery menu on Samsung smartphones, as well as on HTC, LG, Xiaomi, etc. Therefore, we chose the following instructions for different models.
(!) Well, it’s true, there are three practically universal ways - the report about the skin is written in the following article:- By connecting the Android device to the computer, you can put the yoga into the recovery mode through the command line. Windows row, vikoristuyuchi ADB.
- Special programs allow you to enter the Recovery menu from the system.
- Through the Terminal, entering the command (requires ROOT rights).
Navigate through the menu using the keys to change the density, select the button to change / block. In new CWM attachments, the stock recovery can be touch sensitive.
How to run Recovery on Lenovo
To the left Lenovo smartphones zasnіt ta utrimite one hour:
- Guchnist « + » ta « ON»
As if it didn’t work, beat it up:
- Guchnist « + », Guchnist « – "together with life button
Whether you have a tablet or a Google Nexus smartphone, you can first go to Fastboot mode, and then go to recovery. Shchab tse robiti, exalt:
- Guchnist " down» + included

Then use the keys to adjust the density to switch to “Recovery mode” and select by pressing the boost / block button.
Victory today:
- Volume « Down» + launch

For deyaks (spend a glass of water in Recovery):
- Volume « U.P.» + launch

On the larger HTC add-ons, you can spend a lot of time in the Bootloader, and then for the help of the extra keys, you will need to go down to the point “ Recovery» and go to the next one by pressing the power button.
The Bootloader menu has the item " factory reset”, which is required for the reduction of all parameters in the phone to factory settings.
All current Samsung models to enter recovery mode, the following combination of keys is required:
- Button " To home» + increase in density + included

On older machines:
- « To home» + included
On older Samsung tablets:
- Increased density + included
At Meizu smartphones daily recovery, but there is a menu, from which you can install the firmware or reset it to the factory settings.

To spend up to the new, vikoristovyte such a combination:
- « ON» + Volume « U.P.»
- Trim the keys " Change in density» ta « life» Until the LG logo appears.
- Let's quickly let them in and press them again.
- Check out the menu selection.

To the left Xiaomi phones reduce the number of keys:
- Guchnist « Plus» + included

The Xiaomi cover menu is available in a limited number of languages (for the translation of Chinese language). To change the English language, press the button as shown in the photo.

If so, you can grab Xiaomi in Fastboot, Download or Recovery modes.

At bagatioh Sony phones not installed Stock photo of Recovery(To be brought to put TWRP) and only in some models of it. You can come in for help with one of the combinations (try it according to your needs):
- « ON» + density change
- « ON» + short push Goodness « Uphill» until the SONY logo appears, then once more quickly Plus»
- « ON» + density change + increased density

For phones and tablet PCs of the Chinese manufacturer Huawei:
- volume " Down» + power
- volume " U.P.» + power

- Tighten and tame the key of life and Guchnist " down» 2-3 seconds, and then let them go.
- You spend up Fastboot Flash Mode. For help Volume « Down»/« U.P.» change the option to « recovery mode».
- Confirm selection with the live button.

How to enter Recovery on Fly
Trim until the "Fly" logo appears, or choose one of these combinations - lie down in the song model:
- volume " Down» + included
- volume " U.P.» + included
How to enter Recovery on Asus
- emboss life keyі Guchnist « + " (another option: lifeі Guchnist « – »).
- After vibrating, release the button to increase, continuing to decrease Guchnist before the appearance of Recovery.
How to run Recovery on Chinese phones - Doogee, Bluboo, Blackview, Oukitel, Elephone, UMI and others
- Trim Volume " U.P.» + « ON».
- When the menu appears, go to the item " Recovery» button Volume « U.P.”, confirm for help Volume « Down».

Like any other operating system, Android can have a special capture mode, if the device is turned on, but the system itself does not start. This mode is called Recovery Mode, or the Russian mode of innovation. This view mode in any Android device and allows you to disable settings, remember firmware, update firmware from backup copy or just at times hanging. It is noteworthy that on the vіdmіnu vіd root-rights, recovery mode is not unsafe, it is not blocked by the retailer. This function can be faster than leather and more official. Let's take a closer look at how to enter the recovery on any add-on that works on Android, and for what you see the menu item.
Recovery Mode opens access to system functions
Ways to enter Recovery mode
On the outbuilding
standard method. The principle of entering the Recovery Mode is the same for all devices - when it is turned on, it is necessary to press the buttons. Most of the time, the density is uphill, but the following options can be sharpened:
- Samsung - included + high uphill + "Dodom".
- LG - on + volume down.
- Google Nexus, HTC - on + full down, tap on Recovery.
- Pevni Lenovo models, Motorola - turned on + high uphill + "Dodom".
- Sony - the button of vitality, after the vibrations, squeeze the volume.
If I'm trying to get into Recovery Mode using standard methods, try to clarify the instructions. The listed combinations are practical for all modes and can be used both for entering the standard recovery menu and custom. In addition, you can run Navit if the tablet does not start up or the system freezes.
For the presence of root-rights, you need insertion of supplements Terminal Emulator (https://play.google.com/store/apps/details?id=jackpal.androidterm). After the installation, it will be necessary to allow the rights of the supercorrect and enter two commands: su, and then reboot recovery. Priya will be revantaged.

Via computer
Obov'yazkovoy umovoy є vіmkneniy mode of charging via USB (Settings - For retailers - Tuning USB, or choose the appropriate item when connecting to a PC). To that, as earlier this mode was turned off, the tablet does not start up, it does not show up.
You need the ADB Run program (http://cloud-androidp1.in/Android/PC/Project_Site/AdbProgramm/), a cable and a working accessory.
- Connect the attachment to the computer.
- Launch the ADB Run program.
- At the program menu, press 4, and then 3.

Prystriy re-advantage in Recovery Mode. You can choose the procedures you need.
Yak koristuvatsya Recovery Mode
As we have already said, it’s a standard recovery, so it’s custom, or koristuvalnitsky. A lot of reports of coristuvachs are stupefying, that the ability to do the first thing is miserable, it’s better to install an unofficial one. We'll talk about them for a little while, but at the same time we'll figure out how you can see the items in the Recovery Mode menu on your extension.
Install zip from sdcard - installation of an archive with updates saved on a memory card. Through the whole menu, root-rights and the firmware are downloaded.
Wipe data/factory reset - erase data/throw factory settings - outside purification system distribution, skidannya all nalashtuvan to the first place. You can see all the program parameters, but the media files are left with shortcomings. Vikoristovuetsya in case of critical pardons, system failures, or, if a new firmware is vikonuetsya. Particularly effective zasіb in depressions, if the attachments do not stick.
Wipe cache partition - cleaning system cache- distributing the system, in which the time files are stored and all the programs are adjusted. It is recommended to upgrade if the firmware is changed.
Backup and restore - backup system and update from earlier backups.

Mounts and storage - for correct operation, all distributed systems can be properly mounted and connected. Often such a procedure is completed automatically, but sometimes it has to be corrected manually. You can also clear one of the divisions. Radically vikoristovuvat tsey way only for specific needs, otherwise file system do not get carried away, that tablet will not work.
advanced- additional installations, Some of them - reloading Recovery Mode, clearing the dalvik cache, allowing system programs to be removed. Most often victorious are professional programmers.
Management, which is not assigned otherwise, is executed through (go to the list) and (select menu item). In some vipadkahs, vibir is burnt down, and the larynx is thick down. For whatever it is, the system is obov'azkovo kazuє, like the very keruvati dividing the menu. Іsnuyut razrobki іz touch management.
Unofficial Recovery
As it has already been guessed, the standard Recovery Mode often lacks the capacity, so it is better to use third-party, unofficial extensions. The most popular and two of them - clockworkmod recovery(short CWM) and TeamWin Recovery Project (short TWRP). Offenses can change the functionality and allow you to manually modify and change the firmware, remove root-rights, reset the settings to factory settings and restore the backup copy.
Mobile extensions have already significantly increased our lives. Now a person does not show himself as a reason without a smartphone or a tablet. Attachments based on the Android operating system are gaining great popularity. Qia OS was broken Google and at the same time її part of the market is brandy high. iOS looks like Apple Windows phone worthless presence on mobile markets is equal to "Android". However, like all the equipment, attached to this platform, power can be "buggy". Various system failures - rice mastery be like an operating system. I wouldn’t have put it out like a stick out. Duzhe often devaysi brought to reflash. But not everyone knows what can be done without such radical approaches. Adzhe have any gadgets on "Android" є Android System Recovery 3e. How to greet him and what did you start like that? Let's talk about tse mi.
What kind of beast is that?
What does Android System Recovery 3e mean? Tse own Bios mobile annex. Whether the operating system can be your BIOS - the basic system of introduction and maintenance, as a building pratsyuvati navit with a poor main OS. Inode BIOS is not similar to the standard one (like, for example, in Android devices). Vіn serve in order to improve the practicality of a smartphone or a tablet, to stop critical updates or to throw off the factory settings. The menu of Android System Recovery 3e may be anonymous points, but it shows that it is different. Ale beda in what you name is written on English. For those who don’t even know how rich it is to recover properly.
The same article is written for that. Android System Recovery, the instruction of which is absolutely necessary, is an intricate tool for fixing that resuscitation of a smartphone. It is necessary to know everything about those, how to earn money as a recovery, in order not to spend pennies on the master. To make everything richly simpler and cheaper. We will analyze the skin of the menu item of the recovery and we will tell you about everything that is possible. Oh, let's start.

How to get to the recovery?
Tse deposited in specific model outbuildings. For some devices, it is necessary to press the power button and the "Guchnist +" key. And yet, sometimes smartphones are ringing, which is not enough. Older models with a mechanical button "Dodom" will press the button. Deyakі aksesuari vymagayut one-hour onslaught of buttons that "Guchnist". And so, as a kind of obov'yazkovo zatiskannya klavіshi included and both buttons for adjusting the volume. It costs less than the original outbuildings in the form of other pickers.
And yet, there are also "Chinese" gadgets with an unintelligent operating system and a "crooked" translation. The standard methods for entering the recovery can be used in vipades. There are a few options here. First: look at the documentation of the smartphone (like there is no є) and know the required combination of keys. But this option is not for everyone. The majority of such outbuildings are either not in the light of the old documents, or in the documents there are no Russian language. Another option: to know the combination of the path of the subsequent pressure of all the buttons. And now let's move on to the points android menu System Recovery 3e.

Reboot system now
This menu item is victorious outside the re-adaptation of the add-on. After choosing any options, the smartphone will be able to capture the standard operating system "Android" without any changes. Sound this item vikoristovuyut after the completion of all manipulations in the recovery. But well, that one has a vipadka, as if they were zavantazhilis with the whole regime of vipadkovo. If you want, how can you grow up vipadkovo - it’s impossible. It didn’t happen there, Android System Recovery 3e, the instruction for the operation of which is simply necessary for life, there is such a point. І z cim be brought to call.
The menu item needs to be tweaked for the rest of the day. Then, if all operations are completed, all components are updated, the factory settings are thrown off and the firmware is installed. In tsomu, the essence of re-advancement is: let the annexe zastosuvat all the broken changes. Truthfully, after some of them, the smartphone may not be taken advantage of. Ale tse already zovsіm іnsha іstoriya.

Apply Update from External Storage
This menu item allows you to save updates on the memory card. Before speech, through this point, install and new firmware, as the main OS does not fit. Є kіlka pіlka pіdpіnіvіv th menu Android System Recovery 3e. How to flash a new OS? Who needs to go to given menu Then select Choose ZIP from SD Card, as the firmware is in ZIP format. If it's just an update file, select Apply Update From SD Card. Itself is so flashed whether it is a device for additional recovery. It is enough just to copy the firmware file to the root of the memory card, go into the recovery and select the required item.
At the same point, there are other subpoints, which are to be found in non-standard situations. You can check the MDSUM firmware file. This option rechecks the file for consistency and it seems to be wrong, you can see the advance. Also, you can check the firmware file for summ_snіst іz attachments. Tse information for Android System Recovery 3e. Instructions like this are not needed before them. Yakscho є pardons, then put given firmware not necessary. Axis and the whole story.

Wipe data. factory reset
This is an important point. This option is to restore the practicality of the device without any firmware. This tool resets the operating system of the gadget to factory settings. Obviously, everything that was on the smartphone will be seen: add-ons, photos, music. Zagala all those that were in the internal memory of the phone. Android System Recovery 3e, the operating instructions for which you can see here, was created in order to revive the device without seriously messing with the firmware. The first option allows the visconation operation.
This function is also victorious before installing any firmware. Before flashing, it is necessary to throw off the phone at the factory settings. Otherwise, the new operating system is not stable. But still not the best. If you don’t turn around to the factory settings, then the firmware may not be installed, and even if it’s corystuvach, it will take off an absolutely “dead” smartphone. Instructions in Russian my day, but it’s clear to say that it’s necessary to disable the Wipe Data & Factory Reset item before installing the skin firmware.

Wipe Cache Partition
Another one Korisna team in Android System Recovery 3e. Instructions before recovery to talk about those who need to win this option in tandem with Wipe Data. I also clean the front item internal memory I’ll add it, then clear the yogo cache. The work files of addenda are saved there. Zvichayno, if you don’t work before the firmware, nothing terrible will happen. Just nadalі, with the installed new programs, the cache will grow to grow to the name of the expansion. After that, the smartphone will be more appropriately practiced. Alas, it's not so scary, the shards are anonymous programs for cleaning the cache of the Android OS. And the stench works miraculously.
It is also recommended to select this function after the factory reset has been done. Tse dopomozhe smartphone statistically "clean", scho positively vpline on the practicality of the operating system. The instruction of the Russian my Android System Recovery 3e recommends that you run the procedure yourself after the download. I'll build it before re-adaptation. Then everything will be so, how can you be.
Wipe Battery Stats
This function helps to upgrade the battery. After pushing on this point, the battery cache is cleared, in which the flow rate of the living element is recorded, its nominal capacity and other parameters. Throwing off the statistics of the victoria battery, you will be able to continue your life for a little while. This new firmware is more efficient with a battery that is adequate. Chomus richly "guru" "Android" disrespectfully set to tsієї optsії. Ale, it’s true, it’s too hard. However, stasis is not often recommended. Just before flashing I'll add it.

Mounts. Storage
Here you can find the elements of managing the internal and external memory of the smartphone. This item allows you to clear the memory card, or to restore the memory, to format it, or to come as an accumulator without interruption from the recovery. Tsey razdіl could win in that moment, because you forgot to transfer the firmware file to the memory card, and there is no need to reattach the smartphone into the operating system. In order to mount a memory card, I will add it as a storage device, you need to select the Mount USB Storage item. As soon as the date will be installed, the computer will install itself required drivers for robots.
After the installation of the card, you can work with the memory card everything that is necessary: format, clean, copy need files and so far. To unmount the flash drive, select Umount USB Storage on the smartphone screen in the recovery. If possible, you will be able to go to other points of recovery and carry out further resuscitation by the powers that be.
Pardons of the recovery
In some cases, the pardon in Android System Recovery 3e has been expanded, as a way to fix the firmware of either package. You can blame it for a number of reasons: the file with the firmware is wrong, the information in the binary file is incorrect, or the firmware simply does not fit that device. And there is one more option: before the firmware, there was no factory reset. Good, that they can be easily corrected by the same recovery. And there are many ways to do this.
Also, as a pardon to blame the broken firmware file, next download it, connect the smartphone to the computer, go to the Mount & Storage menu item and select Mount USB Storage. If so, you can copy the firmware to the root of the memory card. If you forgot to enter the "wipe", then there is nothing simple, you can move to the equal sprat instead of selecting the appropriate menu item. And from android pardon System Recovery 3e Commands don't seem to be chirped very often. Won't show up only once, if the coristuvach is trying to install the ADB update. Ring out, this method doesn't work. In the wake of what the pardon is to blame. Also, the victorious method is not sensational. All the same, you can’t see anything.
Visnovok
Otzhe, pіdіb'єmo pіdbags. We tried to describe the capabilities of Android System Recovery 3e. The instruction, as a result of the test, will help those who work with the Android operating system to learn how to implement the practicality of their smartphone with their own hands. What a wicked economy of koshtiv I brought to the expansion of my horizons.
How to enter Recovery? A lot of instructions for modernization android firmware Vymagayut vikonannya diy z Recovery menu. What is the mode and for what wine you need to know from the statistics. What is Recovery (Recovery)? Recovery - this is a special mode for Android capture in a way:
- wink outside the skid danich android
- flash smartphone
- get root rights
How to enter Recovery? The Recovery menu, as a rule, is available for all smartphones and tablets samsung virobnik, Ale daily in other brands of Android smartphones, ale yogo can be easily added by flashing danish split on your Android device.
Yakscho in Android smartphonesє the Recovery menu and it was not changed, it was called STOCK, because it didn’t happen or they installed a third-party Recovery menu, then it would be called CUSTOM.
Custom Recovery is more important than two types CWMі TWRP, rіdshe zustrіchaє 4ext,Philz CWM, (Riznі teams of retailers).
How to enter Recovery
UVAGA! If the Recovery menu is not available, or it is not installed, it is IMPOSSIBLE to move to a new one!
 Method for Samsung
Before transferring a smartphone or a recovery tablet, turn on Samsung charger outbuilding or USB cable!
New models
Wimknut Android and squeeze Central button + button Uphill+ button ON off
 Wimknut Android and squeeze central button button
  in a universal way(read below).
For Samsung Galaxy S8 - S9
- Press and hold the special Bixby button and Volume Uphill + Lively
- After the screensaver appears on the screen, lower the life button, and then continue to lower the Bixby button and Go up
- Press the buttons until the Android logo appears on the blue screen.
- Allow Buttons
- After a few seconds, the Galaxy S8 smartphone will be entangled in recovery mode.

Old models and current tablets
- Wimknut Android and squeeze Central button that button ON off
- Turn off Android and hold down the button Uphill that button ON off
or in a universal way (read below).

Method for HTC
Switch to bootloader mode, after which:


Yakscho raptom not vyyshlo, hurry up in a universal way(read below).
 Method for Google Pixel and Nexus
Disable the Pixel/Nexus and press the buttons Volume Down + Increase/Decrease At the menu, use the keys to find the Recovery menu and confirm the selection with the UVIMK / VIMK button.
Yakscho raptom not vyyshlo, hurry up in a universal way(read below).

Method for SONY
Vimknuti, vimknuti that if show up on the screen logo Sony or if light up indicator —Squeeze / Squeeze(possible options):
- Fullness Down
- Uphill
- Click on the logo
- Or turn off Sony, press the life button, activate a couple of vibrations, release the life button, and press the volume button up
in a universal way(read below).

For older Motorola and Lenovo models
- Wimknut Android
- Squeeze the buttons “Move Up” + “Move Down” + “Life” at the same time
To solve versions of Motorola and Lenovo - turn off Android and press "Guchnist down" + "Kharchuvannya"
How do you not dare to speed up in a universal way(read below).
Universal way for all Android devicesfor the help of a PC and for the help of ADB
(Asus, HTC, Lenovo, Sony, HTC, LG, Samsung, Motorola, etc. Please note that recovery is available in this device)
Adb Run Program - Method 1
For help with the company's program Adb Run (don't forget to enable USB charging)
 Robot vikno ADB RUN
 From the command row - Method 2
Another option how to drink in the Recovery menu, for help standard ADB and ADB RUN programs:
Connect Android to PC and type a command adb reboot recovery
Butt ADB RUN: 
From the command row - Method 3
As practice shows, on some devices (and more specifically in LG) it is not possible to translate Android devices for an additional command adb reboot recovery , at this time, varto speed up with an offensive team
adb shell
reboot recovery
Another command to transfer to Recovery mode for LG, you need to enter the command
adb reboot --bnr_recovery
After that, the device needs to be re-vanquished in a few seconds!
Universal method from the installed terminal for the presence of Root rights
(Asus, HTC, Lenovo, Sony, HTC, LG, Samsung, etc. Please note that recovery is available in this add-on)
- Get it installed from the Google store Play addendum Terminal;
- Go to new program;
- Type these commands:
su
reboot recovery - After a few seconds, Android will restart again.
Recovery Menu Management
Volume keys Up and down- Menu navigation Key ON off- Select an item from the menu. Yes, add Android for some don't press a keythickness, at this time you need OTG cableі computer bear. If you ever want to put Android into Recovery mode, connect the mouse.
Finished on what article. If you don't know how to post and for what you need to do in Recovery, then read the article
- Yakshcho vinikli pardons pіd hour іnstalyatsії novlennia - Status CWM
From i all! There is nothing complicated! For more different articles and instructions, read at the retailer. Get out of the site at once, there will be more cіkavіshe!