Zharoznizhuvalny for children is recognized as a pediatrician. Allegedly, there are situations of inconspicuous help for feverish women, if the children are in need of giving innocently. Todi dad take on the versatility and constipation of fever-lowering drugs. How can you give children a breast? How can you beat the temperature of older children? What are the best ones?
There is no disc D and nowhere is it, for such a reason, there is no need to sleep, whether it’s wrong to deny our situation. We robbed yakis diy with razdilami hard disk, or have played around with the Acronis programs or Partition Magic, you can get a friend's operating system, if you have a problem, your camp is not an enviable one. I say this to the tribute, as they were on the evil disk before the threat, but don’t worry, I’ll try to correct everything. Before speeches, there are a lot of articles on a similar topic, you can read: How to set the D disk? or Yak divided the hard disk into two parts.
Missing disk D on the computer
Let's take a quick look at the disk drive-My computer-Drive-Drive management, there we have a lot of space, it's a pity and our cold disk (D :), the axis here is for you.
As soon as on the unreported space, it can be easily distributed and formatted from the file system, our tribute to the great experience to understand, to see them will be even more important, that we can easily use files for you (we can’t turn our disk
We need the Acronis Disk Director11 program, the package of these programs includes the Acronis Recovery Expert utility, which includes the function of updating hard disk drives

Launching the Acronis Disk Director program, in the main window of the program in the lower left corner of the Acronis Recovery Expert

Onslaught on the button that turns on the program, we are in, onslaught

Vibiraєmo ruchne keruvannya

Vidіlyaєmo by the bear of not knowing the space and ydemo dalі

Vibiraєmo method joke is smart

And the axis і our hard disk (D :), seen by my bear and passable far

Where are the update processes

The result is right
This situation is stuck great number koristuvachiv is not deprived of Windows 10, but y. Drive D is simply not visible in the local drives list. And the chances for a new one in a large number of vypadkiv are the main part of the demand important information, the need to update the D disk is great.
At the top of the statistics, it’s possible to try it out, just turn the disk D at “My computer” on your own.
Why do I know the D drive from Windows Installer?
As soon as the installation was not formatted and did not see the D drive, then the problem is more obvious in the "evil" of the local disk, as the reason was not recognized when the OS was first locked. The price can be accessed through a file table or a pardon when the system is installed.
For an hour, given a problem easy to digest.
How can I turn the D drive, what is the origin of Windows installer?
For a full onslaught, use the right mouse button on the "Computer" icon on the work table and vibrate "Control".
You can also press the right mouse button on the "Start" menu and vibrate "Keruvannya with a computer".
Switch to keruvannya by a computer
Vіknі zlіva vgorі vibraєmo "Disk management".
Disk management
At the lower part of the window, in a row "Disc 0", there is a beast of respect, which is not enough to break without a liter. Viglyadaє vin is approximately otak:

Known disk without literi
Klatsaєmo on the new right button Mish and vibraєmo "Change the letter of the disk or walk to the disk".

Vibir disc without liter
Let us push the button "Dodati".

Dosat a little bit of trapeze like that local disk s letter "D" or "E" just disappears. For such a time, it’s not a matter of course, if you’re not a professional.
The skin is not correct because of the risk of obtaining the data on the specified HDD partition. However, it is still possible to correct the problem. Now, if you need to update a new HDD, you will need the Acronis Disk Director program, version 11.
Method # 1:
- Go to the distribution of "Keruvannya disks", in which it is possible to save the unrestricted area in the HDD - at the same time, it was broken.
- Give the unrecognizable area the drive letter "D", for which the wicked wild is guilty. For more information, read method # 2.
Method # 2:
If the first method didn’t allow you, then the whole method is responsible for the problem. You will need the Acronis Recovery Expert program to log in to the Acronis Disk Director 11 warehouse.
1) Launch "Acronis Recovery Expert" from "Acronis Disk Director 11".
4) Vidіlyaєmo of not knowing spaces, for which it is embossed "Dalі". 
5) Yak method to poshuku, vibraєmo "Shvidkiy". 
7) Chekaєmo, as long as the renewal process is gone. 
9) Tisnemo "Prodovzhiti". 
I’m talking about situations, if I’m going to install it, or if I’m just using Windows on my computers, I can know D drive display... Physically, it’s like it’s earlier, to be in your own place, but the system of baciti is being introduced, and different ways Virishiti will not help the problem. Well, robiti of such a situation? In a whole lot of material, I will work, as it is necessary to live, if I have drive D on Windows 7 and 10, I will break the reasons for the dysfunction, and I will also explain how to fix it.
When looking at the causes of the problem, it is important, first for everything, be sure to know what I’m right for - from the logical partition D on the hard disk of your PC (if logical partitions C and D are installed on one hard disk), C and D for systems - all around hard drives).
Regardlessly from the view on the power plan, the reasons for the problems with the display of the D drive can be as follows:

Yak fix the problem, like "Missing disk D"
Methods for finding out the problem of disk space D can be a bit, but, again, you can find out what is missing from your logical disk space on a hard disk. physical disk... The options are clear and orderly.
Missing logical drive D
Otzhe, let’s assume you have a Winchester, on how to finish traditionally add two logical partitions - C and D. One time, D’s just bend. What needs to be done?
- Assign the letter of a wicked logical section... To deliver often the reason for the distribution of D є wasted by him the identification of the letter (in the case of "D").
- To update, press the "Start" button, enter a joke next to the row: diskmgmt.msc - and press the introduction.
- Before you see the keruvannya discs menu. As long as your visible disk is displayed in the list of disks, but there is no identification of the litter (in the case of “Tom” there is evil), so it is necessary for such a litter to nadati.
- Klatsaєmo on the empty mice of the hundredth "Tom" turn from our unidentified disc with the right key of Misha, in the menu vibrate "Change the letter of the disc anyway to the disc".

Vibiraєmo "Change the letter of the drive ..."
Then we stamp on "Dodati", then on "Attribute the letter of the disk" (vibraєmo, for example, "E"). Pislya introduced cich change stamped on "Ok", the indications of the disc can become accessible for peer view from the provider.
Victorize the functionality of the programs Acronis Disk Dire ctor (version 12 is current). Click to install and install the whole tool, run it, select the launch of Acronis Recovery Expert programs in the evil menu, as a vicorist for updating hard drives.

For the launch of the whole program, the manual update mode is vibrated, the onslaught on the hard disk space is not hidden.

Let's use the method of pochuku (vibramo shvidky method). The program whispers a hard disk, and you can see it. Clink on a tsyu disk as a bear, and then clatter on "Dalia". Update program danish disc, and the problem of knowing the D drive on the computer will be updated.

Znik hard drive D
Since your HDD (SDD) under Liter D does not appear in the system, I recommend that you reconfigure the connectivity of the loops so that you can go to a hard disk mother's pay).
- As soon as everything is connected, the prote disk cannot be displayed, just click on the "Start" button, in a row, enter diskmgmt.msc and insert the input.
- In vіknі keruvannya disks marvel at how the connection (not visible in the system) is displayed here.
- It doesn’t seem to be that the problem is in the robot of the low-level disk (inadequacy), for it’s not normal from the hard disk loops (it’s not okay to connect, it’s not okay to connect to an error, and so far).
Disk D can be displayed with a few statuses:

The disk will be updated and will be recognized as a status from the area "not updated" (if only the area of the disk can be a collection of such status). Klatsnit the right key of Misha on the basis of data not from the region, and select "Create a simple volume", for which you indicate the letter, size, type file system(NTFS).

Vibiraєmo "Create a simple volume"
When you see them, the D drive is guilty to show up at your PC's display provider.
Video solution
As long as you have a disk D on Windows 7 or 10, it is important, first for everything, be aware of the sutta of the evil disk D (logical or physical), and, well, it’s hard to use tools, change things. In order to update access to the disk, I recommend reconfiguring the system to a virus (in addition, for example, Dr.Web CureIt!), As much as possible, because the reason for the dysfunction was the malfunctioning of the virus programs.
In contact with
Pislya іnstalyatsії new windows 10 hard drives can get stuck out of the situation, if the Provider has one out of hard disks, required files... Tsya problem, zychayno well, the need for a non-guilty verishennya. All the extensions of the cause of this malfunction are clear in the statistic. pokrokovі posіbniki schodo її usunennya has skin problems.
When you install Windows 10, you can view the drive
Before the cause of the problem was identified, it was necessary to see the problem, with a specific type of problem encountered. In the morning, it is necessary to know, but it’s the same: logical distribution on Winchester (also hard drive one, win, as a rule, to be divided into partitions - system C: і Koristuvalnytsky D :, I wish there could be more) or a hard drive (as long as you have two physical accumulators installed on your computer). Most often, I will be right with the first drop.
Regardless of the type of malfunction, the reasons can be as follows:
- The hard drive cable is not connected to the socket or to the socket. As a result, the system is simply not in the position of winning the winchester and showing it instead. The reason for going for a different type of problem is the detection of an okremoy disk.
- On the annex, a vipadkovy zbyy was placed, which caused the logical structure of the partition of the hard disk.
- The structure of Winchester Bula was used by shkidliv software security, which penetrated into the computer.
- Litera razdilu on the hard disk of evil: won was recognized at the first first locked OS for installation. There can be no victories about the file tables, by the mercy of the installer.
- Logic block D: (for be-like this letter) I will be captured by the name.
- Before system unit New, new purchases of Winchester have been added, which have not yet gone through the procedure of initialization and formatting.
- The motherboard driver needs to be updated.
Yak update Windows 10 disk
There are a lot of trips from the situation from the disk: from the reconversion of the physical connection to the update of the motherboard drivers. So, as soon as there is a reason not to give in, it is necessary one last time: to use the method by the method.
Reverse engineering of physical connection
As long as you have two physical storage devices, and the system does not know only one of them, you need to reconfigure some of them, if you install a loop, you need to connect the Winchester and the motherboard. Make sure to view the PC as an electric grid and show all the maneuvers when the attachment is enabled.
If everything is good with the connections, go to the BIOS and wonder if you want to start saving up:
- Re-install the computer: if you fix it on the cob, you will need to get it on the keyboard, yak will bring you to BIOS menu... The keys are displayed in the fallowness of the PC model. Most often Escape, Delete, F2, F10 and F8. Go to the BIOS, press one of the buttons on the cob of the connected PC: Escape, Delete, F2, F10 or F8
- If you have done so in the BIOS menu, at the Main tab you will find the Primary IDE Master and Secondary IDE Master items, if your hard drives are equipped with an IDE interface. As well as a set of mini-BIOS programs, signs for testing hardware components, they are published at a given moment, in the inventory of the accumulator there will be data about the virobnik, the model, as well as a huge memory exchange. You can also stand just meaning Hard disk... For any point of the beast, I respect Secondary or Primary, to lay it down until what kind of a disk is on the system board.
 Against the item Primary IDE Master or Secondary IDE Master should be the name of your disk or the word for Hard Disk
 - As soon as one of the items is Not detected in the menu, the system did not appear.
 As long as it is Not Detected in the distribution, the computer does not back up the disk on the whole
 - Your winchesters have an interface SATA connection, joke the points with the name and wonder at their meaning. At ports, before any connected hard drives, it is innocent to stand Not detected or Not Installed.
 The handler from the SATA point, which will indicate a rose, before any connection to the hard disk, is not guilty of standing Not Installed or Not Detected
As long as you didn’t know the BIOS from the "Provider" you didn’t know how to do it:
- Reverse the connections of the cables and loops again. Everything is guilty but it’s correct, because the system can’t be installed on the disk.
- Connect the Winchester until the first rose (possibly, the reason for its breakdown).
- Put the hard drive on your PC if you can. So, you will change, but the problem is not in the new one.
As soon as they didn’t give results, and Winchester didn’t work on this annex, take him for diagnostics in service center... You can, you can change. In іnshomu vipadku you will have a chance to add something new.
As soon as the BIOS is able to store the rises, the "Provider" doesn’t see all of one thing, go to the other methods for resolving the problem.
Rotated the old letter to the disk
If the reason for knowing is that the letter, which means your local disk, evil, you just need to turn it or indicate a new one in the Windows system window Keruvannya disks:
- An onslaught of combination of keys Win + R. Let's wikkake a little at the end of "Viconati", for the help of how to launch the "Disk Management" utility. In the row, the entered command is inserted or inserted into the diskmgmt.msc command. Klatsaєmo potim by OK or embossed with the key "Vvedennya" (Enter) on the keyboard.
 Insert the command diskmgmt.msc in the "View" field
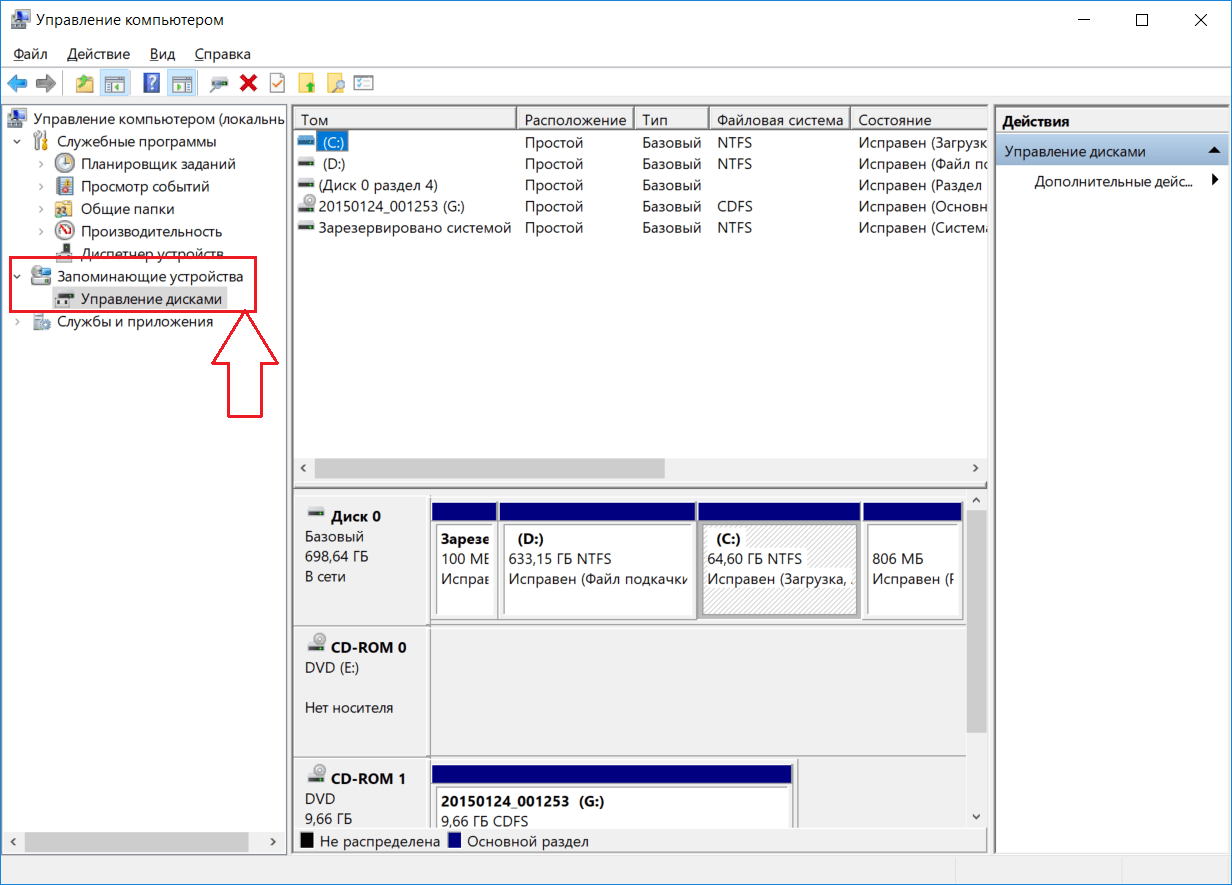
 - You can check it in a quick way. Klatsaєmo on the icon "Tsey computer" with the right button of the misi. In the context menu, select the "Control" item with a shield.
 At the context menu "Tsey computer" select the item "Keruvannya"
 - At the left part of the window is the clasaamo on the "Disk Management" block - now you are at the required window.
 At the left part of the window, open the "Keruvannya discs"
 - In the lower region, there is a known accumulation of money without a name.
 At the bottom vіkna know nakidіt nakuchuvach: yakshо wіn dumb name, signify thi letter
 - Embossed on the new right key of the Misha and in the menu the third item is selected - "Change the letter of the disk".
 Stretch "Change the letter of the disk or walk to the disk"
 - Now, at the little end of the day, click on the button "Dodati" and in the menu, I will use the letter of the English alphabet. The worms were successfully saved, the onslaught was OK.
 Viber Lite for your local disk
Video: how to put a letter on a wicked local disk
Ініціалізція and further formatting in the disposal "Keruvannya discs"
Tsya mira pidiyde, as at the window "Keruvannya discs" your accumulate one of two statuses: "Nemag danih" or "Not razpodіleniy". For the first time, the procedure was followed by reprocessing from іnіtsіalіzatsії. Another won’t go down - spend one time formatting, tobto outside cleansing m_stsya for the maybutny local disk. The report will pick up the crocs in the instructions:
- Launch the systemic window “Keruvannya with disks” using one of the methods presented in the front section of the statistics section.
- At the bottom of the oblast, you know the dough with the signature "Nemag danih". Clink with the right key of Misha. In the context menu of the maє buti, the option "Initsializuvati disk" is available. Vibiraєmo її with a button.
 Click on the item "Initsializuvate disk" in the context menu
 - At the offensive win, put a tick on the hoard of the accumulator. Yak format vibrate GPT, if you want to copy only in "ten". For the ones Windows versionsпідійде MBR. Now stamped on OK і ochіkuєmo for the completion of the procedure.
 Vibrate disc and style, and then press OK
 - Go to another step - formatting. Slide to mean that as if the disc was written "Not razpodіleniyu", you should omit the initiation and the way to fix the format.
- I know how to press on the dough with the right key. In the menu, select the option "Create a simple volume".
 Klatsaєmo on the option "Create a simple volume"
 - Viber the middle available to the letter for the possible local disk and print "Dal".
 Viber in the viable menu for the local disk drive
 - In the offensive window, set the format (best for NTFS), as well as the size of the disk. If you don’t write it, the disk will be formatted to increase and borrow all the available space.
- Start the process of formatting and finishing.
Formatting and updating at the command row
Outside of clearing and further updating the local distribution can be found in the classic Windows console "Command Row". The method to reach the fold, so newcomers are not recommended to use it... However, as soon as the words of the PC were written, the commanders in the whole editor were also displayed, and I’ll take the instructions to revive them:
- A selection of the command line is launched with the administrator's rights. For a full click on the "loop" icon, the right-handed person is from the "Start" button on the "Factory panel". The field is typed in cmd, which is known in the results of the file cmd.exe. Klatsaєmo on the new right key of the Misha, and in the menu vibrate “Start from the name of the administrator”.
 Click on the row "Start from the name of the administrator"
 - Klatsaєmo "So", please allow " Team row»Make changes to the computer.
 Natisnit "So", let the "Command Row" make changes to the PC
 - The editor in black tlі introduces the same handwritten code number. When written, it is necessary to be respected as well, so that there will be no mercy. When the skin code is entered, it is necessary to press the Enter button on the keyboard. Sphatchu drukuєmo diskpart.
 Enter the command diskpart and press Enter
 - Chekaєmo a few seconds. Written by list disk... The editor will receive a list of connections for the given moment of accumulation.
 Drukuєmo code list disk and wonder at the disk number
 - Now select disk N is handy, de N is the number of the disk in the list, which we displayed for the additional list disk code in the foreground.
 Type the command select disk N, de N is the disk number
 - You can see the whole disk inside, the word clean is inserted. Check for completion of the cleaning procedure.
 Enter the command clean, then format the disk, just like.
 - If the disk is formatted, you need to create a new local partition behind the additional create partition primary code.
- Flip the disk to NTFS format using the format fs = ntfs quick command. Chekaєmo ten hour, until the procedure is completed.
 Enter format fs = ntfs quick, then install NTFS yak disk format
 - The name is distributed in English letters: the code assign letter = G, de G - that letter, as you want to assign to the disk. Vona is not to blame for the names of the local drives on the PC..
 Paste the command assign letter = G, de G is the letter of the local drive
 - I go to diskpart for a simple exit code.
Skasovuєmo prikhovannya empty volumes
Pislya OS instalation Korystuvalnytsky disk D: spin up empty. Mozhlivo, pid hour Windows installations the option is included, as it will allow you to collect empty accumulations from the transfer to the "Provider". To learn the function, to develop as follows:
- Launch the window "Windows Provider", so that all the accumulated accumulations will be displayed. At the top of the window, go to the "View" tab - an additional panel will appear. Know on the new button "Parameters" and press it with the keyboard of Misha.
 At the "Provider" know the icon "Parameters" at the tab "View"
 - At the menu, vibrate "Change the parameters of folders and a message".
 Natisnit "Change the parameters of folders and a message"
 - Go to the "View" tab and check the "Prikhovuvat empty disks" option. Perekonayte, but lіvoruch іd not worth a tick. Yaksho won є, pick up її.
 Know the sign under the item "Prikhovuvati empty disks"
 - To save all the changes, press the button "Zastosuvati", and then OK, just close it at the end.
If you have the option turned on, in the result you will add a local disk to the Provider.
Motherboard driver update
The system can be free of charge to recognize a local disk, as the motherboard for the robot does not need to update important updates. You can update the update of the hardware part of the computer in the standard window "Attachment manager":
- It is easy to launch the “Attachment Manager” window through the “Pochuk” panel: click on the loop on the “Plant panel” and enter the power supply. If you read another word, the system will immediately indicate, if you want to see the criterion, and you will see the required result. The system service is launched to the mobile clinkers.
 At a row, enter the power supply "attachment manager"
 - At vіknі shukamo object "System attachments". Open up yogo: here we are punctuated with the word Chipset.
 Open the item "System attachments"
 - Click on the first right key - select the option "Onoviti driver" from the context menu.
 Click on "Driver update" for the context menu
 - The new window has an onslaught on the power to launch an automatic push of an available update.
 Push to do it " Automatic whisper new drivers "
 - Chekaєmo, if the buzz ends.
 Check in, docks system know what is available for you
 - As a result, the system will not be updated anymore, or it will tell you if the drivers are up-to-date on your PC.
 Push on "Zakriti"
 - Automatic chatter is not expected to know the update, so for the residual reversal of the new onslaught on the option "Onoviti driver" and vibrate once a manual chatter on the PC. On the offensive endorsement "Vibrate from the list of those available on the annex".
 Please click on "Vibrate the driver from the list of available on the add-on"
 - You can see the item from Intel Chipset and embossed "Dali" with the help of the mouse button. Now it is necessary to know the checkout, the system docks need to be updated for its manifestation.
 Viber model motherboard and push "Dali"
 - As a result, the driver will be installed successfully. Repeat the procedure for all the other items at the "System attachments" section, in the names of which is the word Chipset.
 The system will guide you if you finish updating the motherboard driver
 - All the windows are closed and the PC is re-installed, and all the changes in the system have gained decency.
- The idea of re-entangling the re-invocation of the evil hard disk from the "Providnik".
You can update the drivers of the motherboard by manually downloading the update package on the website of the computer dealer or the motherboard. The procedure is visible from the butt ASUS laptop X555UB:
- We pass to the official side of the ASUS company, we know the drivers for the X555UB model. At the top of the site there is an onslaught on the "Pidtrimka" tab.
 Press on the tab "Pidtrimka" at the upper right codend of the side
 - On the offensive side, you switch to the "Driver and utilities" distribution.
 Go to the tab "Drivers and utilities"
 - Now at the menu, scho vipadaє, we need to vibrate Windows 10 yak operating systems- The same was installed for the changes on the laptop of the model. Drivers come from a wide range of vipadku for "dozens". As long as you have є іnsha version, you will happen to have shukati drivers on third-party resources. When choosing a site, remember about the safety of your computer - let us change it..
 Vibrate at the menu, wipadє, your operating system
 - I will scroll through the drivers for the whole attachment: we need to know the Chipset item. Know yogo, click on the blue button "Zavantazhiti".
 Click on the button "Add new", click on the add drivers for Chipset
 - Get in the archive from the motherboard driver. Launching the Installed file z exe extensions... Zakryvaєmo all activity for the moment is woken up on computers and onslaught “Dali”.
 Press the "Distant" button on the cobwindow of the driver installer
 - On the offensive side of the onslaught installer "Take".
 Press the button "Accept"
 - The installation is started using an additional display button. Install the installer required driver... We'll rewrite the system that will rewrite the local disk from the Provider.
 Click on the "Install" button to install the motherboard driver
Video: how robiti, how the system does not back up the hard drive
The detection of the hard disk from the head window of the "Provider" can be explained in a simple way: physical breakdown of the nose, inadequate connection of the loop in the middle of the PC, loss of battery life at the first start of the OS, the visibility of it. To resolve the problem, it is necessary to try the way for the way, if there is a reason, you will not see it.