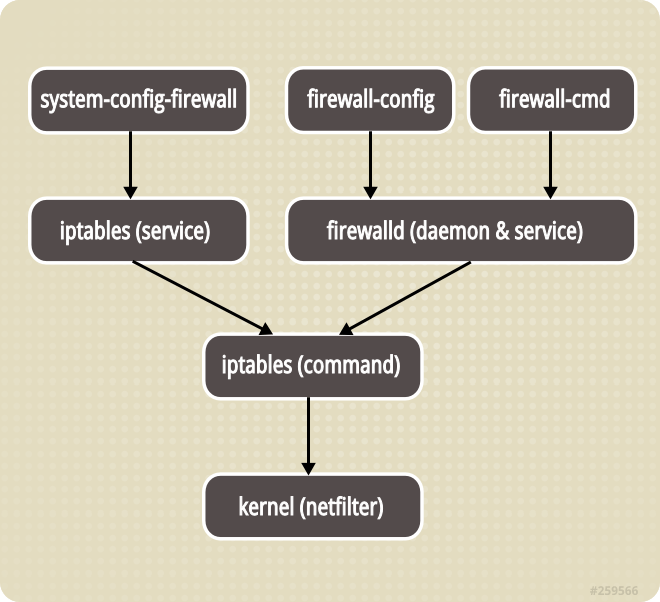
Zharoznizhyuchі zasobi for children is recognized as a pediatrician. Allegedly, there are situations of inconspicuous help in case of fever, if the child is in need of giving it innocently. Todi dad take on the versatility and consistency of fever-lowering drugs. Is it allowed to give children a breast vіka? How can you beat the temperature of older children? What are the best ones?
Centos 7, based on CentOS 6, based on a new firewall - firewalld. Yo you can turn on and replace with good old iptables, even if there are no direct changes of mind, then it is more beautiful to sound up to a new one, and not to creep into the old. This does not mean that Windows 10 more beautiful Windows 7, and Windows XP is more beautiful than Windows 7;) A good butt on a qiu topic is selinux. As soon as some of them all (and I may) were turned on and barked, then now it may not be easy to please, only because it is so necessary. Navpaki, bagato hto vzhe zvik (abo zvikayut) koristuvatysya semanage. We will not immediately turn on the firewalld, but we will try it, as it is for gusto.
Firewalld is not a fundamentally different firewall. Tse іnsha nadbudova over netfilter, because if you can see the robots using iptables, then you will be tormented by a trio and you will quickly know how to use a new tool.
Launching і zupinka firewalld
Reversely, firewalld launches:
# Systemctl status firewalld
Information will be expanded here. Shcheb is short, so (pratsyuє) chi ni can be like this:
# Firewall-cmd --state
running
Ok, pratsyuє.
Zupinka firewalld:
# Systemctl stop firewalld
Fence autostart:
# Systemctl disable firewalld
Launching firewalld:
# Systemctl start firewalld
Including auto start:
# Systemctl enable firewalld
zony firewalld
The firewalld has a wide range of visibility to understand the zoni. A list of all allowed zones for suggestions:
# Firewall-cmd --get-zones
block dmz drop external home internal public trusted work
Appointment of zones (cleverly, zychayno):
- drop - all incoming packets will be displayed (drop) without showing. It is permissible to deprive them of their wages.
- block - rejected from icmp-host-prohibited (or icmp6-adm-prohibited). It is permissible to deprive the system of information.
- public - zamovchuvannyu zone... Z name zrozumіlo, so the zone is aimed at the robot in social framing. We are not allowed to do it, but it is only permissible to sing it out.
- external - zone for new interface router (so-called maskarading). Allowed only for us to enter in.
- dmz - DMZ zone, only permissions are allowed.
- work - a zone of work. We still don’t trust anyone, or even not so much, as before :) Allowed only singing input.
- home - home zone. I can do it, but it is not allowed only to sing it out.
- internal - internal zone. I do not allow it, but it is not allowed only to sing it out.
- trusted - everything is allowed.
List of all active zones:
# Firewall-cmd --get-active-zones
public
interfaces: enp1s0
Yeah, the public zone, before which the hedgehog interface is enp1so. Go to the public zone with a dodamo new port, on which sshd will hang.
Knowing the hedgehog interface (for example, enp1s0), you can find out to which zone you should trace:
# Firewall-cmd --get-zone-of-interface = enp1s0
public
And you can know how the interface should be located in a specific area:
# Firewall-cmd --zone = public --list-interfaces
enp1s0
Application: Allow ssh on non-standard port
Let's allow access to the server via ssh on port 2234 / tcp, and not on 22 / tcp, yak in a zamovchuvannyu. Along the way, selinux torknems.
Some people will be surprised that they are allowed permanently on our server:
# Firewall-cmd --permanent --list-all
public (default)
interfaces:
sources:
services: ssh dhcpv6-client
masquerade: no
forward-ports:
icmp-blocks:
rich rules:
I am not a vikory pocky ipv6, so I will immediately clean up accordingly. firewalld rule:
# Firewall-cmd --permanent --zone = public --remove-service = dhcpv6-client
It is permissible on a regular basis (but the message is NOT rubbed after being overridden) to be sent to port 2234 / tcp (on a new, probably sshd):
# Firewall-cmd --permanent --zone = public --add-port = 2234 / tcp
Reload rules:
# Firewall-cmd --reload
reconverted:
# Firewall-cmd --zone = public --list-ports
2234 / tcp
Ok, port of vіdkritiy. Redagumo sshd config:
# Nano / etc / ssh / sshd_config
...
port 2234
...
# Systemctl restart sshd.service
Ale SELinux, yaku vi, I do not enable, do not allow to connect to ssh on a non-standard port (port 2234 / tcp for sshd is non-standard). You can skip and change the crochet, how the SELinux logger will work, or you can set everything up at once:
# Yum provides semanage
# Yum install policycoreutils-python
# Semanage port -a -t ssh_port_t -p tcp 2234
The axis is now ok. Reversed ssh connection on a new port. Everything is OK, access to port 22 is closed:
# Firewall-cmd --permanent --zone = public --remove-service = ssh
# Firewall-cmd --reload
Wonderful, what happened:
# Firewall-cmd --list-all
public (default, active)
interfaces:
sources:
services:
ports: 2234 / tcp
masquerade: no
forward-ports:
icmp-blocks:
rich rules:
From and everything.
Rіznі korisnі commanders:
Enable blocking mode for all outgoing and incoming packets:
# Firewall-cmd --panic-on
Enter the blocking mode for all incoming and outgoing packets:
# Firewall-cmd --panic-off
I am aware of the inclusion of the blocking mode of all outgoing and outgoing packets:
# Firewall-cmd --query-panic
Reload the firewalld rules without losing the current z'єdnan:
# Firewall-cmd --reload
Reload the firewalld rules and throw off the current data (recommended only in case of problems):
# Firewall-cmd --complete-reload
Add to the zone and the hedgehog interface:
# Firewall-cmd --zone = public --add-interface = em1
Add to the zone and the hedgehog interface (be careful if the firewall is overridden):
# Firewall-cmd --zone = public --permanent --add-interface = em1
It is possible to specify in the ifcfg-enp1s0 config, which zone and lay out the interface. For the whole dodamo ZONE = work in the file / etc / sysconfig / network-scripts / ifcfg-enp1s0. If the ZONE parameter is not specified, the zone will be assigned by default (the DefaultZone parameter in the /etc/firewalld/firewalld.conf file.
Allow a range of ports:
# Firewall-cmd --zone = public --add-port = 5059-5061 / udp
Masquerade (masquerade, win nat, win ...):
Revision status:
# Firewall-cmd --zone = external --query-masquerade
Include:
# Firewall-cmd --zone = external --add-masquerade
Here you need to mean that you can enable masquerade and for the public zone, for example.
Redirect to port 22 to the original host:
# Firewall-cmd --zone = external --add-forward-port = port = 22: proto = tcp: toaddr = 192.168.1.23
Redirect to enter on port 22 to the other host on the designated port (from 22 to 192.168.1.23:2055):
# Firewall-cmd --zone = external /
--add-forward-port = port = 22: proto = tcp: toport = 2055: toaddr = 192.168.1.23
At the end of the day, the application can be endlessly rich. Dodam only, especially I didn’t leave my little thought in the drive of the firewalld innovation, so before the syntax of the call it’s all the way to your zoo, if the OS Linux is developing, then in the first place there might be a problem. If you have mastered firewalld, broaden your horizons - most often, most of all, vitraified zusil.
perevagi firewalld
The main thing is that you are abstracted from the iptables lanes. To enable port redirection, you don't have to think about PREROUTING or POSTROUTING to add to FORWARD. You are given the "API from iptables from virobnik", which is in all sorts of ways. If you include nat, then it is not respectful, de same (in which ordinal number of the precise rules) the rule is displaced. Just enter - enable nat on eth0. І without fools;) Tse can be done by hand, if you need to organize web interface firewall control.
Є You can change the status (for example, inclusions nat chi ni!). I can also be victorious in your scripts, in the logic of your stash, for example. I don’t know how to set up the status (on / off) in iptables. It is possible, as it were, in the genus iptables -L -t nat | grep "...", wait a minute, the whole thing is not the same as the viconati "firewall-cmd --zone = external --query-masquerade". Є, for example, hundreds of VMs from CentOS, in which there can be three names called wan interfaces anyway. And so you can write a universal cmdlet that can give you the result on new machines.
Incomplete firewalld
The main shortcoming, at my glance, is that when you hear it, you will be able to see a "clean" iptables, such as in Debian, in Ubuntu, in CentOS, and in a glance, skryz. Navigate, to the point, in a small syntax and lanterns similar to the type on iptables. Tse for an amateur, zychayno. For a professional, everything is the same, for pratsyuvati, like є concretely think, win will be pratsyuvati z tim, so. Ale ... I am a retrograde and seemingly relying on (due to the marriage of obvious changes) novelties, like the great dear grave who realizes for himself. RedHat obviously, as more and more new people will be aces in firewalld.
If you switched to firewalld, then you just need to screw up the pure syntax of iptables - if you just mess with the firewall robot, if you can read / update the rules not beyond the standard firewalld syntax.
I don't want firewalld! Turn my old iptables!
If you still want to turn it past and replace firewalld with iptables, then it doesn't matter how it goes:
It's not a fun for newcomers:
# Systemctl disable firewalld
# Systemctl stop firewalld
Putting good old iptables:
# Yum install iptables-services
Launches the firewall:
# Systemctl start iptables
# Systemctl start ip6tables
Autostart when enabled:
# Systemctl enable iptables
# Systemctl enable ip6tables
To preserve the iptables rules, when overriding:
# / Sbin / iptables-save> / etc / sysconfig / iptables
# / Sbin / ip6tables-save> / etc / sysconfig / ip6tables
In the old way:
# Service iptables save
The flow rules are in the files:
/ Etc / sysconfig / iptables
/ Etc / sysconfig / ip6tables
Restarting iptables (for example, if any changes are made):
# Systemctl restart iptables.service
Alle the command iptables are foldable, and it is important for the people to remember all the options and options, in which they need to be victorious. To that end, the distributors of distributions set up their own overheads over iptables, which additionally help to simplify the management of the firewall. CentOS calls itself Firewalld for iptables management.
Firewalld has a lot of important features, in the context of iptables. Here, access control is up to the level of visibility to the level of zones and services, and not to the rules and regulations. And also the rules onovlyuyutsya dynamically, not overwhelming neglected sessions. This statistic will show the Firewall CentOS 7 setup on the Firewalld application.
As I have already said it, Firewalld did not rule out the rules, but on the zones. The leather stitching interface can be assigned a singing zone. The zone is a set of rules, a set of rules, and permissions, which can be fixed up to the whole border of the interface. Only one zone can be reversed for one interface. The dealers opened a sprinkle in front of the zones:
- drop- block all incoming packages, allow only incoming packages
- block- an update from the blocking of the package will be sent to the list of the previous version to the original of the package;
- public- accept input data only for ssh and dhclient;
- external- customize NAT for attaching internal framing;
- internal- allowed services ssh, samba, mdns and dhcp;
- dmz- vikoristovuyutsya for isolated servers, for which there is no access to the fancy. Only SSH connection allowed;
- work- dialed ssh and dhcp services;
- home- similar to internal;
- trusted- Everything is allowed.
In such a rank, if you allow a fence, be it a service, you can finish it or change the zone of the interface to the one that is permissible. You can draw an analogy with the policy for the rules for packages in iptables. Trusted zone can only allow ACCEPT policy and allow all connections, block zone can use DENY policy, which can be used, and all of the zones can be controlled by lower block zones, plus there are also some servers in advance for allowing ...
Firewalld also has two types of configurations:
- runtime- design only before re-entailing, all changes, in which it is clearly not specified, should be frozen until the whole configuration;
- permanent- post-settings, as will be done and after re-entangling.
Now you know everything you need, we will pass to that before disposing of firewalld-cmd.
Firewall-cmd options and syntax
Keruvati is set up by Firewalld, either behind the additional console utilities firewall-cmd, or in the graphical interface. CentOS is most often victorious on servers, so you get to see it in the terminal. Let's see the utility syntax:
firewall-cmd opt
To manage zones, use the following syntax:
firewall-cmd --configuration --zone = zone options
As a configuration, it is necessary to provide an option --permanent, so that you can save any changes if you do not rewrite anything, so that the changes will be valid only before rewiring. Yak zone vikorystyte іm'ya demand zones. Let's see the utility options:
- --state- set the firewall camp;
- --reload- re-enable the rules with a permanent configuration;
- --complete-reload- zhorstka perezavantazhennya rules for the distribution of all z'adnan;
- --runtime-to-permanent- transfer the settings of the runtime configuration to the post-configuration;
- --permanent- vikoristovuvati post-configuration;
- --get-default-zone- Imagine a zone, vicoristovuvanu for substitutions;
- --set-default-zone- set up the zone for the candidates;
- --get-active-zones- visualize active zones;
- --get-zones- visualize all available zones;
- --get-services- to update the services;
- --list-all-zones- enter the configuration of all zones;
- --new-zone- open a new zone;
- --delete-zone- see the zone;
- --list-all- add everything that is added to the other zone;
- --list-services- bring all services up to the zone;
- --add-service- add service to the zone;
- --remove-service- vidality services iz zone;
- --list-ports- visualize the port, up to the zone;
- --add-port- add the port to the zone;
- --remove-port- visualize the port from the zone;
- --query-port- showing, adding the port to the zone;
- --list-protocols- to keep the protocols up to the zone;
- --add-protocol- add the protocol to the zone;
- --remove-protocol- visualize the protocol from the zone;
- --list-source-ports- Vive port dzherela, add to the zone;
- --add-source-port- add port dzherelo to zoni;
- --remove-source-port- video port-dzherelo iz zone;
- --list-icmp-blocks- add a list of blocking icmp;
- --add-icmp-block- add blocking icmp;
- --add-icmp-block- vidaliti blockuvannya icmp;
- --add-forward-port- add port for NAT redirection;
- --remove-forward-port- view port for NAT redirection;
- --add-masquerade- enable NAT;
- --remove-masquerade- NAT visualization.
There are far from all the options for utilities, but for the whole statty we will have enough.
Setting up Firewall in CentOS 7
1. Firewall status
Before you need to marvel at the camp of the firewall. For tsoy viskonite:
sudo systemctl status firewalld
If the Firewalld service is enabled, then you need to enable:
sudo systemctl start firewalld
sudo systemctl enable firewalld
Now you need to wonder how Firewalld is launched, for the additional command firewall-cmd:
sudo firewall-cmd --state

As soon as the program is running and everything is good, then you will see "running" as soon as possible.
2. Zone management
Yak vzhe zrozumili, zoni is the main tool for management with stitching... Schhob marvel at the zone for the candidates, visit:
sudo firewall-cmd --get-default-zone

I have a public zone. You can change the stream zone for the additional option --set-default-zone:
sudo firewall-cmd --set-default-zone = public

Just wonder if you want to be able to use it for all fancy-work interfaces, visit:
sudo firewall-cmd --get-active-zones

The list will have vivedin zones and interfaces, for whatever stinks are available. With such a command, you can marvel at the configuration for the singing zone. For example, for the public zone:

3. Nalashtuvannya services
You can be amazed at all the sights of the service with the command:
sudo firewall-cmd --get-services

The team vived all available services, you can add them to the zone, you can do it. For example, it is permissible to connect to http:
sudo firewall-cmd --zone = public --add-service = http --permanent

And then you can see the service, visit:
sudo firewall-cmd --zone = public --remove-service = http --permanent
In both cases, we chose the --permanent option, so that the configuration took place after being re-entangled. Writing changes requires new rules:
sudo firewall-cmd --reload
Then, if you are amazed at the configuration of the zone, then there will appear the addition of services:
sudo firewall-cmd --zone = public --list-all

4. How to open a port in Firewalld
If you need a program for your needs, there is no service, you can see the port I will hand. For tso just give the required port to the zone. On port 8083:
sudo firewall-cmd --zone = public --add-port = 8083 / tcp --permanent

You can see the port iz zone, visit:
sudo firewall-cmd --zone = public --remove-port = 8083 / tcp --permanent
Similarly to services, when you open a port in a firewall centos 7, you need to re-enable the firewall.
sudo firewall-cmd --reload

5. Forwarding ports Firewalld
Proboring ports in Firewalld is simpler than in iptables. If you need to, for example, redirect traffic from port 2223 to port 22, to get to the redirection zone:
sudo firewall-cmd --zone = public --add-forward-port = port = 2223: proto = tcp: toport = 22
Here the redirection is displayed only on the flow machines. If you want to set up a NAT line and send a port to your machine, then you will need to turn on the masquerade link:
sudo firewall-cmd --zone = public --add-masquerade
You can also add a port:
sudo firewall-cmd --zone = publiс --add-forward-port = port = 2223: proto = tcp: toport = 22: toaddr = 192.168.56.4
6. Expanded rules
Since the functionality of the zones is not enough for you, you can choose to expand the rules. The general syntax of the extended rules is as follows:
rule family = "family" source value destination value log audit diy
Axis of value of the main parameters:
- In yakosti families of protocols you can use ipv4, or ipv6, or do not use anything, so the rule will be stuck to both protocols;
- sourceі destination- the price of the invoice and the receipt of the package. You can use the same parameters as IP addresses, service names, port, protocol and so on;
- log- Allows you to log packets passed, for example, to syslog. In the tsy setting you can specify the prefix of the row of the beam and the details of the logging;
- audit- a whole lot of alternative logging methods, if you will be sent to the auditd service.
- Diya- tse dia, as it is required to create a single package. Available: accept, drop, reject, mark.
Let's take a look at the butt. We need to block access to the server for the koristuvach with IP 135.152.53.5:
sudo firewall-cmd --zone = public --add-rich-rule "rule family =" ipv4 "source address = 135.152.53.5 reject"

For we need a fence for the whole koristuvach only access to port 22:
sudo firewall-cmd --zone = public --add-rich-rule "rule family =" ipv4 "source address = 135.152.53.5 port port = 22 protocol = tcp reject"
You can marvel at all the rule extensions with the command:
sudo firewall-cmd --list-rich-rules

visnovka
Have ts_y statty mi rozibrali, as vikonutsya firewall setup In CentOS 7, you can use the new Viconati to help you get started. The program is more simple to use, lower iptables, or more to my thought, a firewall from Ubuntu - even simpler for Vikoristan.
Fixing with CentoOS 7 to set up filtering rules for traffic with a new tool firewalld... It is most advisable to use a username to manage iptables rules. In CentOS 8, the default filter package iptables is now replaced by the nftables framework, and when you tweak the firewall rules through firewalld, you can tweak nftables. It is easy to understand the installation, the basic concept of setting up the firewalld firewall on a server under a CentOS 8 kernel (in CentOS 7, everything is the same).
FirewallD- multi-cut screen for server recovery from unused traffic with dynamic rules management (without restarting) and implementation of permanent firewall rules. Pratsuє yak interface for i nftables. FirewallD is available on all Linux distributions.
Basic concepts of firewalld, zones and rules
Before Tim Yak, proceed before the establishment of the order firewalld, We can be cognizable from the understanding of the zones, as they are victorious for the purpose of making the rivny doviri to the new spoluks. For other zones firewalld You can set up filtering rules, set up active firewall options in front of the services, protocols and ports, redirected ports and rich-rules.
Firewalld filtering inbound traffic by zones in fallowness from zastosovannyh to zones and rules. yaksho IP-addresses of the originator will be sent according to the rules of any zone, then the packet will be sent through the zone. If the addresses are not posted on the server zones, the packet will be covered by the zoning zone for the changes. When installed firewalld the zone for the candidates to be called public.
At firewalld є zones, even before the forefront permissions are set for other services. You can vikoristovuvati settings or set up the power zones. The list of zones, by default, that are set when firewalld is installed (stored in the catalog / usr / lib / firewalld / zones /):
| drop | minimum level of doviri. All incoming information is blocked without notice, only incoming information is allowed; |
| block | the zone is similar to the front one, but when the input power is turned off, it is sent as if it were icmp-host-prohibited for Ipv4 or icmp6-adm-prohibited for Ipv6; |
| public | representing huge, underdeveloped festoons. You can check out the input in an individual order; |
| external | callouts with a firewall in the form of a gateway. Vaughn is set up for NAT masquerading, so your internal mesh will be kept private and accessible; |
| internal | antonim zone external. Host volodiyut is sufficient for sufficient supply, a number of additional services are available; |
| dmz | victorious for computers roztasvani in the DMZ (isolated computers without access to the bottom of the fence). Permission of only a single entry; |
| work | zone for robotic machines (there are more computers in the net); |
| home | home fusion zone. You can add more PCs, or you can only use them; |
| trusted | add to all machines in a net. Find the best view from all the available options. |
V firewalld to pick up two set of rules - post-and-time. Timchasov_ rules work until the server is re-secured. For substitutions with additional rules in firewalld, Rules vvazayutsya team hours ( runtime). To add a rule on a permanent basis, it is necessary for Vikoristovuvati - permanent... These rules will be locked when the server is re-secured.
Installing and including firewalld on CentOS
CentOS 7/8 firewalld will be installed under OS. If you have seen it, if you want to install firewalld, you can use the standard / dnf manager:
# Yum install firewalld -y - for Centos 7
# Dnf install firewalld -y - for Centos 8
schob demon firewalld starting automatically when the server starts, you need to add it to:
# Systemctl enable firewalld
І run:
# Systemctl start firewalld
Change the status of the service:
# Systemctl status firewalld
● firewalld.service - firewalld - dynamic firewall daemon Loaded: loaded (/usr/lib/systemd/system/firewalld.service; enabled; vendor preset: enabled) Active: active (running) since Mon 2019-10-14 14:54 : 40 +06; 22s ago Docs: man: firewalld (1) Main PID: 13646 (firewalld) CGroup: /system.slice/firewalld.service └─13646 / usr / bin / python2 -Es / usr / sbin / firewalld --nofork --nopid Oct 14 14:54:40 server.vpn.ru systemd: Starting firewalld - dynamic firewall daemon ... Oct 14 14:54:40 server.vpn.ru systemd: Started firewalld - dynamic firewall daemon.
Or by the command:
# Firewall-cmd --state
The firewall-cmd command є the firewalld frontend up to nftables / iptables.
# Firewall-cmd --state
A robot with firewalld rules
Rules for residents:
Before adjusting the rules of firewalld, it is necessary to reconfigure how the zone is victorious:
# Firewall-cmd --get-default-zone
So yak firewalld, they just stood up and didn’t set it up yet, we have a zone in a zamovchuvannyu public.
I will override the active zone. Vaughn is also one - public:
# Firewall-cmd --get-active-zones
Public interfaces: eth0
Yak bachimo, eth0 hedgehog interface controlled by zone public.
To marvel at the rules of the active zone, enter:
# Firewall-cmd --list-all
Public (active) target: default icmp-block-inversion: no interfaces: eth0 sources: services: dhcpv6-client ssh ports: protocols: masquerade: no forward-ports: source-ports: icmp-blocks: rich rules:
From the listing you can see that in the given zone there is a special operation, connected with a DHCP client and ssh.
available zones
To look over the list of all zones, you will need the following command:
# Firewall-cmd --get-zones
I have the following list:
Block dmz drop external home internal public trusted work
To reconsider the rules of a specific zone, it is necessary to add a prapor - zone.
# Firewall-cmd --zone = home --list-all
Home target: default icmp-block-inversion: no interfaces: sources: services: dhcpv6-client mdns samba-client ssh ports: protocols: masquerade: no forward-ports: source-ports: icmp-blocks: rich rules:
The rules for all zones can be reviewed with the command:
# Firewall-cmd --list-all-zones
The listing will be great, so yak zones can be very rich.
Zmіna zoni for zamovchuvannyam.
For the suggestions of all the lines and interfaces for the installation in the zone public, Ale їkh can be transferred to be-yak from zones, with the command:
# Firewall-cmd --zone = home -change-interface = eth0
for parameter -zone = add the required zone.
To change the zone for the candidates, you need to get the command:
# Firewall-cmd --set-default-zone = home
Dodavannya rules for dodatkiv
You can open a port for a supplement, you can add it to a service. List available services:

Visnovok will be revealing a great number of services. Detailed information about the service xml file. Tsi files roztashovani in the director / Usr / lib / firewalld / services.
for example:
# Cd / usr / lib / firewalld / services
The XML file has a description of the service, protocol and port number that will be displayed in firewalld.

When the rules are added, you can choose the parameter -add-service, Show access to the singing service:
# Firewall-cmd --zone = public --add-service = http
# Firewall-cmd --zone = public --add-service = https
By writing the rules, it is possible to reconsider, adding the services to the designated zone:
# Firewall-cmd --zone = public --list-services
Dhcpv6-client http https ssh
If you want to change the rules, if you add, you need to add a parameter -permanent.
Schob vidalyti service iz zone:
# Firewall-cmd --permanent --zone = public --remove-service = http
Dhcpv6-client https ssh test
If you want to add it to your service, you can open the file xml independently and memorize it. You can copy data from any service, change the name, description and port number.
copy file smtp.xml in the director for robots with services koristuvachiv:
# Cp /usr/lib/firewalld/services/smtp.xml / etc / firewalld / services
Change the description of the service in the file.

The xml file itself may need to be changed to the name of your service. For what, it is necessary to re-enable firewalld and change the number of our service in the list:
I'm calling the service test i in the list of wines appeared:
Syslog-tls telnet test tftp
Now it is possible to add services to the be-yak zone:
# Firewall-cmd --zone = public --add-service = test --permanent
# Firewall-cmd --zone = public --permanent --list-services
Dhcpv6-client http https ssh test
If you know the service you need is in the list, you can open the required port on firewalld with the command:
# Firewall-cmd --zone = public -add-port = 77 / tcp - open port 77 tcp
# Firewall-cmd --zone = public -add-port = 77 / udp - open port 77 udp
# Firewall-cmd --zone = public -add-port = 77-88 / udp - open port range 77-88 udp
# Firewall-cmd --zone = public -list-ports - change the list of allowed ports
Block / allow ICMP messages:
# Firewall-cmd --zone = public --add-icmp-block = echo-reply
# Firewall-cmd --zone = public --remove-icmp-block = echo-reply
Vidaliti dodanu port:
# Firewall-cmd --zone = public -remove-port = 77 / udp - see time rule 77 udp
# Firewall-cmd --permanent --zone = public -remove-port = 77 / udp - see the rule permanently

Supplementing the power zones
You can open the vlasnu zone (called її our):
# Firewall-cmd --permanent --new-zone = our
Writing a new zone, as well as sending a service, a re-supply is required firewalld:
# Firewall-cmd --reload
# Firewall-cmd --get-zones
Block dmz drop external home internal our public trusted work
zone our available. You can add a service to us or you can use it.
Firewalld: blocking IP address
You can add the address and IP address to the firewalld account or block it.
Schob dodati in viklyuchennya specific IP addresses(For example 8.8.8.8) to your server via firewalld Vikorist command:
# Firewall-cmd --zone = public --add-rich-rule = "rule family =" ipv4 "source address =" 8.8.8.8 "accept"
Overwhelm the zone, and overwhelm IP additions to the victories in the rich rules:
Public (active) target: default icmp-block-inversion: no interfaces: eth0 sources: services: dhcpv6-client http https ssh test ports: protocols: masquerade: no forward-ports: source-ports: icmp-blocks: rich rules: rule family = "ipv4" source address = "8.8.8.8" accept
schob block IP, It is necessary to replace accept on reject:
# Firewall-cmd --zone = public --add-rich-rule = "rule family =" ipv4 "source address =" 8.8.4.4 "reject"
# Firewall-cmd --zone = public --list-all
Public (active) target: default icmp-block-inversion: no interfaces: eth0 sources: services: dhcpv6-client http https ssh test ports: protocols: masquerade: no forward-ports: source-ports: icmp-blocks: rich rules: rule family = "ipv4" source address = "8.8.8.8" accept rule family = "ipv4" source address = "8.8.4.4" reject
It is possible to enable the singing service only for powering from a specific IP address:
# Firewall-cmd --permanent --add-rich-rule "rule family =" ipv4 "source address =" 10.10.1.0/24 "service name =" https "accept"
If you need the term blocking of all power to the server, pick the panic command:
# Firewall-cmd --panic-on
You can exit the panika mode with the command:
# Firewall-cmd --panic-off
Abo by restarting the server.
You can block the configuration of firewalld, as root could not change the firewall rules by you:
# Firewall-cmd --lockdown-on
Exit to blocking mode:
# Firewall-cmd --lockdown-off
Port redirection to firewalld
You can set the port redirection rule in firewalld. To redirect port 443 to 9090:
# Firewall-cmd --zone = public --add-forward-port = port = 443: proto = tcp: toport = 9090 --permanent
You can see the port forwarding rule:
# Firewall-cmd --zone = public --remove-forward-port = port = 443: proto = tcp: toport = 9090
On the server shutdown, from external threats in the first place, there is a supply of a multi-cut screen, which is a filter of incoming and outgoing traffic. Setting up iptables - about the firewall on CentOS, I want to read the statistics, as well as updates about its setup and enabled. My credibility will not be weary, I will lose those aspects, as I put the most important ones and I myself will be victorious in my robots.
The article is given as a part of one cycle to the article about the server.
entry
Iptables in Denmark is the de facto standard in modern linux distributions. I can’t guess at once what kind of vicorist it is in the quality of a firewall. So, any Linux administrator should be able to use his own robots to set up a firewall.
Until the end of the firewall, use the strapping, which is used for more "manual" settings. Ubuntu є ufw, In centos - firewalld, Z інshimy do not know. Especially I don’t use any kind of lightness in victorian tools. I sounded like a Linux firewall in the old way, yak nestling on the very cob of a robot. It’s easy for me to be built in the best possible way, in a manual way, in which I’ll join you. The essence of this is to build up to the point where the script is set with the rules of the firewall. The whole script can be easily edited from the server to the server.
open firewalld
Powered by firewalld I am already tucking in those on. In front of the firewalld, which is present in centos 7, as suggested during the installation:
# Systemctl stop firewalld
Now you can see it from the auto-lockout, but it won't turn on again after restarting:
# Systemctl disable firewalld
When sending to the server, the settings of the hedgehog screen will increase in visibility. You can marvel at the iptables rule with the command:
installing iptables
For the sake of justice, the firewall on our server is already worth it, it's just that there are no rules, everything is open. We will need to install it for additional management utilities, without any configurable iptables. For example, you cannot restart the firewall:
# Systemctl restart iptables.service Failed to issue method call: Unit iptables.service failed to load: No such file or directory.
Abo dodati in autorun is not visible:
# Systemctl enable iptables.service Failed to issue method call: No such file or directory
There were no additional pardons, the necessary package with utilities was installed:
# Yum -y install iptables-services
Now you can add iptables to auto-mailing and run:
# Systemctl enable iptables.service # systemctl start iptables.service
Firewall setup
To manage the rules of the firewall, I am a vicorist script. Create yogo:
# Mcedit /etc/iptables.sh
We will then be reminded of the necessary rules. I will sort out all the significant parts of the script, and I'll bring you back to the viglyad text file in the statistics... The rules of breaking in the view of the pictures, for the protection of the copy and the insert. It is possible to bring the rules to the grave in the robot, whereby I myself stumbled upon the hour of preparing the statistics.
We can understand the situation, if the server is a gateway to the Internet for a local fancy.
All the changes are put in front of us, as we will be victorious in the script. It is not necessarily robotic, but it is not recommended to transfer it manually from the server to the server. To deliver will simply re-assign the change.

Before filling in the new rules, everything is cleaned up:

All traffic is blocked, which does not follow the rules:
All localhost and local traffic is allowed:
Permissionmo robiti ping:
If you don’t need it, then don’t give the rules for icmp.
Open access to the Internet by the server itself:
If you want to see all the input from the server, then give the following rule:
Now, dodamo will take out the most widespread fenestration attacks. A selection of all packages can be seen, which does not mean any status:
Blokuєmo zero packets:
Closing the syn-flood attacks:
If you don’t put a bunch of money on the access from the local framing, then all connections to the Internet are allowed:
Slide zaboronyaєmo access from the Internet to the local edge:
Our local hedge was used by the Internet, including nat:
Do not deny access to the server, if you set the rules, it is allowed to connect via ssh:
I will write down the rules in the letter, and the stench got stuck in the letter for re-entailing:
We put the simplest config, which is a block of all incoming data, ssh and access to the local net on the Internet. Along the way, they got rid of all kinds of hedgehog attacks.
Zberigaєmo script, robimo wikonuvanim і launchєmo:
# Chmod 0740 /etc/iptables.sh # /etc/iptables.sh
Viconamo re-examination of the rules and reversal, and all the rules in the world:
# Iptables -L -v -n
I wrap up your respect - zastosovuvati rules are not necessary if you have access to the server console. With a pardon in nalashtuvannyah you can deny access. Cross over, in an abnormal situation you can turn on the firewall and quickly set it up.
port display
Now we are expanding our configuration and display in iptables port for some services. Suppose we have a working web server and we need to get access to the Internet. Dodaimo rules for web traffic:
The bulo also dialed to the input connections on the 80th and 443rd ports, which is a vikorist web server at its own robot.
If you have a post server installation, then you need to allow for a new input on all victorious ports:

For a correct robotic DNS server, you need to display UDP port 53
Forwarding the port
The situation is understandable, if it is necessary to display the portals from the new interface to the computer in the local framing. Suppose you need rdp access to the computer 10.1.3.50 from the Internet. Robimo kidok TCP port 3389:
If you don’t want to change the name of the port, you can create a redirection from a non-standard port to the rdp port of the end computer:
As soon as the port is located in the middle of the local hedge, then make sure to comment on the rule that blocks access from the outer hedge to the inside. My application has a rule: $ IPT -A FORWARD -i $ WAN -o $ LAN1 -j REJECT
Anyway, before the cim rule, you can set the rule for accessing the call to the internal service, for example, the axis is like this:
$ IPT -A FORWARD -i $ WAN -d 10.1.3.50 -p tcp -m tcp --dport 3389 -j ACCEPT
logins included
Before the hour of setting up, turn on the logs, so that you can monitor and block the packages, and for those who have access to the necessary services, which have already been displayed. I send all blocked packets in the vicinity of the lanterns (block_in, block_out, block_fw), send directly to traffic and in the logs to skin directly. So it’s easy to get the job done. Dodajmo offensive rules in the very end of the script, before saving nalashtuvan:

All blocked packages can be found in the / var / log / messages file.
In order to finish setting up, comment on the series by enabling logging. Obov'yazkovo varto tse zrobiti, so yak logs grow rapidly. I don’t especially support a practical sense in the selection of such information.
How to enable iptables
If you do not need a firewall anymore, then you can enable it with the following rank:
# Systemctl stop iptables.service
Qia team is zupinyaє fаєrvol. And I saw it coming from the auto-invoice:
# Systemctl disable iptables.service
Having turned on the festooned screen, we checked all the data.
visnovok
After looking at it, I wicked the finished script with the basic set of rules that I looked at
I want to brutalize again once again, but when iptables are set up, it is necessary to be borderline respectful. Do not fix the qiu right, because you can not access the server console. Navigate for the hour of writing the statistics, I have thrown access to the server through the deadlock in the rules. The graveyard of the tsya is victorious through the copy and in the sub-dash - it has changed to a single one.
online course "Linux Administrator" in OTUS. The course is not for beginners, for the proper need for basic knowledge of fingering and installing Linux on a virtual machine. The start of the course is 5 months, for whom the successful graduates can pass the course with the partners. To give you a course:
- Knowledge of Linux architecture.
- Mastering the modern methods and tools for the analysis and processing of the data.
- Clearing the selection of the configuration for the necessary management, managing the processes and ensuring the security of the system.
- Volodinnya with the main working tools of the system administrator.
- Reasonableness of features of gorgetting, adjustment and service of fancywork, inspired on the basis of Linux.
- The health of the system quickly resolves to emerging problems and fails to provide a stable and uninterrupted robot system.
zoni
The firewalld daemon controls groups of rules beyond the so-called zones.
Zones - tse, by the essence, set the rules, like keruyut traffic on the basis of the rule to do the same. Zones are assigned to the freezer interfaces and the behavior of the firewall.
Computers, which are often connected to different heights (for example, laptops) can be used to protect zones, which can be used to set rules in the areas of the middle. For example, when connected to a huge WiFi firewall, the firewall can set the rules, and in the home you can relax the rules.
Firewalld has the following zones:
- drop: the lowest level of the drop. All incoming traffic is skipped without a message, only the incoming traffic is received.
- block: the zone is similar to the one in front, but when the power is on, it will be dropped if icmp-host-prohibited or icmp6-adm-prohibited.
- public: this zone is a public border, which cannot be completed, however, it is accepted in an individual order.
- external: zone of new heights. I will adapt the NAT mask, which makes it possible for the inside of the net to be closed, so that access is not possible.
- internal: the reverse side of the zone, external, internal hems. Computers in the zone can be added. Available additional services.
- dmz: run for computers that are rooted in the DMZ (for isolated computers, which cannot be accessed to the innermost part of the hedge); pіdtrimu tіlki deyakі vhіdnі z'єdnannya.
- work: zone of work. A large number of machines in the netting can be added. Available additional services.
- home: home fancy zone. Refinement can be done, or it can be accepted only by singing coristas in the background.
- trusted: all machines in the mesh can be trusted.
keeping the rules
Firewalld rules are permanent and time-based. As in the set, there will be a change in the rule, the exact behavior of the firewall will change all at once. However, after re-engaging, all the snakes will be lost, if you do not spare them.
Most of the firewall-cmd commands can be victorious - permanent, which is a rule of thumb, if you want to be victorious on a permanent basis.
Disable the firewalld firewall
For the ear, you need to turn on the demon. The systemd unit file is named firewalld.service. Start the demon, enter.
sudo systemctl start firewalld.service
Perekonayte, scho launches service:
firewall-cmd --state
running
Now the firewall of launches and pratsyuє according to the configuration for the deputies.
At the given moment of the start-up service, it will not be started automatically by opening the server. Do not block vipadkovo yourself on a vlasny server, select a set of rules, and then set up autorun.
Firewall rules
Revision of the rules for the candidates
Schob diznatisya, yak zone vikoristovuyutsya for umovchannyam, enter:
firewall-cmd --get-default-zone
public
At the moment, the firewalld has not cut off any instructions for other zones, besides, there is no one interface before the other zones, so at once the public zone is by the zone behind the targets, and also by one active zone.
To trim the list of active zones, enter:
public
interfaces: eth0 eth1
Before the public zone, two hedgehogs are bound to the interface: eth0 and eth1. The interface, tied to the zone, is adjusted according to the rules of the zone.
Schob d_znatisya, like the rules of the vicorist zone for the candidates, enter:
firewall-cmd --list-all
public (default, active)
interfaces: eth0 eth1
sources:
services: dhcpv6-client ssh
ports:
masquerade: no
forward-ports:
icmp-blocks:
rich rules:
Now, now you know, well:
- public є by the zone behind the deputies and by the single active zone.
- Prior to it, the eth0 and eth1 interfaces are bound.
- I will receive DHCP traffic (private IP address) and SSH (visible admin).
Іnshі zone and firewall
Now we are going to get to know the other zones.
Check the list of all available zones, enter:
firewall-cmd --get-zones
To correct the parameters of a specific zone, give the command -zone = to the command.
firewall-cmd --zone = home --list-all
home
interfaces:
sources:
services: dhcpv6-client ipp-client mdns samba-client ssh
ports:
masquerade: no
forward-ports:
icmp-blocks:
rich rules:
To set the value of all available zones, give the option -list-all-zones. For more manual viewing, the patterns can be sent to the pager:
firewall-cmd --list-all-zones | less
Parameters of zones of interfaces
A collection of all the hedgehogs of the interface are linked to the zone for the substitutions.
Change of zone and interface for one session
To transfer the interface to the іnshu zone for one session, choose the option -zone = і -change-interface =.
For example, to transfer eth0 to the home zone, you need to enter:
sudo firewall-cmd --zone = home --change-interface = eth0
success
Note: When shifting the interface to the zone, it needs to be wired, which can be inserted into the robot of some services. For example, the home zone will accept SSH, so that service will not be dropped. Ale deyaki zoni skidayut all data, including SSH, and so you can vipadkovo block your access to the vlasny server.
Schob perekatatsya, but the interface of bindings to the new zone, enter:
firewall-cmd --get-active-zones
home
interfaces: eth0
public
interfaces: eth1
After re-assigning the firewall, the interface will be bound to the zone for the change.
sudo systemctl restart firewalld.service
firewall-cmd --get-active-zones
public
interfaces: eth0 eth1
Change of zone and interface on a permanent basis
If the interface is set up, the zone is not assigned to it, if the firewall is restarted, the interface will be bound again to the zone for requests. For CentOS, these configurations are stored in the catalog / etc / sysconfig / network-scripts, in files in the ifcfg-interface format.
To assign a zone to an interface, open the config file of this interface, for example:
In the end of the file, add the change ZONE = and in the value of the value add the zone, for example, home:
. . .
DNS1 = 2001: 4860: 4860 :: 8844
DNS2 = 2001: 4860: 4860 :: 8888
DNS3 = 8.8.8.8
ZONE = home
Save and close the file.
To open new settings, run the fencing service and firewall:
sudo systemctl restart network.service
sudo systemctl restart firewalld.service
If the eth0 interface is restarted, it will bind to the home zone.
firewall-cmd --get-active-zones
home
interfaces: eth0
public
interfaces: eth1
Nalashtuvannya zoni for zamovchuvannyam
You can also vibrate the zone for the change.
For tsyogo vikoristyu parameter -set-default-zone =. All of the interfaces will be linked to the third zone:
sudo firewall-cmd --set-default-zone = home
home
interfaces: eth0 eth1
Statement of rules for dodatkiv
Adding service to the zone
It is easy to add a service or a port to the zone, like a vikorist firewall. Take a look at the available services:
firewall-cmd --get-services
RH-Satellite-6 amanda-client bacula bacula-client dhcp dhcpv6 dhcpv6-client pmp dns ftp high-availability http https imaps ipp ipp-client ipsec kerberos kpasswd ldap ldaps libvirt libvirt-tls mdns mountd ms-wbt mysql nfswe ntp open pvp pmwebapis pop3s postgresql proxy-dhcp radius rpc-bind samba samba-client smtp ssh telnet tftp tftp-client transmission-client vnc-server wbem-https
Note: More information about skin specific services can be found in the .xml files in the / usr / lib / firewalld / services directory. Before the butt, about SSH services are stored in /usr/lib/firewalld/services/ssh.xml and look like this:
If you want to enable custom service in the same zone, select the -add-service = option. You can specify the target zone using the additional option -zone =. For the suggestions of the change, there will be a success in one session. To save the changes and vikoristovuvati їkh on a permanent basis, give a permanent-permanent.
For example, just start a web server to service HTTP traffic, to get started, you need to enable traffic in the public zone for one session:
sudo firewall-cmd --zone = public --add-service = http
If the service needs to be added to the zone for the change, the ensign -zone = can be omitted.
Perekonet, scho the operation was successful:
firewall-cmd --zone = public --list-services
dhcpv6-client http ssh
Test the robot's service and firewall. As long as everything is correct, you can change the set of rules and add a new rule to customize the service.
sudo firewall-cmd --zone = public --permanent --add-service = http
Check the list of permanent rules, enter:
sudo firewall-cmd --zone = public --permanent --list-services
dhcpv6-client http ssh
The public zone now accepts HTTP and port 80 on a permanent basis. If the web server can serve SSL / TLS traffic, you can also add the https service (for one session, or in a set of permanent rules):
sudo firewall-cmd --zone = public --add-service = https
sudo firewall-cmd --zone = public --permanent --add-service = https
What are you doing, if the required service is unavailable?
The firewalld firewalld includes many more advanced services. However, for those who do not need a service, they need some service in the firewalld. In such a way, you can drink two paths.
Method 1: Nalashtuvannya to the port
In such a situation, it is easy to find the port of the add-on in the required firewall zone. You just need to specify a port or a range of ports and protocol.
For example, addon, like vicoristovu port 5000 and TCP protocol, it is necessary to add it to the public zone. If you want to enable the bootstrap programs at the bottom of the session, select the -add-port = parameter and enable the tcp protocol or udp.
sudo firewall-cmd --zone = public --add-port = 5000 / tcp
Perekonet, scho the operation was successful:
firewall-cmd --list-ports
5000 / tcp
It is also possible to add the last range of ports, having brought the first and last port to the range behind an additional dash. For example, if you add the Vikorist UDP port 4990-4999, you need to enter:
sudo firewall-cmd --zone = public --add-port = 4990-4999 / udp
For testing, you can add rules in the post-firewall settings.
sudo firewall-cmd --zone = public --permanent --add-port = 5000 / tcp
sudo firewall-cmd --zone = public --permanent --add-port = 4990-4999 / udp
sudo firewall-cmd --zone = public --permanent --list-ports
success
success
4990-4999 / udp 5000 / tcp
Method 2: Service assignment
It is easy to add port to the zone, if you have a lot of such additional things, as a result, you will be able to smoothly provide for the purpose of that port. In order to avoid such a situation, it is possible to replace the ports by virtue of the service.
Service - tse just pick up a port with a song and a description. For additional services, it is simpler to manage the settings, but by its own stink it is foldable, lower port.
To get a copy, you need to copy the existing script from the / usr / lib / firewalld / services directory to the / etc / firewalld / services directory (here the firewall shukaє non-standard setup).
For example, you can copy the value to the SSH service and to copy it to the smart service example. The script can be used to expand the service and expand.xml.
sudo cp /usr/lib/firewalld/services/service.xml /etc/firewalld/services/example.xml
Edit the copied file.
sudo nano /etc/firewalld/services/example.xml
The file has an SSH value:
Most of the value of the service is stored in metadata. You can change the service shortly in the tags
Let's turn to the example service; admittedly, vin vimagaє display TCP-port 7777 and UDP-port 8888. It will look like this:
Save and close the file.
Restart firewall:
sudo firewall-cmd --reload
Now the service will appear in the list of available services:
firewall-cmd --get-services
RH-Satellite-6 amanda-client bacula bacula-client dhcp dhcpv6 dhcpv6-client dns example ftp high-availability http https imaps ipp ipp-client ipsec kerberos kpasswd ldap ldaps libvirt libvirt-tls mdns mountd ms-wbt mysql nfsnfs ntp open pm pm pmwebapi pmwebapis pop3s postgresql proxy-dhcp radius rpc-bind samba samba-client smtp ssh telnet tftp tftp-client transmission-client vnc-server wbem-https
toggle zones
The functions of the firewall include richly zoomed zones, which, in most cases, can be added to the robot. Ale, in some situations, it is necessary to establish a zone for the koristuvach.
For example, for a web server, you can open the publicweb zone, and for a DNS service, a privateDNS zone.
You need to add the firewall settings in the post-firewall.
Try opening the publicweb and privateDNS zones:
sudo firewall-cmd --permanent --new-zone = publicweb
sudo firewall-cmd --permanent --new-zone = privateDNS
Cross over to zone and run:
sudo firewall-cmd --permanent --get-zones
The streaming session of the new zone will not be available:
firewall-cmd --get-zones
block dmz drop external home internal public trusted work
To restore access to new zones, you need to restart the firewall:
sudo firewall-cmd --reload
firewall-cmd --get-zones
block dmz drop external home internal privateDNS public publicweb trusted work
Now you can assign the required services and ports to the new zones. For example, SSH, HTTP and HTTPS can be added to the publicweb zone.
sudo firewall-cmd --zone = publicweb --add-service = ssh
sudo firewall-cmd --zone = publicweb --add-service = http
sudo firewall-cmd --zone = publicweb --add-service = https
firewall-cmd --zone = publicweb --list-all
publicweb
interfaces:
sources:
services: http https ssh
ports:
masquerade: no
forward-ports:
icmp-blocks:
rich rules:
You can add DNS to the privateDNS zone:
sudo firewall-cmd --zone = privateDNS --add-service = dns
firewall-cmd --zone = privateDNS --list-all
privateDNS
interfaces:
sources:
services: dns
ports:
masquerade: no
forward-ports:
icmp-blocks:
rich rules:
Then you can bind the hedgehogs to the new zones:
sudo firewall-cmd --zone = publicweb --change-interface = eth0
sudo firewall-cmd --zone = privateDNS --change-interface = eth1
Now it is possible to protest the establishment. If everything is correct, you can add the rules in the post-settings.
sudo firewall-cmd --zone = publicweb --permanent --add-service = ssh
sudo firewall-cmd --zone = publicweb --permanent --add-service = http
sudo firewall-cmd --zone = publicweb --permanent --add-service = https
sudo firewall-cmd --zone = privateDNS --permanent --add-service = dns
Writing can be set up with grids interface for automatic connection to the correct zone.
For example, eth0 will bind to publicweb:
sudo nano / etc / sysconfig / network-scripts / ifcfg-eth0
. . .
IPV6_AUTOCONF = no
DNS1 = 2001: 4860: 4860 :: 8844
DNS2 = 2001: 4860: 4860 :: 8888
DNS3 = 8.8.8.8
ZONE = publicweb
And the eth1 interface will be bound to privateDNS:
sudo nano / etc / sysconfig / network-scripts / ifcfg-eth1
. . .
NETMASK = 255.255.0.0
DEFROUTE = "no"
NM_CONTROLLED = "yes"
ZONE = privateDNS
Restart the mesh services and firewall:
sudo systemctl restart network
sudo systemctl restart firewalld
Reverse zones:
firewall-cmd --get-active-zones
privateDNS
interfaces: eth1
publicweb
interfaces: eth0
Cross over, scho in the areas where the necessary services are needed:
firewall-cmd --zone = publicweb --list-services
http htpps ssh
firewall-cmd --zone = privateDNS --list-services
dns
It is meant for a koristuvach zone and more ready to robot. You can zrobiti be-yaku with them a zone for zamovchuvannyam. for example:
sudo firewall-cmd --set-default-zone = publicweb
Automatic firewall startup
Now, if you have changed all the settings and changed, all the rules are correct, you can set up the autorun of the firewall.
To enter:
sudo systemctl enable firewalld
The firewall will now be started at the same time as the server.
visnovok
The firewalld firewall is a nasty tool. Zones allow you to quickly change the firewall policy.
Now you know, as a firewalld, you know with the basic understandings of the firewall, you have to set the designation for the zone and the service.
Tags :,