Antipyretic remedies for children are prescribed by a pediatrician. But there are situations of indispensable help in case of care, if the child needs to give faces negligently. Then the fathers take on themselves the resuscitation and stop the antipyretic preparations. What can be given to infants? How can you lower the temperature in older children? What are the most safe faces?
The same Firewire and eSATA drives, as well as other hard drives, may have an important sign: stinks are connected to the computer on the go, and connected on the go. The system may be used with such devices as those from SCSI.
How to connect external disks to Linux?
Local systems (KDE, Gnome) of almost all distributions react to the connection of the external host in the following way: file manager(inode without confirmation request) that secures manual access to the files of the connected caller.
Often an icon appears on the desktop, which means it is worn and allows you to open the context menu, through file system You can specifically select the directory tree.
It is necessary to specially switch on all the zvnіshny nose from the tree of catalogues, and then pull the cable! For most distributions, for which you need to click on the wear icon and select Eject, Safely Remove, or a similar menu entry.
In this way, you guarantee that all recording operations will be completed, and then the attachments will actually turn on. How to piss off sim crocodile, you risk damaging the file system and spending data!
And surprisingly, the procedure is simple. Maybe there just wasn’t something created for the store?
Maybe there just wasn’t something created for the store?
Imovirno, that's how it was. On the hard drive were Windows programs. I didn't want to run them under Wine. I don't mess around with a virtual machine. Axis so do it.
If I wanted to be already on a new program, then I split it up. But it’s possible, with the help of programs, everything was encrypted for the disk to be protected, it was so easy to format it and didn’t get away.
Trying to connect the original disk Change axis looks like this: Error mounting gid=1000,dmask=0077,fmask=0177" "/dev/sdb1" "/media/vadim/3Q HDD External"" fixed with non-serious wiring 13: $MFTMirr $MFT is not picked up (record 0).
Pardon "/dev/sdb1": Input/output error
NTFS є її not valid, or є hardware fault, or "
SoftRAID/FakeRAID hardware. For the first time, run chkdsk /f on Windows
then reboot into Windows twice. Variant /f parameter є more
important! If the device is a SoftRAID/FakeRAID then first activate
it and mount different device under the /dev/mapper/ directory, (e.g.
/dev/mapper/nvidia_eahaabcc1). Please see the "dmraid" documentation
for more details.
Try to install the mountmanager program, it helped me a lot in a similar situation:
sudo apt-get install mountmanager
Original: "Ubuntu Hacks: Chapter 1 - Getting Started"By: Kyle Rankin, Jonathan Oxer, Bill Childers
Publication date: June 2006
Translation: N.Romodanov
Translation date: Lipen 2010
You can install an Ubuntu system, install it, and use it again with a FireWire, USB, or other external disk, or for which you need a special setup. Below, from the cob to the end, we will describe the process of such an adjustment.
In the process of working on this book, we realized that the main shortcoming of the laptop as the main computer: it’s much more foldable to replace hard disks for an hour of testing systems. We needed to tweak the Ubuntu system in such a way that we could revise the different ways and take that particular system tweak, but, as we could, we didn’t want to re-split the laptop’s main hard drive and install the system. We tried to install the Ubuntu system on a new laptop and run it; In this way, the original system is left with an undertorque, but we can still run the Ubuntu system, if necessary.
Sorry, this installation option will not automatically work without tweaking through a sprinkling of reasons:
- Behind locking the initrd file (external ram-disk), which Ubuntu uses, there are daily drivers necessary for grabbing from the outside building. Your BIOS can easily detect your attachment (think about how to take advantage of the capture from the memory disks), and just as the kernel can be captured, Linux cannot detect and mount the disk to continue the capture process.
- Navite as initrd may need drivers, kernel, first try it out, it will take a few seconds to capture these modules and show the memory disk. For a while, the system, better than everything, try to get involved and you can’t know the old disk, the shards of this configuration will not be completed until this moment.
- The Ubuntu installer is a handy tool that helps you to detect other operating systems that you could install in the system, and for the skin OS add an entry to the GRUB driver. Unfortunately, this means that the skin OS is to blame for being on the internal hard disk, which is the first disk, the indications from the BIOS, then the external disk will be different (either the third or the fourth, if you have other disks). If the BIOS fails to take advantage of the znimny disk, the system will have to fix it like the first disk, which will cause problems in GRUB.
Let's see how we can solve these skin problems so that we can install Ubuntu on an external drive and get started with it.
Adjustment of disk partitions
The first step is to start the process of installing Ubuntu exactly the same, as and for any other installation options, count on everything you read about in the "Installing Ubuntu" section [Rada # 5] until the moment you reach the stage of re-ripping the disk into partitions. If Ubuntu goes to the disk layout, it will be respected, what for the mind, Imovirno, it will be taken from the system's internal IDE or SCSI disks. If your system has an IDE attachment, you can select an external drive by specifying a SCSI drive for that system. The row that appears to the disk, normally looks like "SCSI (0,0,0) (sda)". If you already have a SCSI disk in your system, then knowing the USB disk will be three times more foldable, ale, better for everything, there will be a remaining SCSI disk in the system.
Guard
You are absolutely responsible for the fact that at that stage you chose the required disk, the Ubuntu shards formatted and resized the disk you selected and saw all the data, as if they could be on a new one. If you don't know which disk to choose, ask for help with an Ubuntu Live CD and reverse the device names ( sda, sdb and so on) assigned to your system to different disks.
Installing GRUB
Once you have selected a different attachment to format, continue the Ubuntu installation process until the end, until you reach the GRUB setup stage. Here you will be supplied with the power, chi want you to capture GRUB on the internal hard disk to the head capture MBR. You are not guilty of labor, the shards were created before the overwriting of the zavantazhuvach, which vikoristovuetsya in the system. Natomist, give the prompt No ("Hi") and, if it appears to be offensive, enter /dev/sda (otherwise I'll add Linux, as it is assigned to a sizable disk) in order to be able to install GRUB directly to a memory disk.
Vikoristovuemo chroot
Let's continue the process of installing Ubuntu until the moment you are prompted to select Continue ("Continue") and reboot the system. First of all, you need to re-advantage, you will need to invest in the system of kilka nalashtuvan. The Ubuntu installer, in fact, allows you to enter the main console, which can be changed to run other commands on the system. Press the Alt-F2 keys to go to the console, and then press the Enter key to activate it.
Now you need to prepare an external disk, you can speed it up with the chroot command and change the files. The real disk will be mounted at the /target directory, and the first step will be mounting on any attachment of the special /proc file system:
# mount -t proc /target/proc
Now you can use the chroot command to change the /target directory to the operating system partition. In this way, you can run commands, nibi you zavantagelis from that disk:
# chroot /target
Nalashtovuemo initrd
How only will the team be victorious chroot, first, what will you need to rob, add those Linux modules, so that you can make your external disk accessible to initrd. The /etc/mkinitramfs/modules file can have add-on modules, which will be added to initrd, so use a console text editor of your choice and edit the file. If you don't have a favorite console text editor, just use the editor vim(If you don't know vim, then look at the "Editing configuration files" section [Rada #74] vim):
# vim /etc/mkinitramfs/modules
As soon as this file will be opened, go to the end of the file, add more steps to the row, then save the changes and close the file:
ehci-hcd usb-storage scsi_mod sd_mod
hint
If your old device is connected via the IEEE1394 socket, also add the next row:
ieee1394ohci1394sbp2
and for other outbuildings, just add to the file those modules that are needed for these outbuildings.
As soon as the modules are properly configured, the next step will be to configure the initrd daemon so that you check a few seconds before it, so as to continue the advance. In this way, Linux will have an hour to show that disk configuration. Open the /etc/mkinitramfs/initramfs.conf file with a text editor:
# vim /etc/mkinitramfs/initramfs.conf
In order for Linux to check a few seconds before it, how to complete the capture process, now add a new parameter to the file on the cob
To our knowledge, ten seconds is enough to capture Linux USB disk, but you can, as necessary, change the value to a greater or lesser value. Save your changes and close the file.
Now you can use the help of a special tool mkinitramfs rebuild the file initrd, in which new adjustments will be added:
# mkinitramfs -o /boot/initrd.img-2.6.15-16-386 /lib/modules/2.6.15-16-386
Change the paths initrd.img and /lib/modules so that they stink to give you the kernel version that matches your installation CD.
Changing GRUB
The rest of the field is changed by changing the settings for the GRUB configuration file. Ubuntu installer now old priy(or a different disk, the BIOS has an indication) as a hd1 attachment, but you need the same disk as a hd0 attachment, the shards of this attachment will be the first system attachment for the BIOS, if you are interested in a new one. In a text editor, open the GRUB menu.lst file:
# vim /boot/grub/menu.lst
and know the rows, like the roots of the GRUB add-on. The stench looks something like this:
## default grub root device ## e.g. groot=(hd0,0) # groot=(hd1,0)
Change the rest of the row to add to hd0:
## default grub root device ## e.g. groot=(hd0,0) # groot=(hd0,0)
Title Ubuntu, kernel 2.6.15-16-386 root (hd1,0) kernel /boot/vmlinuz-2.6.15-16-386 root=/dev/sda1 ro quiet splash initrd /boot/initrd.img-2.6.15 -16-386 boot title Ubuntu, kernel 2.6.15-16-386 (recovery mode) root (hd1,0) kernel /boot/vmlinuz-2.6.15-16-386 root=/dev/sda1 ro single initrd /boot /initrd.img-2.6.15-16-386 boot title Ubuntu, memtest86+ root (hd1,0) kernel /boot/memtest86+.bin boot
Title Ubuntu, kernel 2.6.15-16-386 root (hd0,0) kernel /boot/vmlinuz-2.6.15-16-386 root=/dev/sda1 ro quiet splash initrd /boot/initrd.img-2.6.15 -16-386 boot title Ubuntu, kernel 2.6.15-16-386 (recovery mode) root (hd0,0) kernel /boot/vmlinuz-2.6.15-16-386 root=/dev/sda1 ro single initrd /boot /initrd.img-2.6.15-16-386 boot title Ubuntu, memtest86+ root (hd0,0) kernel /boot/memtest86+.bin boot
As Ubuntu has shown and created the configuration for other OSes and if you want to speed it up too, just for the skin OS, change your own for the configuration parameter root- Just change hd0 to hd1. Let's save your changes and close the file.
Now you can get out of the chroot command mode, so type exit at the console, and then press Alt-F1 to return to the main Ubuntu installation console. You can now select the Continue option to restart the machine and start the installed system.
hint
Please note that on most computers it is not possible to select the drive from a small disk, such as a CD-ROM or another hard disk. Some BIOSes have the ability to set the settings so that when pressing a special key for the hour of interest (for example, F12), you can choose which device to take advantage of. In other BIOSes, in order to enter the BIOS and adjust the order of attachment attachments, you may need to press one of the Esc, F2 or Del keys.
Vihіdnі dаnі аbо scho i had for the cob installed:
- Vlasne Ubuntu distribution - ubuntu-11.04-dvd-i386.iso
- Netbook - Acer AO BGK-531h
- Outrageous HDD - Transcend Classic 320Gb
Vlasne, what I want to know:
Install Ubuntu, on the same HDD, moreover, when connected HDD before any computer, that display in BIOS-e interest from which HDD, Ubuntu would be zavantazhuvalas. And if you want to take a computer without connecting another HDD, you would be interested in installing the OS on this computer.
The problem I'm stuck with and in fact I'm getting around in this article:
With the initial installation (connecting the external HDD to the computer, logging in through the Ubuntu distribution kit and installing it), the MBR (head record) of the computer is overwritten, Ubuntu installs its own GRUB and remotely takes over the computer, without an external HDD inserted it is not possible. I don’t include what it is possible to get around the presence, but at the moment I don’t know, I’m wondering if it’s possible to get around.
Alright, let's get started:
Having googled and read the numerical forums, I figured out that in order to install without erasing the MBR on a computer, you can: a) turn on the hard disks of the computer, or b) install through a virtual machine. I'm happy to get along software methods, but I didn’t want to turn it on, I didn’t want to turn it on, the installation time was calmly working and surfing the Internet. I chose VirtualBox 4.1.0 to create a program for creating a virtual system, wanting in principle the entire segment to be no more than that, I didn’t have a chance to choose it.
1. We install the program-launcher.
2. Create a virtual machine, with which type of OS and version, rather sing-songly choose Linux and Ubuntu appropriately. Why? As far as I understand, then the keyboard and the bear are more likely to work at the virtual center of the VM. If you want, I can have mercy:
3. Because I have a netbook and I don’t have a DVD drive in the new one, I have 8GB flash drives, for collation exciting flash drives I didn’t have it under my arm, I installed Alcohol 52% in front and created a virtual accumulator in the new one, to change the default image of Ubuntu. Fortunately, the VM accepts it as a great drive and easily launches a new installation. Well, I can still say that I wanted to use software methods to get around ... Well, I didn’t want to shukat a flash drive like a foreign drive + DVD-ku more ...
4. Start the virtual machine, at the first start it will not ask which host to win, select which Alcohol 52% after creating and which we already mounted the ubuntu-11.04-dvd-i386.iso image. ii.. op! Appears when the program is installed:

I won’t tell you about subtle installations, I’ll only designate specific moments:
- When I first started the installation, if I went to choose a hard drive, where to install Ubuntu, I only had 1 drive there, which launched the VM. This is why the VM failed to connect the USB HDD. Climbing for lashings, I know, at the outbuildings, outbuildings USB connection Old HDD and by ticking the box, only after that it was possible to choose a location where the system will be installed, choosing the old HDD.

- It's easier to choose Ubuntu in text mode. Zvichayna installation even in graphical mode, but it didn’t suit me.
- Moreover, a netbook is not suitable for launching a VM. Everyone fights properly and for a long time ... do not get any tightness, so I did not check and repeated the whole procedure on a normal computer.
As a result, we may have a well-known HDD with Ubuntu OS, which you can connect to any computer, get involved and work, with which all data will be saved.
How do you want a portable flash drive? hard drive h, then є, as a minimum, two options:
- install the system on a flash drive
- (with a shovishem)
The first option is similar to the normal installation of the operating system. Ale, we will install stones on a USB flash drive, we will take portability - the ability to take advantage of any computer with a USB input. Any changes that are broken in the system are saved after re-advancement. With the help of a robot, little is seen in the robot with a great computer.
Another variant Live systems on a USB stick (the same flash drive). But the Live system is not able to save changes (files of the coristuvacha, fixing the system), for it, one more division is being created, for which files are saved and the changes are made. Tobto, zdavalos b, go out approximately like the first option - є system, like "memory" zroblenі change after restart. Really, there are real nuances.
Live system s persistent on her own, she borrows less than a month - stilki w, skolki vantazheniya ISO image- tobto. ring out, up to a few gigabytes. The operating system, installed superbly, takes about 13-15 gigabytes. Then the system was installed with a great rank, the system is more zavantazhuetsya, shards of Live vikoristovuetsya stisk. A persistent live system can run into a problem if the new kernel (as it can be upgraded) is insanely old and exciting (which is part of the Live image and is not upgraded).
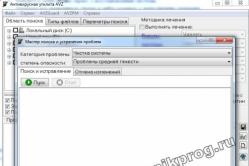
In general, insults can be merited on the basis, and the stench of insults will be looked at on the sides of the site. This instruction will show how to create a flash drive from an installed Kali Linu x. It will describe the reporting procedure for solving some problems, which can be blamed for the hour of installing the system on a USB portable device or grabbing from a USB flash drive or an external disk.
Features of installing Kali Linux on a memory card
Installing on a USB flash drive is similar to installing on an internal drive. Ale schob vipadkovo do not mess up the main system of the computer, hard disks of the computer or zavantazhuvach main system, I will propagate the installation Kali Linux to a USB flash drive on a virtual computer. After the installation is completed, you can get your real computer from a flash drive. Like a virtual computer, I'm vicorous.
I bet you already have VirtualBox installed, because you know how to install it.
Have VirtualBox create a new virtual computer. The simplest virtual computer for Linux. The only thing is that it is not guilty of a (virtual) hard disk. If you have difficulties with setting up a virtual machine in VirtualBox, or to blame the difficulties with other power supplies associated with VirtualBox, go back to the instruction "", there it is described in detail and illustrated with screenshots.
If in the process of creating a new virtual computer you will hard drive, then choose " Do not connect virtual hard disk»:
Once the virtual machine has been created, launch it. As ISO, official releases are recommended (rather than random automatic builds). When trying to win the selection, I got pardons, due to the impossibility of taking over the kernel modules, and the installation ended in failure.
USB flash drive for Kali Linux
For Kali Linux, and also for any current Linux distribution, I recommend memory cards with a capacity of over 16 gigabytes. Tobto. 32 gigabytes or more. Chim more swidkіst - tim better. Flash drives are badly suited for a few one-hour read/write operations, and operating systems work in this mode. Navit with a memory card, your system should be remembered more for the floor, it can “lag”, “talm”. With a filthy (proper) card, the robot's memory can become twisted, uncomfortable.
How to live USB flash drives with an installed operating system
I am quiet, who does not harm his media-carrier. On my memory card in the phone I zavantazhu torrenti, on my USB flash drives I install operating systems, intensively vicorist, often I make and update new backup copies. I didn't have any problem with the old memory/USB card of the intensive recording. To be honest, I respect the myth of roses that memory cards can be drawn through parts of the victoria. Possibly, I'm just happy. I want to say that USB flash drives (for example) are able to “live” and beat the operating systems installed on them.
Cleaning the USB memory stick for installing the operating system
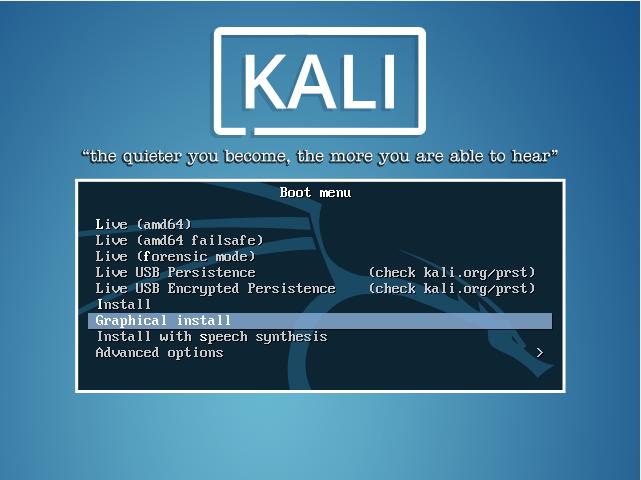
Before the beginning of the installation, I recommend again erasing data from the flash drive (vidaliti GPT), but the shards sometimes blamed me for the problem of writing to disk. Tse mi zrobimo by the forces of the Live system itself, having taken advantage of the downloaded ISO.
When the menu appears, select the option "Graphic setting" to enter the system.

If you are interested in connecting a USB flash drive to the system in the lower bar of the virtual machine:

You can look through the list of disks, and see the shards of any other ones ( hard drives), there is nothing there, then you only need a flash drive for im'yam /dev/sda:
Fdisk -l

To see GPT from the disk, for example, won't, vikoite:
Gdisk /dev/sda
To switch to expert mode, enter there
Let's see if we can see GPT, enter
Please wait a second to clear the disk.
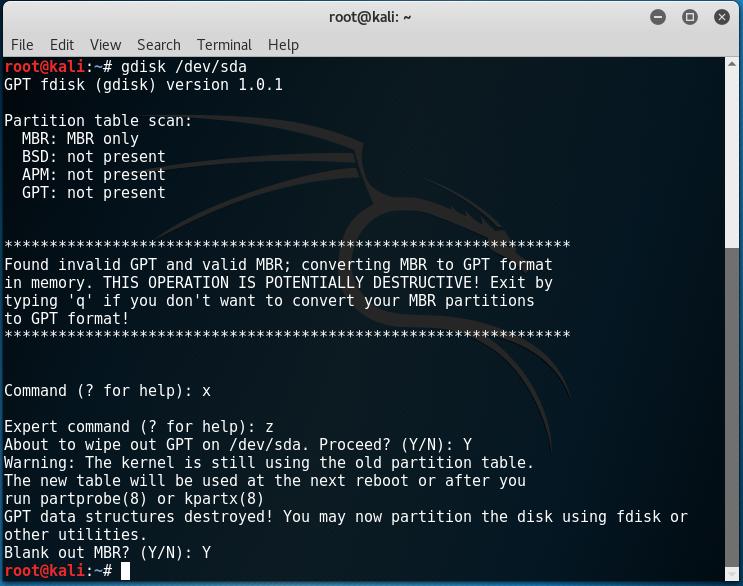
Now our flash drive is cleared, do not wiymayuchi її, restart virtual system. Now choose " Graphical install»:
Instructions for installing Kali Linux on a USB memory stick
Whether there are any authorities regarding the installation of the operating system, there is no way - everything is done in a standard way, choose a movie, the name of a koristuvach, etc. If you have problems, then, again, I’ll turn to the note “”.
Mabut, there is only a small nuance from the distribution of the feed. We don't need to distribute flashcards on flash drives - we need to use the resources of the computer without intermediary, that is. all operational memory- what can vistachiti spovna. But it’s not like that, it’s not like that, it’ll be only Skoda, the windows of wine will be even more correct. To prevent the distribution of the podkachka, then when going to " Disc layout» select item « Manually»:

Select division:

Choose "Yes":

Choose "VILNE MISCE":


At the coming vіknі, svvide for everything, nothing will happen to change:

Choose "First":

Select "Finishing the distribution is completed":

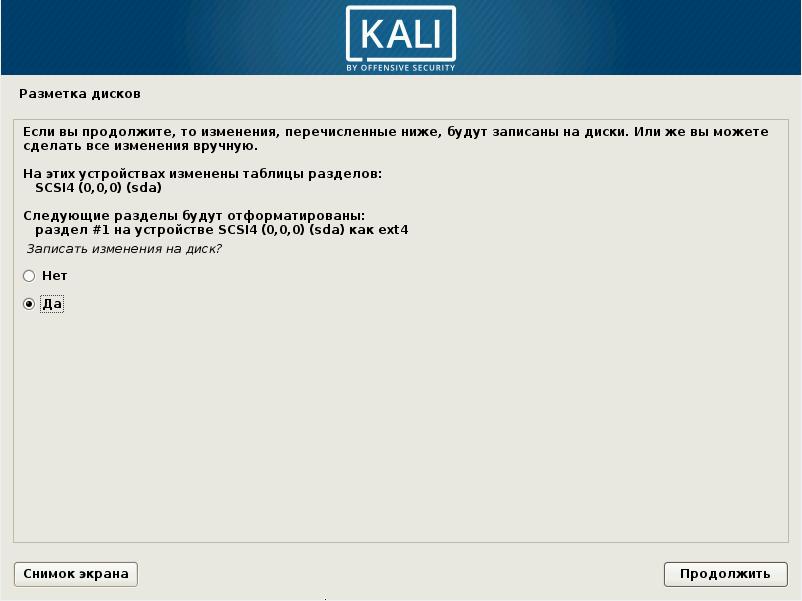
Choose "Finish the layout and write the change to disk":

The system complains that it is not given the right distribution for the expanse of podkachuvannya and all the praise of it. In our case (installing the OS on a USB flash drive), wine is not really needed. Choose "Ni":

Now select "Yes":
After that, the Kali Linux OS has been installed.
Here fill without change:

Select your flash drive:

If the installation is over (and it may take more than an hour, you can check it, the flash drives are not as fast as you can get the same hard disks, not seeming about the SSD), then turn on the virtual computer. You can reconfigure your real computer to get it freshly installed on the USB flash drive of the system.
Capturing Kali Linux from flash drives
If you don’t have UEFI, then press the Delete button or Esc a lot of times on the cob of the computer’s capture maternity pay- You can check with Google). At the BIOS, there is de "Procedure of entry" to select your USB flash drive. The flash drive at this moment can be inserted into the computer, otherwise the BIOS will not work. As soon as a USB flash drive is inserted, but if the computer does not run out, try inserting it into different sockets and immediately re-install and go to the BIOS.
If you have UEFI, then you just can’t go to BIOS. The easiest way to get into BIOS is to enter in command line(in the name of the administrator):
Shutdown.exe /r /o
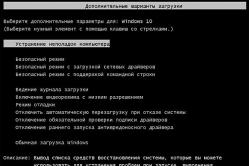
After some time, you will be informed that the computer will be re-vanquished for less than one quarter. After re-advancement, we can go here and select "Diagnostics":

Now select "Additional parameters":

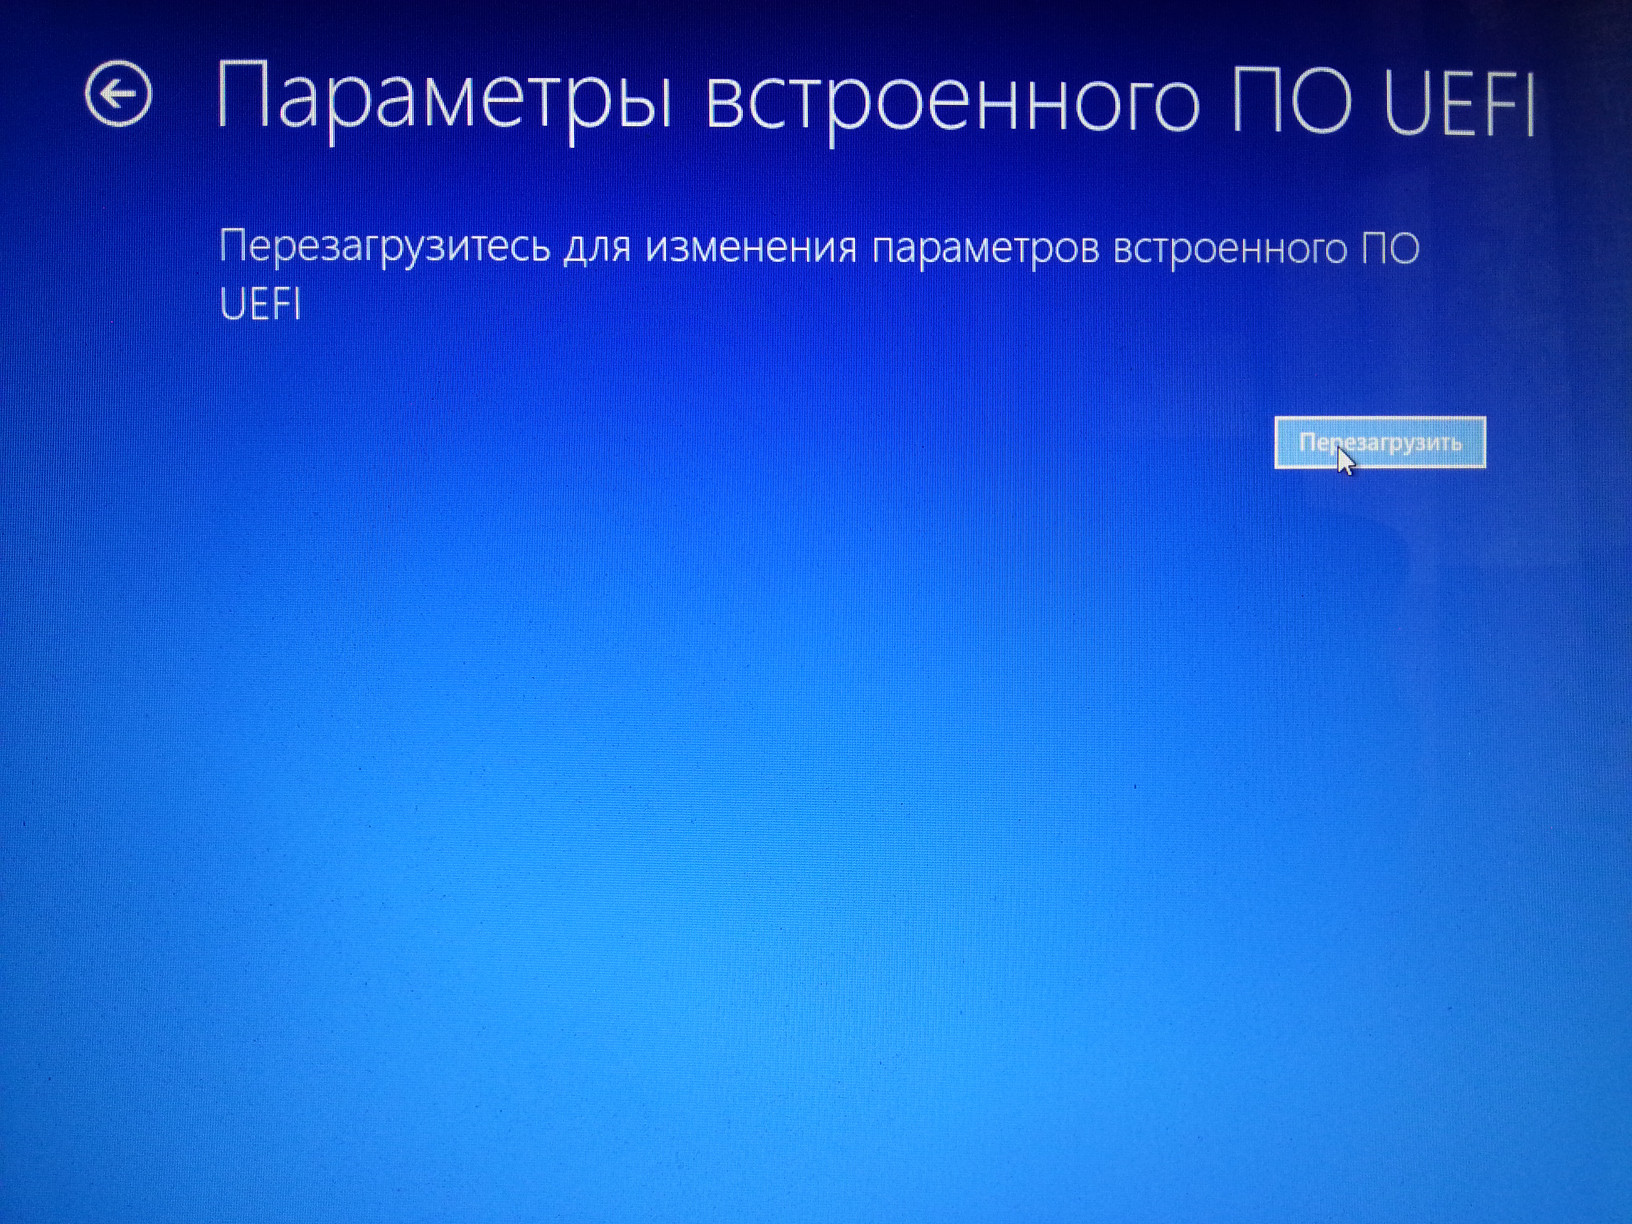
Now "Settings in the UEFI booted firmware":

Well, "Rezavantage":
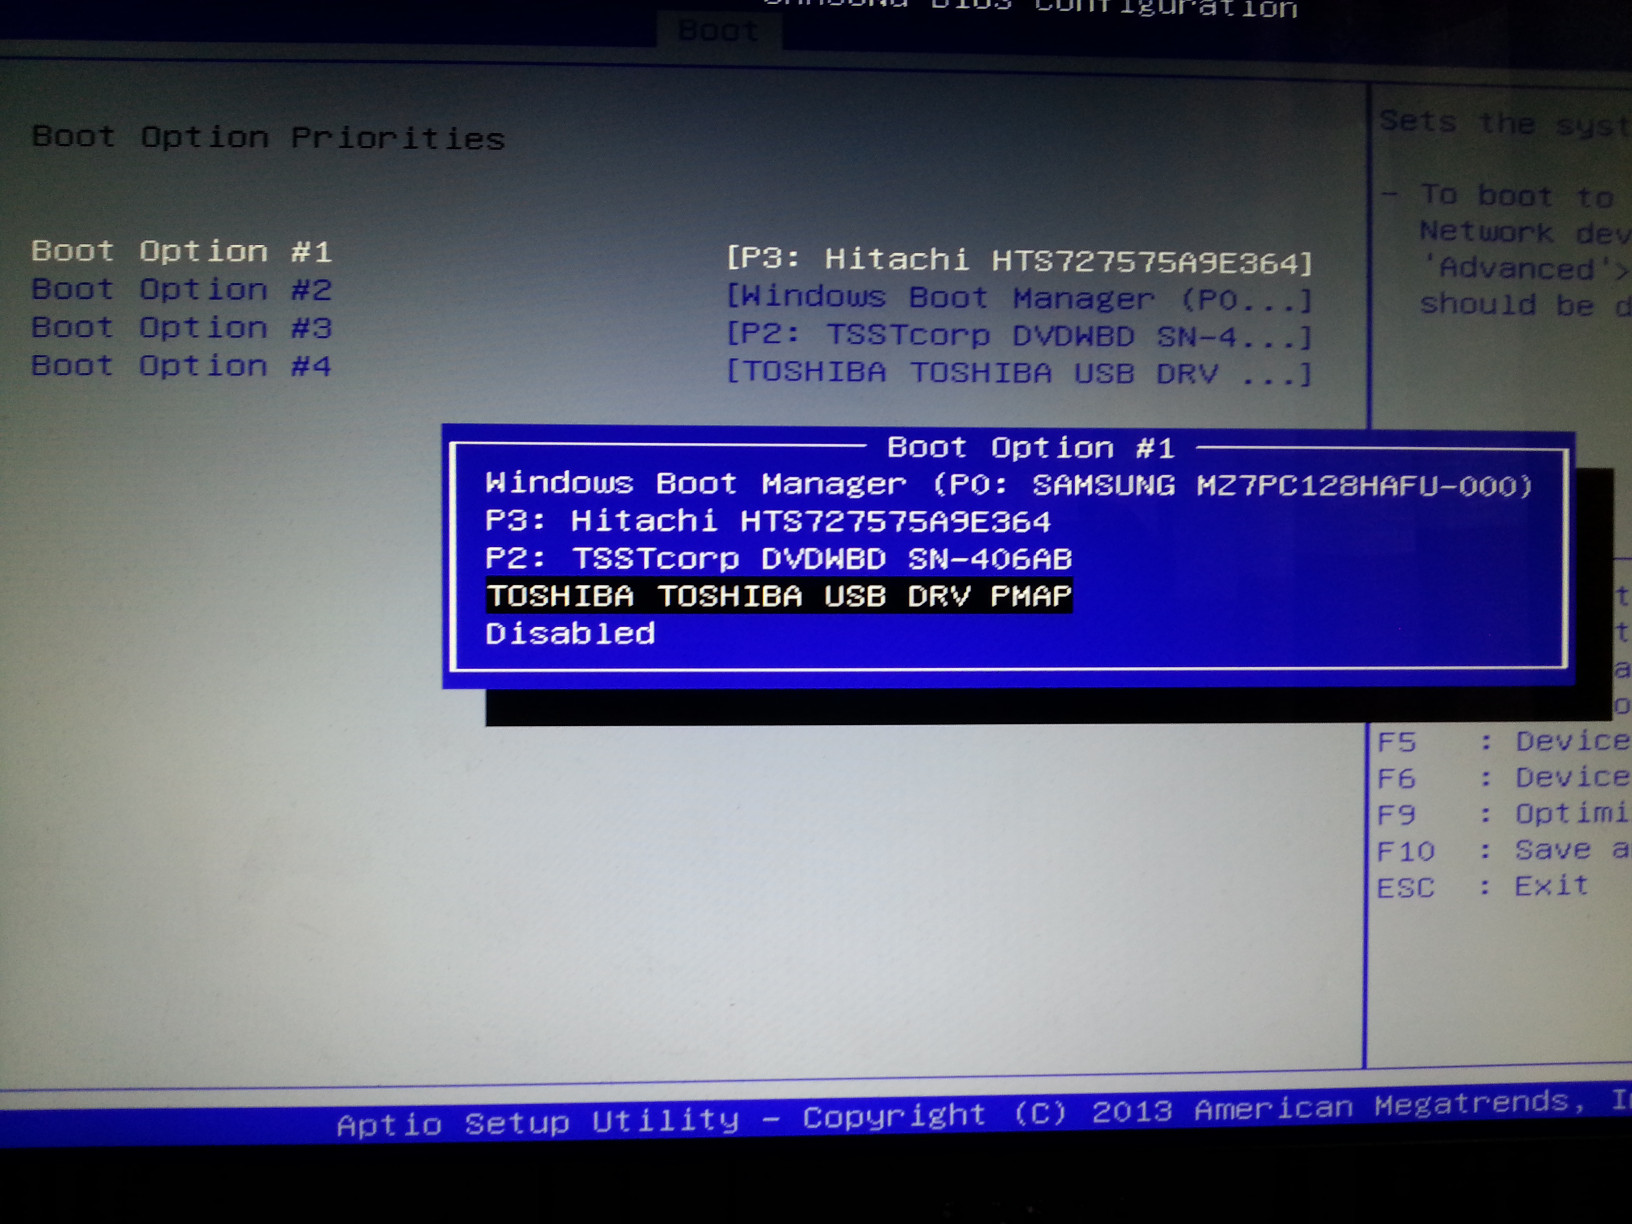
Different biographers have different bios, so you can be different. Ale, I will show the butt of my laptop, so that the bula will understand the essence. Go to the Boot tab, select Boot Option Priorities there, look at the options:

There is only one option and there are definitely no my flash drives.
Shukaєmo Secure Boot and turn on (Disable):

There is a new menu item OS Mode Selection. For the new one, select CMS and UEFI OS. If you choose CMS OS, then Windows inserts don't get carried away.

Now there is such an item as Fast BIOS Mode and Enabled Yoga (Disable). This is necessary in order to get the BIOS up to an hour by checking the availability of USB devices:


Ale, we need a new BIOS! To that, under the hour of zavantazhennya, press the double key. My key is F2. On the old computer, press the Delete button. Tsyu klavіshu Bios itself write when the computer is occupied. If you don’t get to marvel, or if you don’t understand English, then marvel for your model in Google. Abo try a path to bust. Krim naming, another key can be Esc or F*.
Go back to the Boot Option Priorities tab. Now there was a flash drive. If you do it like I do - put a flash drive on the first place, and Windows Boot Manager on the other, then you will reach an offensive effect: if the flash drive is inserted into the computer, then you can get Linux from the flash drive. If you don't have a flash drive, then you can get into Windows - and you don't need to crawl into the BIOS!
Do not forget to take care of that revantazhuemosya.
Solution to "the disc contains an unclean file system" problem
At exciting Linux you can shut up with a pardon:
The disc contains an unclean file system (0, 0)

Particularly often, this pardon is shown when trying to get started from a USB flash drive or a hard drive. The reason is that GRUB hacking is pointing to the wrong drive, for example, to Windows disk. The system does not understand the disk file system and it cannot continue to advance. Tsya problem virishuetsya dosit easily.
Restart your computer and press a key when the GRUB capture menu appears e. You will dance something like this:

Return respect to the row that starts from linux. My mind has a note there
Root=/dev/sda1
Shards when a flash drive was installed in the virtual computer of the Crimea did not have any other information, then it was given a name /dev/sda1. The real computer has one more hard disk, and the name /dev/sda1 could be assigned to it. And a flash drive, with which I am trying to get involved, now I can’t. This name can be /dev/sdb1 or /dev/sdc1 or else (depending on the number of disks in the system).
If you don't know a new name, just go through the different options. Move the cursor to the disk name and remember it on /dev/sd b 1. Next press the key F10 that dochekaytes zavantazhennya. If you are not far away, restart your computer and remember the entry on /dev/sd h 1 (and so far behind the alphabet), press F10 that reversed the success of the vanity.
After a successful entry into the system, remember the name of the disk that you want to enter. For example, in my mind, the name of the disk appeared /dev/sdc1(with a letter c). Same team for change zavantazhuvalny disk look like this:
sudo grub-install --recheck /dev/sdc sudo grub-mkconfig -o /boot/grub/grub.cfg
Deputy /dev/sdc Submit the disk name or flash drive.
Now, with a re-advancement, there is no pardon, and I will immediately use Kali Linux, installed on a USB flash drive.
Creating a backup copy of a flash drive from Kali Linux
The installed operating system on a USB flash drive, and especially farther away, the installation of the installed software is a process of trials. On that vipadok, like a flash drive is still broken, otherwise you need to write it down course work You can make a backup copy. It is also recommended to make backup copies before installing video drivers or other unsafe experiments for the OS.
We are talking about making a backup copy of the OS, and not okremikh files, then the best option is to clone the image of the entire disk. At the same time, the consumer should be allowed to quickly rotate the entire operating system with the necessary adjustments. The downside of this method is those that the image with a backup copy takes exactly the same place as a flash drive. Navіt akscho, for example, operating system Since the files occupy only half of the volume of the USB port, then the image will still be the same volume as a USB flash drive. As already mentioned, plus those that do not need to select files for synchronization, all backup copy zberіgaєtsya at the sight of one file, vіdnovlennya guaranty povne povnennya at the vihіdny camp.
At Linux systems a similar image can be created for additional programs dd, and for Windows it is a miracle without cost, exit code utility.
Run Win32 Disk Imager device choose your flash drive, and have the field image file write down the path, wherever you want to save the image:

When everything is ready, press read.
If you need to install the operating system on a flash card, then similarly select the image that you want to write to a flash drive, then press Write.
Visnovok
This instruction showed in detail how to install Kali Linux on a USB flash drive, described possible problems that way is their cherry. Indeed, in this rank you can install whatever Linux on USB card memory. You will be shown how to create a USB stick in Kali Linux. persistent(Shovishche).
If you happen to see files placed on flash drives, from the main Windows systems, go back to the instruction "".
It will not be a novelty for those who, for the sake of ostentatious Linux, are overturning MS Windows. One of such indications is the productivity of the system.
The Linux OS is richly rationally organized, especially unviable in terms of hardware resources. Therefore, on older PCs that can handle Windows XP SP1, the system should be fully functional.
So, maybe the amount of RAM is 512 MB. The disk space of the system is close to 5 GB, with this data it includes, in itself, the system's power, to do the inconvenience of a set of office and system add-ons.
With the output of the world "Linux-and z human guise" - the operating system Ubuntu, the installation of the OS and її components is carried out easily.
The administration and just the process of winning have become, before that, richly successful, lower in most previous releases.
Tsomu, zokrema, spriya razvineniya and fully graphical interface of the system. That and richly zavdan here virishuyutsya "mayzhe yak at Windows".
Let's take a look at the Ubuntu Linux installation process
In this article, the installation will be carried out on a clean hard drive. You know how to install Ubuntu, for example, on a new laptop.
Nasampered, it is necessary to select the OS version for installation. Here the choice is small:
- Zvichayna is only one of the versions that comes out of the black forest.
- LTS-versions (Long Term Support)
You can upgrade the original version to the new LTS, which is now, and navpak. Crimia raznykh terminіv pіdtrimki, tsі two types of release of the operating system can't think of the essence of their vіdmіnnosti.
Ale choosing the LTS version, you will not have mercy. As soon as they were appointed, they gave the order of our diy to be as follows:
- 1. Get the ISO image linux ubuntu from the official site - https://www.ubuntu.com/download/desktop.
- 2. Removing the ISO image is written to a disk, it is installed in the BIOS from a CD / DVD.
- 3. Insert disk and reboot computer.
Thank you for the first time, that you should choose your interface. Russian and Ukrainian movies are present, select from the list and press the "Install Ubuntu" button.
At this conversational vіknі, you can get rid of the promotion. To go further, press the "Continue" button.
If your computer has more than one physical storage device, then once the time has come to choose, on which hard drive the system will be installed.
Smaller hard drive, faster and more stable operating system and running programs.
Ours has one single disk, so press the "Install at once" button and proceed.
At this stage, we select the keyboard layout.
We create our physical record. It is necessary to come up with your own password.
If you do not want to save confidential data on your PC, you can select the option "Sign in automatically". If you do not happen to enter the password for the next hour when the computer is occupied.