Zharoznizhyuchі zasobi for children is recognized as a pediatrician. Allegedly, there are situations of inconvenient help for feverish women, if the children are in need of giving innocently. Todi dad take on the versatility and constipation of fever-lowering drugs. How can you give children a breast? How can you beat the temperature of older children? What are the best ones?
A lot of seasonal laptops are released with built-in microphones. As soon as a working microphone is transferred to the computer, start it up and set it up so that it can be used for training.
A selection of options for reconverting the presence of a built-in microphone on a laptop. In the technical description to virobu maє buti it is meant, which pristіy abo vіdsutnіy. If a laptop is connected with a web camera, it means that a microphone is transmitted and connected. Reverse the visibility on the laptop drivers sound picture that rearrange їх. The driver can be found at the all-important hedge, or take it from the disk, and download it from the sound card.


As soon as the specified operations are performed, the microphone does not fit in, it means that the sound adapter is broken. For unprepared koristuvachev it is not important to correct it, to carry a laptop for revision to the mainstern.
A microphone on a laptop is required for most versatile purposes and most often for using Skype. Ale persh nіzh rozpochaty spіlkuvannya, you need to connect. And here it is difficult to find out, because it is far from the skin of the mind, how to put the microphone on the laptop and more, how to connect it.
How can I turn on the microphone on my laptop?
In laptops, the installation of this attachment is often not required, which is already in the base version. Ale yaksho gadget is not pratsyuє, then, melodiously, vimagaє nalashtuvannya.
For a skin laptop, the diagram can be seen, and also can be seen new models devices and development models of computers, zovnishniy viglyad of which to see. But what do you want to know additional views about those who have connected the microphone to the Asus laptop, then you can look into the instructions from the virobnik. Ale persh nіzh zamatisya pochuk personal іnformation, you can vikoristovuvati a universal way.

How can I turn on the microphone on a laptop with windows 7?
- Know the image of the dynamo.
- Vibrate "Recorded attachments".
- With the live button of the bear, vibrate the required microphone setting.
- Squeeze on the image, sprinkle the writing "Umknuti".
- There is a check mark on the pictogram.
Setting up a microphone attachment on laptop windows 8 There are three things to look at, which is what is in the menu system.
Yak nalashtuvati microphone on a laptop with windows 7?
If you need it, you need to set up a microphone attachment at the laptop, and quickly use the following recommendations:
- open the Keruvannya panel, through the "Start" section go to "Nalashtuvannya" or "Keruvannya Panel" - name it in different OS, but the essence does not change;
- at the nalashtuvannyakh abo panels є "Sounds and recording attachments." Through a chain of razdіl it is possible to connect the microphone attachment, to display the necessary level of purity. The OS doers have the sign "Strengthening the microphone";
- Also it was necessary to reconsider the presence and availability of drivers for the sound card. I didn’t see it, it’s necessary to make sure that you do it. on the new disk to the laptop.
As soon as I’ve got the idea of adjusting the microphone attachment, it’s necessary to vibrate “Own that sound”, and then go to the “Control of sound attachments”. Here є the "Record" tab, as it is necessary to move the cursor and press the mouse button. In vіknі bude it is written "Mikrophon", having changed according to what seems to be deprived of activating "Vlastivostі".

- At the bottom of the screen there is a tab "Home". Here at the razdіlі є "Stuck in the attachment."
- I will name the categories in the list of vibrati propositions "Vikoristovuvati". If it is necessary to confirm the vibration and natisnut "Zastosuvati".
- Open the "Specials" tab, put the sign of the "Microphone +20 dB" bar. Zastosuvati snakes.
- View "Rivni", know the pozunok, push it to the right, so it will get better. The button of the guchnomovtsia is cross-linked, press on it, and set the fence on the sound.
- Natisnit OK, you need to save all the changes.
How can I put the microphone on my laptop?
As soon as there is no microphone in the laptop, it is possible to add an okremo and quickly lecturer schodo yogo connection.
In the last windows, you can see the microphone attachment on the laptop, or you can see it through the "Control Panel".

Hello, shanovnі vіdvіduvachі! Bagato vlasnikov laptops and home computers, adding a microphone for spilkuvannya or igor, I don’t know how to correctly set it up. Our instructions for adjusting the microphone are shown to be correct. Want to call up the victor to get the call? That is rich. For example, for roaming with close friends in Skype (before the speech, we have є of the article), or for spilkuvannya in online games, such as Dota, World of Tanks (WoT) and Counter Strike.
In our publications, it’s not only possible to set up a microphone on a laptop and computers, or just to connect it, and also how to convert all the drivers on the audio card are installed. On the right, where the microphone is adjusted, lie down installed driver at your operation Windows systems... In one vipad, the driver can be standard and all adjustments can be connected through the plug-in into the system programmatically secure... And in another way, on your laptop, you may have installed the software for securing Realtek High Definition Audio and plugging in the microphone is required through a new one. We can easily understand the options for connecting and adjusting the microphone.
Otzhe, almost from the simplest - from connecting a microphone to a laptop or a computer. As a matter of fact, there is still no article, and there is still a poorly written way to connect the microphone to the computer. A little more beautifully repeatable information. And it’s far from all of you, chanovny readers, I know how to plug them into a computer or a laptop. For the microphone on the audio card, a special rose is transferred - 3.5 jack, like in the earliest headphones. Rose on the sound card of the computer

As long as your computer doesn’t have a sound card, it’s also not important to know the microphone rose. Vin of the rosetting on the wired audio-module mother's pay:

Those are the same laptops, netbooks and ultrabooks. Roz'єm zzvychay razvashivaniyah from the right abo left side of the laptop and the designations of a special graphic icon.

Yak bachite, nothing folding. Vvazhatimo, physically everything was plugged in. The hour is yogo Windows setup... The offensive croc nalashtuvannya is the noise of the microphone in the Windows operating system. As they said, all systems have drivers. To that, my roses were divided into two parts. standard setting Windows has it adjusted through the Realtek HD Audio software. It is important to know which driver you have installed, to vibrate the required parameter.
Reversed audio driver for laptop and computer
Persh nіzh correctly set up the microphone on the computer, freeing it up from the one popular gratitude of the ears computer koristuvachiv... Often, in addition to self-tuning, problems arise with the audio driver. Zychayno, as the sound from the speakers, then all garazd, but often buvaє and navpaki. That is why we can radically reconsider its manifestation in the system. Change, that on your laptop or your computer the audio driver is not installed smoothly. For the whole we need to go to the dispatcher Windows add-ons... There are several ways to achieve this. The first way is to click on the end of the computer on the work table and vibrate the required menu item.

Abo to know the manager of attachments at the command row through the "Start" menu:

The third way to know the attachment manager is through the “Control Panel”. For all the necessary information through the "Start"> "Control Panel", in the control panel, find the item "System" and there will be a dispatcher of attachments. In a different way, koristuvatisya is not so important. Well, at the “Sound, video and video attachments” distribution, you have installed drivers for the sound picture, and there are no uninvolved attachments, as shown on the offensive screen.

If there is no attachment, then why not worry about a non-irradiated microphone, just go to the website of a laptop computer and add the drivers for the sound card of your PC. Otzhe, we perekonalis, the driver for the sound picture is installed. Proceed to adjust the microphone.
Microphone adjustment in Realtek High Definition Audio
Realtek HD Audio dispatcher is a program for adjusting a microphone, which is even more popular and can be used on a large number of modern laptops (as the program for securing is not installed on your PC without a break, please read our new status) I don’t know how Realtek HD Audio is installed on your laptop or computers. The Realtek High Definition Audio driver can be found in the attachment manager. For knowing the icon at the viglyad of the store in the Windows tray, which is shown on the next picture.

You can also find the Realtek audio driver through the "Control Panel", using the "Control that sound":

Open the dispatcher directly to the “Microphone” tab. Here you can tune the basic level of the microphone's soundness. As soon as it is pratsyu, then it is most beautiful to get the maximum performance. Screenshot axis:

The dispatcher can also customize the power. Iakshcho mіkrophone to make noise or to fonder, stronger and more beautiful than the smallest. And it is more beautiful to transform the robot with a few rinties:

As soon as your laptop is able to wake up the microphone, you have turned it on again. call microphone, then in the Realtek HD dispatcher it is necessary to set the settings, as you want to be victorious for the changes. On the screen below for the price of the display of the option "Set the standard setting".

Yak Vi was melodiously remembered for the same picture (roasted food), on the contribution you can adjust the sensitivity of the microphone. In principle, you can finish adjusting Realtek HD Audio. We have a check on the final section of the statistics, in which it is easy to understand, like setting up the settings for Windows. A report on the adjustment of the microphone at Windows 7, Ale given instructions will be relevant for Windows 8 and Windows Vista... Yaksho Vi є we will win Windows XP, nothing terrible in the whole dumb. Our joy, as you set up a microphone on a laptop or computers, are universal and you need to know about it.
How to set up a microphone for Windows
Otzhe, as I got overwhelmed, the driver for the sound picture was installed that sound at the computer є. Now it's time to go to the Windows microphone settings. Open "Control Panel" through "Start", go to "Control that sound" and select the "Sound" menu item.

For it is possible to make it even easier and know how to adjust the sound through command line Windows:

You can also find the adjustment in the system tray by clicking on the column icon. Well, I know, it’s not important, you can eat it. Once you have adjusted the sound, go to the "Record" tab. Itself on nіy maє visualize our pristіy sound recording. As long as your system has more microphones, there will be only one. If on your laptop you can install a microphone and connect the additional headset or a webcam with a built-in microphone, then there will be two. Vidilyaєmo necessary pristіy and an onslaught on the "Power" button.

While pushing the button "Power" to adjust the vibration, I will attach it, until you can adjust the microphone. On the deposit "Zagalny", nothing is especially necessary to adjust. Just perekonayte, scho pristіy uvіmkneno.

On the offensive contributions, as you call yourself "Prosluhati", please tick the box on "Proslukhovuvati from ts'go attachment". This option allows you to bring the sound from the microphone to the speakers or connected headphones. Varto respect, that when you pick up the opt-in to a friend who has a microphone and a dynamite, you can hear a whistle from the speakers, but you don't expect it to be heard. If you don’t need an option, you can leave the tick off.

On the contribution of "Rivni" you can adjust the soundness of the microphone (adjust the level of soundness) and set the sensitivity. Opts_ya guchnostі especially buvaє korisna yaksho v online grі Because when you are in Skype, the sound is disgusting. And if you can get stronger, you can sizzle when the microphone is splashed. Zagalom, if pristіy nasty pratsyuє, then the tab "Rivnі" itself is for correcting children. Tilki zakoplyuvatisya especially not varto. Guchnost can be up to 100%, and more powerful to get up to 10-20 decibels. There may be noisy wheezing and clacking, so it can be noisy.

Give me the tab "Painted". The option “Recognition of all sound effects” is attributed to the creation of sound at the annex. If you choose a cheap microphone, when broadcasting the sound a little bit overshoot, you can turn on the option and turn on the option for muffling and noise. Vidalennya postynoy warehouse - additional help with a restless sound, scho to clutter. Vaughn tidies up the sensitivity of the microphone.

The “Dodatkovo” tab is available to serve more quickly for tuning studio microphones. On it you can set the sampling rate and the number of channels that you can use in the microphone.

Otzhe, Windows have been installed. Thanks to our instructions for setting up a microphone on a computer or a laptop, you know it. Iakshilisya like a power supply or any problems with connections, whether weasel power up the comments. Nasamkіnets wants to be able to use one of the popular power supplies of our headphones - like adjusting the microphone on the headphones. Everything is absolutely the same, as described in the guide to the instructions. It’s an extravagant microphone, and a headset with headphones is an offense for gadgets to adjust in the same way.
Today's laptops are equipped with a built-in microphone, which will significantly reduce the life of the old people. It was not often necessary to buy a garniture, to send the switch to a computer, adjust it, etc. Apparently, it took the vitrachati an hour before, a penny, etc. Now, it’s not easy to be afraid of it automatically, ale. Let's try to get back to that, as the steps include adjusting the built-in microphone on the laptop.
Why should you want to?
Nasampered slide to reconsider, chi є tsei pristіy on a laptop. Uninvolved on those, most of the everyday laptops, is equipped with a built-in microphone, which makes it easy for your technology to enter the whole group. Schob perekonatysya, then respectfully read the documentation to the laptop, until the moment is given.
In addition, the microphone can be quilted through the Attachment Manager menu. First go to Start - Keruvannya Panel. Here vibrate Sound - Record. At the menu, which is visible, prist_y, if it is obvious, is guilty of being imagined. We will continue to do this before the presentation is clear, including setting up the microphone on laptop Asus chi technicals from the first virobniks.
As long as the list shows a number of outbuildings, because of the one that we need, we can knock on the body with a hand from them. Bіlya piktogrami mіcrofonіv roztashovanі green smuzhny. At the sound of one of them, you can feel the image of a chat. Otzhe, the very same prіtіt us needs.
Tuning the wired microphone
Deyaki utilities allow you to finely adjust the microphone. Vibir of such programs lie in the main type of sound picture, like standing on a laptop. For example, it is possible to get up to the smothering of the noise, or to relieve the loonie from the one who speaks. In addition, it is optimal to be seen from the koristuvach before the outbuilding of that rich. Such utilities can be expanded to the Internet without a booster, and it is not difficult to download them. It can be seen that setting up a microphone is an awkward and non-trivial process. In order to make sure that the attachment is correct, it’s enough to kill all the dough, if it’s right, it’s right for you.
As part of the pro-proponated statty, you can set up a microphone on Windows 10. Configuring a sound recording is not easy. Adequately familiarize yourself with the certification and guidance of the new instructions.
All laptops are connected with a microphone, we can wake up a portable computer in the area of the touchpad, and for reasons not active. For the sake of the attachment, I will be able to build up the steps.
1. There is a quick pop at the Start menu with the help of the Win + S key.
2. Vibiraєmo Keruvannya panel.
3. Proceed to the distribution "Possessing that sound".


As the elements of the Keruvannya panels were displayed in the view of the icons, and not in the categories, the "Sound" applet wikipedia was switched to the "Recording" tab. The result will be similar.
5. Vibrating sound recording of possession (as a microphone, as vikoristovuyutsya for a change) and vіdkrivamo yogo "Vlastivosti".

6. From the list of roztashanoi at the bottom of the form "Zastosuvannya attachment" vibrate "Vikoristovuvati tse ... (incl.)" To activate the microphone.
8. Change to the tab "Rivni".
9. The "Microphone powering" checkbox changes in the first position of the zero line - 10 dB, and the soundness of the microphone is up to 100%.

10. Actively set up with OK.
Microphone not detected
With a vikonanny 5 crocus in front of the front podrozdilu can appear, but turn on that tune nothing. For such a vipad it is necessary to reconsider whether the driver is installed. Only for the presence of the PZ for the sound payment by robotic, the possibility of setting up the headphones and inserting a sound recording device into them appears. It is also possible that it is attached to the manager of the plant or, at the same time, at the computer, it is switched on from a given rose, or it is switched on incorrectly (in the case of suspended roses).
Otzhe, reconsidered, the driver for the sound picture.
1. Open Attachment Manager via Win → X or Keruvannya Panel.

2. Rosgortaєmo list of sound, gamer and video attachments.
3. We know that they have their own sound board.

Yaksho є - everything is wonderful, it’s impossible to see it, or it’s signified by the same ikonkoy - a problem with the driver. Those, as it is established, is assigned to the statute.
4. Rozgortaєmo pidrozdil from the turn of audio inputs and outputs.
5. Known for a new microphone.

Yakscho win is denoted by the ikonkoy with an arrow pointing downwards, which means that there are no inclusions on the software ryvn.
Through the context menu of the icon, active ownership.

With the problems rose, now it is clear, how to set up a microphone on a computer at Windows 10.
1. Through the context menu of the "Dynamics" icon, you can see it clearly from the overturn of sound recording possession.

2. Vibrating demand, like two (for example, integration for a laptop and a microphone for headphones) and an embossed "For favors".
3. When the device pictograms appear, a green icon appears.
All pratsyuє, ale do not feel anything
Yak set up the Windows 10 microphone and switch to the newest setup. It was the beginning of the virginity of the problem with the sound of the sound or the low sound of the sound. The situation is polarized in the fact that when we are changing the sound recording device to a new recording device, it’s just as low as it gets.
1. Yak and earlier, a list of recording attachments is displayed.
2. Vіdkrivaєmo Vlastivosti vikoristovuvanogo nini for drowning the sound with an attachment.
3. Vistavlyaєmo bazhaniy rivn of guchnostі, as vіn zanadto low, zbіlshuєmo feasibility, as not whistling tediousness, іtranslated, thаt pіktogram dynamіka bіlya guchnostі bula without worms.

4. Onslaught on the "Zastosuvati" button.
5. To change the level of guchnosty ydemo in "Prosluhati".
6. Actively with the option "Listening to a specific annex".

7. It is said that in the real hour the quality of the sound is appreciated.
Smothering the noise
Trisk and noise when recording the sound, for some reason, which has not been heard before, can appear for several reasons.
1. At the first vipad vіdkrivaєmo "Power" of the microphone that tidy up the power.

2. The depository "Dodatkovo" is experimenting with the format of two-channel 12-bit sound.

3. The sound dispatcher (launched from the Keruvannya Panel or the context menu of the Dynamika icon) has an active option for suppressing noise that moon.
Successful performance.
Remaining rocky development programs with the function of voice splitting have become not a big part of our life. Skype і Paltalk, ICQ і Mail.ru Agent, QIP and other related products allow us to use one-by-one voice communication, using one way of one per thousand kilometers. Alee buvayut the situation, for what a microphone, in the case of our laptop, repairing pratsyuvati (or a copy of pratsyuє) is not correct, it’s sutta to speed up our spilkuvannya. This problem is attributed to the article, in which I will open it, as I set up a microphone on a laptop, and as a tool to help us.
First of all, you can pick out in detail, how to check the adjustment of the microphone on the laptop, then it becomes due to the specifics of the microphone, which is inserted into the case of the laptop, if it will be connected to the call. If you have a built-in microphone, be sure to ask for the answer, the call option will need to be connected through the standard 3.5-millimeter socket, the order with a microphone pictogram is applied. Make sure that when the external microphone is connected, the computer will automatically start the connection of the settings, and the rear function of the system.

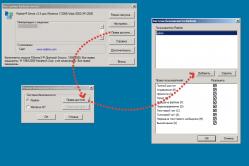
- Go to the "Control Panel" of your computer;
- Go to "Owning that sound", and then click on "Sound";
- To see the screen, go to the "Record" tab there, in which case you can see the image of the microphone (aka the number of microphones);
- It’s easy to say that, and make sure that you have a sound at the green gradation of the right-handed person.

Yaksho ni, then move the mouse cursor to the valid part of this window, click on the right key of the Misha and vibrate the option "Show attached attachments." As soon as you wake up the microphone, then click on the new right key of Mish and vibrate "Umknuti".
Install new drivers on the sound card
Also, install the best drivers for a sound picture on your PC. It is far from a secret that the visibility of the robotic driver is not correct in order to "build the nanny" to the robot to navigate the nicest microphone, which is inserted into the body of your laptop. It is recommended to use these programs for installing drivers like DriverPack Solution or Driver Genius, as they have improved their efficiency on the machines of the laptop.

Yak set up a microphone on a laptop - after all
- To set up the microphone on the laptop, hover the bear cursor over the dynamo on the plant panel (bottom right), click on the right key of Misha and vibrate "Recorded attachments".
- You can see the "Sound" window, you can see how to adjust your microphone (you can also go to the "Sound" option, which is described in the front section).
- Then go to the "Record" tab.
- As long as you have a small number of microphones, set up the requirements for the victorious for the change. For the first time, press on the new one, and then press on the button "For the change."

Croc 2. Now we need to adjust our microphone. Two click on the new one, and then go to the "Equivalent" tab at the new one. Here you can use the microphone's level of purity. For some koristuvachіv there is one socket ("Microphone"), for others - dvі ("Microphone" and "Powerful Microphone"). It is recommended to set the "Microphone" panel at the maximum value (100%), and the "Microphone strength" panel at the value of 20-30%, so that the best result is achieved.

Krok 3. Then, having switched to the tab "Painted" (on older versions of the OS, that sound picture can be seen), you can check the checkboxes of the handbook for the owners, because of the available ones that are View of the post-warehouse ").

The depository "Dodatkovo" will set up the optimal bit rate and sampling rate for you (if 16 bit and 96000 Hz are enough). Then it is necessary to press the button "For suggestions" at the bottom to fix this parameter.
You can revise the correctness of the microphone robot and you can use the additional programs "Sound Recording" (Start - Use programs - Standard), or by calling the Skype test number (echo123).
Krok 4. You can also go to the "Listen" tab in the "Sound" window and check the box next to the "Listen through an add-on" option. Do not allow you to bring the sound from your microphone to the dynamics of your laptop, and to adjust the characteristics of your microphone.
I still don't have a microphone
How robust is the situation, if not a good microphone on a laptop? In front of you, viznachtesya, like a microphone for switching on (as long as you have a kilka). Go to the "Sound" window, as described, and set up a correct microphone, which will be victorious for the suggestions.
At the same time, switch the microphone on the phone, so that the plug is connected to the required socket of the laptop, and the microphone cord itself is not physically connected through any reason.

As soon as the sound from the microphone is heard for the update of the operating system (it is most common to use Windows 10), try to display the system to the front of the update point, so that you can help with the latest problems.
Also, the reason for the presence of the microphone's robots can be the problem of the drivers before the outbuilding. Revise the appearance of the microphone in the "Attachments Dispatchers", if necessary, install new drivers for your microphone from the retailer's website.
Visnovok
I will go to the food about those who set up the microphone on a laptop, and how to adjust the parameters of the microphone in the way that we will describe it. Raju will pay special respect for the correct vibration of the microphone, so that you can be victorious for speaking, as well as the appearance in the system of decorative add-ons and improper adjustment can lead to the emergence of new dysfunctions. It is even more important to correctly set up the adjustment of the microphone's strength, and even "overloading" this indicator can be caused by noisy noises and unpleasant factors. Vikoristovyte the whole complex of changes I will enjoy, so that you allow the correct adjustment of your microphone, guaranteeing, nadal, yogo stable and nadiynu robot.
In contact with
On a call from you, I’m the head of Dmitro Smirnov, and in the whole article I would like to tell you about those, how to turn on the microphone on the laptop, and to buy it, if you have a laptop in the region of 20,000 rubles.
On the right side, if your laptop starts at 10,999 rubles (at a time of 16,000 rubles for the dollar exchange rate), then, if the laptop is not really cheap, I recommend that you buy a microphone, if you need to pay for it often spilkuvatisya with clients from skype. If you just want to see a comus - if you use the phone, or if you speak in games, then there will be enough microphone in your laptop. In any case, first of all, judge about the quality of the sound recording, the method of reconverting your microphone, and only because of the robustness of the recording.
I wrote about the past statutes about those, and I myself told about those that need to be robbed, as your laptop has 1 roses and for headphones and for a microphone, so the titles of "combinations of roses". Bagato often feeds on those in the laptop.

As a matter of fact, you can be just a little bit in your laptop. Alright, as the rule is a microphone є in any bitchy laptop, and if there is a webcam in the presence of a new one, then the microphone is 100% responsible, or the virobnik is out of control, as if it had not been built into a new microphone. Sound the chain for receiving sound from the webcam or from the main part of the laptop. But everything can be wondered in Windows itself.

It is necessary to go to the "start" - "control panel" - the contribution has a sound "You must know" by sound attachments ", when you see the tab, you can wonder if you have a microphone on a laptop.

At the "recording" deposit you can look at the plug-in sound attachments, and the microphone itself. I have a microphone as a set of inclusions, and as I say, the scale is green in color up the mountain. I have at least 2 microphones, which are connected to the laptop, and at the same time I can use the call microphone, which is connected through the call to the sound card.
Setting up a microphone on a laptop
As a matter of fact, some special adjustments for a microphone on a laptop are not needed, everything that needs to be done is not necessary, but itself:

You just need to click on the microphone, show up the menu, and wonder if the sound is turned on. I have 100%, maybe it is turned on. As soon as the microphone becomes more powerful, it’s all for an amateur, if you can see 0 dB, the sound will not be the cause of the sound! If everything is so with you, like it is with me, then everything is great!
Setting up a microphone on a laptop is not required, if you have reinstalled the driver on your computer, and you will need to install the driver.