Antipyretic treatments for children are prescribed by a pediatrician. There are also situations where it is difficult to get help for fever, if the child needs to give up. Then the fathers take on themselves the stability and stagnation of antipyretic drugs. What can you give to infants? How can you lower the temperature in older children? What types are the safest?
Since long ago, at the dawn of their birth, portable dynamic speakers began to sound less common on telephone handsets. These speakers were connected to radio amplifiers and for use in radio receivers, especially if they were intended only for the transmission of human language, so they were not affected by the width of the range of the sound spectrum.
In addition, the first headphones were small and large in size and were characterized by a high support, which was important with modern tube technology. Since then, nothing has changed fundamentally, but today’s headphones sound much better and have become much more compact. The increased clarity of sound is prompted by the emerging Hi-Fi standard, which describes devices that produce sound of increased purity. What are the current head phones?
Range of available frequencies
Clear headphones are responsible for the singing range, where they can produce sound sounds. The minimum permissible frequency range is a frequency range that is sensitive, such as 20 Hz to 20 kHz. If the range of headphones is tighter, then they will not be able to provide part of the sound, which will inevitably affect the volume of the sound.
More clearly, Hi-Fi and Hi-End headphones cover a wider range – from 5 to 25000 Hz, which allows them to convey all the subtle nuances of music, most clearly.
Headphone design
Based on the design, headphones can be divided into two main types:
- What is the use of headbands in the shape of an arc;
- What to fasten without a headband.
The first type usually includes over-ear monitor headphones, as well as sports vacuum headphones with a cushion for better fixation of the ears. To another type, you can add compact earbuds and earplugs, if you want to use small overear headphones, which are used for attaching special clothespins to the ears.
Headphones are used according to the principle of closedness:
- Phone earbuds can be opened and closed due to the presence of visibility or the presence of gaps in the ear pads;
- In-ear headphones are placed on a stand that closes the ear canal - the ear buds do not overlap, the earplugs completely fill the ear canal.
In-ear headphones vary depending on their anatomical features - shape and size. If the headphones do not fit and wobble, then you can change the situation with the help of foam tips, but only in small areas - most often you will have to use vacuum headphones. The stench is found in the middle of the ear canal and is called internal canal. Such devices have been found since the 20th century based on medical devices for hearing analysis. Today, such smart headphones can deliver Hi-Fi brilliance.
To increase the comfort of in-ear headphones, you can use ear pads of different diameters, as well as special polymer or foam tips, whichever best fits the speaker in the middle of the ear.
Oversized headphones come in two types: closed-back and open-back. Devices of another type have small ventilation openings in the ear pads, which can allow sounds both inside and outside to pass through. This promotes safety when wearing headphones while at home, as long as slightly unnecessary sounds are allowed. This is useful for musicians when recording sound - open monitor headphones allow you to instantly hear the minus and your voice.

Closed headphones have ear pads without openings, which do not allow the sounds of calls to pass through, at the same time preventing the music from the headphones from being lost in the unnecessary middle. This allows you to use such headphones in order to maintain silence for as long as possible - for example, if you want to watch movies and listen to music without being distracted by the surroundings.
Speaker
In general, the design of headphones is very simple - the skin ear consists of a dynamic speaker of small dimensions, embedded in the ear pad. Vacuum headphones also pump into the accessory canal, through which sound is absorbed from the ear canal of the speaker.
Due to the small dimensions of the dynamics, the headphones do not have powerful speaker characteristics - they are not divided into rich and wide-smoky ones, they are not low-frequency or high-frequency, but are responsible for transmitting the entire possible sound spectrum. In addition, the headphones do not have such a parameter as activity - in the compact body of the headphones there is simply no room for an enhanced sound boost. Therefore, the headphones will always be used to enhance the sound. You can also use a portable booster for headphones, which will significantly improve the clarity of the sound.

Other characteristics of the dynamics of power headphones are similar to those of speakers.
Impendance
Impedance and electrical support are one of the most important parameters of any acoustic device, and any discrepancy between the device that produces sound and the source of sound can lead to serious equipment breakdowns.
As a rule, mobile equipment - players, smartphones and tablets - are insured for the addition of headphones with a 32 Ohm support. In this case, the technology will be fully revealed and can function as efficiently as possible. Sometimes you can drive headphones with support from 24 to 40 ohms. Devices with a high support - these are, as a rule, monitor headphones, which are insured in the professional market and are connected to special equipment.
Pushing
Despite the widening of the mind, the tightness does not in any way contribute to the loudness of the sound, like these headphones make. The headache that comes with fatigue is the reliability of the headphones, so that you can hear sound without serious problems.
As a rule, “sophisticated” large-sized headphones do not reach the weight of the simplest portable speakers - the maximum that can be heard is 4 W. Headphones with a pressure of 1 – 1.5 W are most often used. Small in-ear headphones have a power rating of up to 0.1 W, sometimes 0.2 W. Cheap earbuds typically have a power rating of around 0.05 W.
To improve the sound, you can use portable boosters. The headphones are connected to the audio device via USB, and the headphones are connected to them via a standard interface. Powerful headphones can be connected to stationary speakers.
Cable
With this part of the design of the headphones, everything is even simpler - the shorter the cable, the better the sound from the headphones without any interference or loss of signal. Most often, the headphone cable should be 0.8 - 1.2 m, or even one and a half meters. There is no need for a great deal - just let the sound of the earphones be heard nearby. If necessary, you can quickly get under the shoes, otherwise in such a situation there will inevitably be oversteps, no matter how small.

If you need a long range of action, it is faster than dartless models. Instead of the cable, it is possible to receive the Bluetooth signal, which is supplied to the headphone housing by the battery. Current devices and batteries have even modest dimensions, so such devices do not require headphones to be compact.
The design of the headphones may vary. The headset must have a cable with a variety of channels - this is divided so that the other ear can be thrown over your neck. Over-ear headphones have a traditional cable in the shape of the letter Y with a length, or a wire that goes only to one ear. Professional headphones have interchangeable cables that can be connected to the headphones, or only one channel can be connected.
The wire can be flat or round, both covered with polymer insulation, and some can be additionally decorated with laced coatings. A special feature of these headphones is the use of acid-free honey during fertilization, which allows you to significantly reduce the level of cable inflow into the acidity of the sound.
Plug
The headphones have one of three standard jacks – 6.3 mm, 3.5 mm or 2.5 mm. The plug can be straight or L-shaped - you can choose either one, but connect them manually to any equipment.
The plug must fit as closely as possible to the socket that is being used. The jack can have one to four rings to accommodate different functions. One and two transmit sound from the front channels, the third serves as a microphone in headsets, and the fourth is not grounded. Headphones with 4 rings are usually used for listening to phones.

Thus, the installation of headphones is very simple, and choosing the most consistent design is difficult. If necessary, the headphones can be easily removed and re-soldered, but such an operation may be more difficult because headphones are expensive – it’s easy to throw them out and buy new ones.
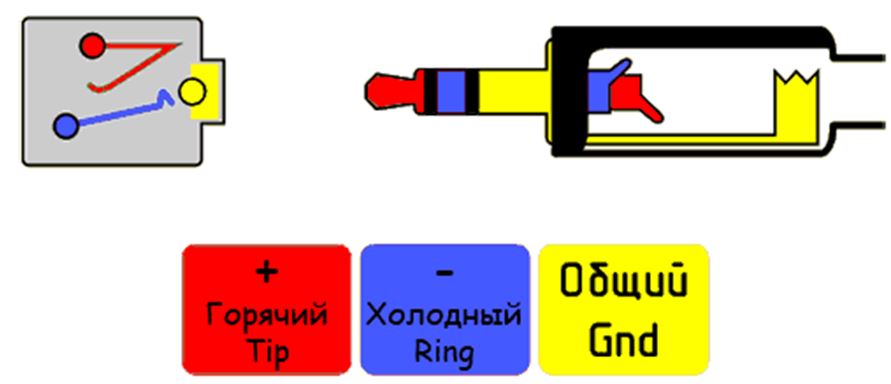
The TRS connector (the name is based on the English abbreviation tip, ring, sleeve) of the pin type is often installed in various audio devices. There are a number of options available, the 3.5 mm jack (also the same as the mini-jack) orientation is important for earbuds or medium-sized headphones, and can also be used in microphones, radios, players and various multimedia gadgets. This variety of roses is also popular in mobile phones.
Zagalnyy look different 3.5 jack
Design features of 3.5 jack
TRS has three contacts of standardized sizes, which allows for stereo signals. On the pin part of the coupling fork, the diameter of which is 3.5 mm, there are three contact areas, which are separated one by one and reinforced with insulating washers.
Signals of the left and right channels of stereophonic communication are supplied to the head of the tip and the foot of the ring; the ring closest to the body is used to connect the ground, which is used for these channels. There is an additional groove on the end part of the viconan tip, which gives it a characteristic shape that is easy to recognize. This type of connection allows you to fix the plug in the workbench using the spring-loaded contact of the socket part of the connector.

Assignment of contacts to 3.5 jack socket
Cable for TRS connection
The self-propelled cord will get stuck in such situations if it does not last until the purchased cord. The functions of the cable can be combined with almost any two-wire cable with a braided screen. To transmit signals, both twisted pairs and untwisted darts are best suited.
Layout of cable wires behind the contacts and their connections
Through a small number of working contacts 3.5 jack unpinned does not suffer from great foldability. The standard unsoldering is shown a little lower.

Standard 3.5 jack connection
The 3.5 mm TRS jack may be used in professional devices, which are characterized by a balanced connection that is subject to a reduction in brightness. This situation changes little by little and takes on an advancing form:
Balance not soldered 3.5 jack
In both options for connection, vikoryst is used. This wire will be visible on the channel contacts of the cable side of the openings for inserting cores. The grounding contact is connected under the seal. We lived in advance to get service.
A situation that often plagues the lives of music lovers is that their favorite headphones stop working. The biggest problem is mechanical damage to the cable and plug. There appear to be a variety of reasons: they whistled sharply from a nest of roses, got caught in something, or were squeezed by a flashlight. It’s just about time. How can I correct the situation and turn my headphones back on? Let's figure out how to solder the plug to the headphones.
What we need to do first
Before you begin self-repair, you need to determine the nature of the defects being repaired and the possibility of replacing one or more parts. It may happen that the cable needs to be replaced.
It’s also important to evaluate the financial side of the supply: adding the necessary tools may require you to work in the workshop, or even replace the headphones with similar new ones. The power supply information will tell you where to start the work, how to solder the 3.5 plug to the headphones and what else is needed.
Necessary tools
Most stores sell dismountable plugs that are made up of two parts: the plug itself and the housing, into which the first one is screwed. Also, stinks are separated by their acidity and the material of preparation. Of course, for clear headphones you need to choose a travel connector so that you don’t lose the joy of good headphones.
For this operation we need:
- The headphones themselves or the headset have a faulty or damaged connector.
- The new rose you are installing.
- Low-power soldering iron with a thin tip.
- Solder, rosin and flux.
- Hostry nizh chi pasatizhi.
This is a minimal set of tools so you can start working. A good tool is the key to success, so soldering the plug to the headphones will be easier.
How to replace the headphone plug
To correctly complete the operation to improve the performance of your headphones, you need to know how to solder the headphone parts to the plug, where to go from them, and follow the instructions. To fight for a few simple crumbs.
Krok first - preparation of wires before further soldering. Before starting work, it is necessary to prepare everything by removing the insulation from the wires. Let the robot go away. This can be done with a knife and pliers.
It is necessary to choose three darts: red, black (possibly white, blue or green) and weaving that screens (can also be used as insulation, often clear). From the red and black wires, do not remove the insulation completely, leaving 2-3 mm removed so that there is no further contact between them.

Another step is preparation of the rose before further soldering. I bought a spare part from the store and put it on the elements that need to be folded. Just a little tidying up before the next possible soldering, so that you can solder the plug to the headphones more accurately.
After this, it is necessary to rinse the part with solder, so as not to scratch the spots, you will not be soldered. The space in the rose is so small that the “nozzle” of the solder makes it difficult to further solder.

The third step is the soldering itself. First, what you need to do is to stretch the wire from the housing to the connector. You won’t be able to earn money after this, you’ll have to over-earn it. Before soldering the welding joints, tighten the wire that will be placed on the tip. This is the left channel, so the black wire. We solder the ground first, and then the channels - left and right.

Croc of the fourth - isolation and folding of the rose. To ensure that the contacts do not short out and the headphones do not seal, be sure to insulate the socket. The easiest way is to use electrical tape. To do this, carefully, with a thin ball, wrap the plug, checking that the body is in place. If everything is assembled correctly, let’s get ready, and the headphones will work.

How to replace the headset plug
Headphones with a microphone - a headset - wear little bits of a different design, even simpler headphones, but in which case they don’t shake too much, so as not to get stuck in the room. So how do you solder the plug to the headphones and microphone?
The headset has only one wire more than the original headphones. This wire goes to the microphone. The pinout of the connector can vary greatly depending on the headset driver, but there are two main reasons:
- The CTIA, when pinned out from the tip, looks like a left-right-backside microphone.
- OMTP, where everything is the same - left-right-microphone-background.
When soldering, if there is such a need, it can be converted from one standard to another by rearranging the two outer wires.
What is not required?
This is a very serious problem - there's a lot of haste, since it's not so easy to solder the plug to the headphones correctly. The work with soldering is done efficiently and neatly, and the fluidity will lead to problems that can seriously affect the efficiency, and then the gadget will be completely sealed. The main benefits of self-repair are:
- It’s an unclear problem that after every hour the headphones or headset stop working.
- The isolation of contacts is rotten, as headphones also do not work through.
- Buying an obscure rose, through which it is impossible to earn good money.
- Do not damage the plug due to short circuits. The speakers may be damaged, which will require replacement.
- Incorrect layout of two wires will prevent the connector from being connected.
- The tester in ohmmeter mode will show you how to solder the plug to the headphones, since the colors vary greatly from the main ones, and you have forgotten which channel it is.
- The left channel of any headphones is the end of the plug. The other one is right behind him.
- Since it is not possible to buy a different one, you can save the front one, and make the body from a handle or epoxy resin.
- When soldering a cheap plug, insert the spring under the same pen. Protruding beyond the end of the socket, it turns the wire through the bends.
- For manual work with a plug, you can prepare the simplest method. To do this, drill a hole in the wood and insert a plug into it.
Most importantly, with simple rules and detailed instructions, replacing the headphone jack is not so difficult. For the availability of tools and the right to earn the price can be paid for. But the joy of having repaired your favorite headphones yourself cannot be compared to anything else.
Connection diagrams. The connection diagram for headphones to the main jack is presented below. The wires in the middle have a different color coating, but I did not specifically indicate on the wiring diagram which color is selected for the right or left channel, since there are variations in the position of the transmitter. The best thing to do is to call and find out.
Previously, all laptops had a microphone socket. The microphone for this robot receives live feed from the laptop on the central ring. The signal is picked up from the tip of the plug. The third contact that is missing is the ground wire. Everything is as it is shown on the little one below evil. Ale Yakshcho Vi Rosbert Steter, then you know the wing 2 dart there and not 3. on the right in the same, the signal pro -provid is to the plus of the cutting of the micalon capsule, for the Ekonon, for the EXCOM pointing to the little one, right-handed. 
At the same time, laptops have been stripped of their microphone and headphone jacks, adding another contact to the jack. Now the headset (microphone + headphones) is connected to the computer with one plug, with which you can insert headphones without a microphone into the jack and the smell will work normally. It’s a pity that I haven’t bought a lot of microphones for my computer yet. Everything was achieved by changing the third, found contact of the plug. Now it is divided into two and connected to the additional contact, which is the highest, a microphone. The wiring diagram that works on my Lenovo Z500 laptop is shown below. 
Today we’ll talk about headphones and how to repair them with your own hands. One of the most common problems with headphones caused by careless use is a broken cable in the area of the plug. This is achieved through those who often pull the player from the casing by the cable, while collecting the player, twist the cable. Naturally, the place where the plug comes out is damaged, the wire gets cut off, and the headphones either play normally, or stop playing.
Do not rush to throw away such headphones, they can be repaired. They can be repaired in this way; you just need to renew the contact from the end to the plug. You can earn money in a number of ways, for example, buy a plug like this. 
They are even wider, not expensive, but their size is not suitable for me. Just close your eyes to those in the middle of the stench that are already strong and not clearly formed, the stench is working, and you can use them. The stench is great.
When repairing such devices, use the original plug. I remove all the insulation from it and solder the wire. Then I remove the bandage from the thread and the result is all nicely trimmed. At the moment, my headphones are working miraculously, and I won’t neglect them. If you have a similar requirement, you will not need to solder a 4-pin minijack to the microphone headband. Here the whole sequence of actions is the same, as if I were repairing headphones, except with one caveat, that the circuit diagram here is a little different. 
So let's go! To begin, we need to remove the dry insulating casing. When preparing, add soft, gummed plastic, or gum, and it is easy to taste with special bokorizas. 
You need to bite into shallow balls, without rushing, ball by ball, until you reach such a plug. This is the inner part. You can see the plastic insulator, contacts, and excess wires. 
The first thing you need to do is remove excess wires. For this we need a soldering iron, some flux, and some alcohol-rosin flux. The soldering iron warms up the soldering area and cleans up the area. After cleaning, we have such a plug. 
We cleaned the plug from the wires, now we need to check that as a result of cleaning we did not put any snot in here, or, perhaps, the insulator has melted and the contacts short-circuit to each other. It is necessary to reconsider what seems rude, so that skin contact does not become isolated from someone else. To check, I used a vikory tester, placing it between the two. I place the probe on one of the contacts and check that there is no support between them and the other contacts. I know that there is an inconsistency in me at the same time. I move the probe to the front contact and check further. 
Since we all have two hands, in order to solder this plug, we need to trim the wire with one hand, the soldering iron with the other hand, and we also need to trim this plug. So, the ideal option is not to squeeze it into a vise, since not all the vise is worn out, so you can squeeze it with some important object. For example, with wire cutters. 
Now I need to solder the signal wire. For this purpose I apply a little flux to the place of soldering and solder. I have soldered one wire, now I need to solder the other wire in such a way that it does not shorten the first one, for which I will put a cambric tape on the other one. We try and reject the application. 
Now it is necessary to tin and solder another wire. For this reason, I also apply a little flux and some caulk. Now it is necessary to solder, for which we apply flux to the soldering area, press the plug with an important one, so as not to press the wire itself. So, as soon as the heat gets hotter, you can quickly clean it with a toothpick. 
Everything looks good, everything is beautiful. Now you can flux everything to make it more beautiful. If there is just one thing missing, we need to check it again so that our circuit breakers do not freeze, for which we again test the speed with our multimeter, switch it to the variable support, select ohm. We check that the probes are connected correctly, for which we close them and we have a reading of 0.3 Ohm. Now, just like last time, we check the electrical contact between one of the pins and the gate. Now, if you have headphones, then between these pairs of contacts there will be support, on the right, because the speakers themselves have about tens of ohms, be careful and do not confuse the short circuit with the support of the speakers, if you have de short zamikannya , then there will be 0 ohm. At this stage, you need to check how everything is functioning. For this reason, since I already have a microphone, I’ll insert it into the computer’s sound card and check what I’m doing. If you have headphones, insert the plug into the player, reconnect what you need to do, then turn the balance three times, reconnect so that you have correctly soldered the left and right earphones. At this stage it is still possible to correct it, but further correction will be easier.
I've checked everything and it works for me. You can take a heat-sinking tube and place the plug in it, but again you won’t get enough sealing, so if the cable gets wet, I’ll get wet in the soldering area and naturally, the wire will stop running after about an hour. It is necessary to do this so that the wire is fixed to the plug. For this purpose I need the original sewing threads and glue. You need glue that, when hanging, becomes elastic, so that it is not tenacious, and it is necessary for it to be visible. Use globe glue, because this type of glue is not very clear, and when it hangs, it is a little dark. 
Once the thread is frayed, I will soak it with glue. For the beginning, I will apply a little glue to the plug, and then take the thread, trim it from one side with my finger, and wind it tightly. It is necessary to wind it tightly, because due to the strength of the winding and gluing, we will have a wire of attachments all the way to the plug. It is necessary to wrap it step by step so that the empty items are not lost. 
If we find that everything is empty, through which the contacts are visible, then we are further informed. The axis of the principle is everything, the thread is tied. You can deprive it like this, but the knots of stench will loosen over time, and this thread will begin to grow. Or you can add more glue. Especially, I once again soak in some glue, and since this glue is transparent, it will seep through, and when the veins hang, the sky will coat this surface. We let the glue seep through thoroughly, and the result will be, if the glue dries, we will have what can be called a monolithic body, which will be very nice to trim, and hopefully will be no worse than a new one. It is obviously not so presentable, not so attractive, and its functions will be compromised. 
The axle and everything, now you need to remove it so that the glue is dry, you need to do it in a suspended position, so that this plug does not hit the rod, and any paper that will then stick, and having torn it off, you will place a piece of the paper on the plug And, and it won’t be beautiful. 
Stereo headphones(headphones) – this is a mobile sound-producing device intended for individual listening to music and listening.

Headphones according to the constructive wiki sound:
- internal canal (sprinkles, earplugs, barrels, vacuums, earplugs), which are inserted into the ear canal;
- Overheads that are inserted into the ear shell;
- There are two headsets on which two telephones are installed;
- A headset on which two telephones and a microphone (headset) are installed.
For the majority of headphones, the sound signal to the phone and microphone is transmitted through darts, rubbing of which is the main cause of failure. It’s difficult to figure out such problems with headphones with your own hands, which is what the statistics have to say.
Electrical diagram of headphones
To successfully repair any type of earphones, it is necessary to know their devices, electrical diagram and wiring order.
The electrical diagram shows the unsoldering of the headphone wires to wide widths for transmitting the audio signal using a jack (mini-jack) ⌀3.5 mm connector.
Mini-jack 3.5 plugs are widely used for transmitting audio signals in headphones and microphones, sound cards of computers and tablets, mobile phones, sound boosters and audio speakers.

Until 2012, the distribution of mini-jack 3.5 sockets was carried out using the OMTP (Open Mobile Terminal Platform) standard. On the diagram there are jacks of the TS, TRS and TRRS OMTP types. In 2012, a new CTIA (Cellular Telephone Industries Association) standard was adopted, for which all audio systems are soldered together, on the circuit there is a TRRS CTIA jack (in the photo of the right-handed version).
The polarity of the R+ and L+ channels is specified mentally, so the sound signal has a changing tone. This is necessary for phasing the left and right channels. For a mono system, one dart transmits a sound signal directly to two headphones connected in parallel. However, the polarity of the speaker connections must also be adjusted.
Interchangeability mini-jack 3.5
When connecting headphones to the output of the audio device, ensure that, regardless of the geometric dimensions of the mini-jack 3.5, they are not always interchangeable.
If you connect stereo headphones with a TRS plug, TRRS OMTP or TRRS CTIA in a socket, for mono headphones with a TS plug, use only one left earphone.
When you turn on mono headphones with a TS plug and TRS, TRRS OMTP or TRRS CTIA sockets, it works on both phones without stereo effect. For simple headphones, phones are connected in parallel
The TRS plug can be adapted to work with TRRS OMTP and TRRS CTIA connectors. And when using headphones with a microphone, as a headset is called, there may be problems.
Interchangeability of TRRS OMTP and TRRS CTIA
If a headset with a TRRS CTIA plug is connected to a device with a TRRS OMTP plug installed, then the microphone will not work, and the headphones will suffer great problems. This is due to the fact that the contact of the microphone input will be connected to the main port, and the contact to the microphone input.

With this connection, the sound signal can flow only from the lance from the L+ output, through the phones, turned on sequentially in the antiphase and R+. The signal from the original sound goes to the microphone, but through the great internal support it will not flow into the sound creation.
When you press the SB microphone lock button, the headphones will return to normal mode. Since there is no use in the microphone, if you lock the SB microphone lock button, you can use the headphones without damaging the equipment. If you need a microphone or plan to use the headset with the device for a long time, you will need to unplug the headset and swap the GND and Mic pins.
A similar situation will be avoided if the TRRS OMTP plug is inserted into the socket under the TRRS CTIA plug.
Column of wire unsoldering
The cord that comes out of the plug has a bunch of darts of different colors placed on it. Yak cables have a high-density wire of the tinsel type, in which a thin tension is intertwined with a nylon or wool thread, which promotes the mechanical strength of the tension and tension.

There is no international standard for the distribution of darts according to colors. Therefore, the distributors solder the darts to the jack pins, using internal documentation.
With practice, you can come to an unpretentious conclusion, so that the hidden GND wire is not prepared by all the generators and the color of the medium is coated with an insulating varnish.
Repair of in-ear headphones
Dart headphones are becoming very popular these days. Low price, small dimensions and pleasant sound quality make them indispensable for use in the headset of mobile devices.
So, as you fiddle with headphones under the hour of collapse, the darts gradually rot and then fray after an hour, call the place where you enter the telephone, first of all, Jack.
As soon as the phone starts ringing, the sound in one of the phones begins to periodically disappear when the phone breaks. In this case, even without accessories, it is clear that the wire has frayed. I’ll show you how to do the DIY repair of HTC in-ear headphones.

In these headphones, the wire on one of the phones that was inserted has frayed. To perform repairs, you must open the housing. To do this, insert the blade of the knife into the gap between the halves of the body and the wrapping parts, and reinforce the halves.
If the halves of the phone click together for a tight fit, there are also grooves in one part and a shoulder that protrudes into the other, so they come apart without problems.

After disassembling the phone, it became clear that one of the pair of wires was broken, and part of the other wire was also broken. To ensure that the cord at the entrance to the earphone is worn out, it is necessary to remove all the unwanted parts.

Therefore, the conductors were soldered to the phone, the cord was cut a couple of centimeters and the wires were cleaned and insulated. Then the fixing bow was pressed and removed and secured with additional embossing pliers on the cord in a new place. The place was chosen so that if the cord was pulled, the soldered conductors would not be strained.

Lost tin and solder, adjusting the polarity, the wire to the headphone switch. Pliers were used as a third hand. The handles of the pliers were covered with pharmaceutical gum, which made it easier to squeeze the phone.

All I had to do was close the halves and check the headphones at the robot. During the repair, I soldered the darts into another earphone, and the fragments of the stink would have disappeared in the near future.
Repair of over-ear wireless Bluetooth headphones
The sound signal to Bluetooth headphones is transmitted over the air. Connect to this socket for connecting headphones until the signal is sent. Therefore, it is difficult to check the integrity of the cord using a multimeter.

An important feature of this model of headphones is the presence of permanent magnets on the back of the headphone, which allows the phones to creak. However, the repair technology does not affect the technology; it is easy to use.

As a rule, it’s rare that two phones are damaged at the same time, and then one of them begins to malfunction. Unscrewing the block is more difficult, then the search for malfunction will need to start from the earphone, which has ceased to work.

Sound the earphone and the two parts connected to each other using rubbing force. To disassemble the earphone, you need to insert the blade of a knife into the gap between the halves of the body and turn it.

After removing the earphone, the cause of its failure immediately became obvious. The leading conductor of the copper color will be at the cooler.

The cord is stretched from the body and cut along the line of the entrance to the earphone. Often, in headphones, the cord frays at the entrance itself, in order to prevent a possible breakdown in the near future, the cord is cut in this place.

The insulation of the cord was melted using a soldering iron over a stake and cut off. Here you need to not overdo it, so as not to melt the nylon thread in the middle of the conductor tinsel.
The wire is coated with a ball of varnish, which collapses when heated. It’s good to take a solder shot when using aspirin tablets with flux. It became impossible to solder the conductors to the phone by adjusting the polarity.

The pressed cord of the brass bow was very stiff, and it was important to open them. Additionally, they fixed the cord directly from the headphone exit, but only allowed the cord to go in as far as possible. As a result, the wire in the middle broke. To disconnect the cord, it was fixed with additional hot-melt adhesive. When you pull the cord into the opening of the headphones, the hot-melt adhesive will shrink and fix it tightly.

Suddenly I re-soldered the cord into another headphone. If the wire has frayed in one, then in the next hour it will fray in the other. The photo shows the cutting of the cord after repair.

The repair of the headphones with your own hands has been completed and now they will last even longer, even before the repair was carried out, and the structural defect was installed, so the headphones came out fine.
Repair of shotgun headphones with microphone CHP 510
In the case of over-ear stereo headphones of the headset type, the darts in the cord are frayed when entering the phone.

I brought my familiar headphones, which you see in the photograph with such a problem. Having independently repaired the headphones, the solder removed the darts, only to have them break again. This type of repair only results in short-term operation of the headphones.
For proper repair, you need to cut the cord that is frayed, unplug the earphone and solder the horns in the middle until the sound is restored.

To begin disassembling the headphone you need to remove the ear pads. To do this, you need to pull it over the edge with your fingers, and use a flat twist blade to remove it from being attached to the phone.

After removing the embouchures, several fasteners became visible. Sometimes the phone cover is fastened with screws.

To remove the cover, you need to press it with a flat screw onto the pins directly in the center and press them.

After cutting the frayed section of the cord, it is closed so that it becomes tightly fused into the elastic tube, which protects it from harsh wires. I had a chance to remove the darts from the tube with the help of a drill. After cleaning, the tube was put on the cord.

Then be very careful, so as not to damage the veins of the darts, cut the insulation with a knife. A soldering iron will not help here, since the conductors are practically fused into the insulation, and it was impossible to destroy them with darts.

After the PVC insulation is applied, the ends of the conductors need to be tinned using an additional soldering iron and flux. The photograph shows the cord being prepared for unsoldering the earphone.

In order not to get confused with the markings, the defective ones were not soldered back, and at the time of soldering the new ones, the old ones were soldered and then soldered in the same color.
The wires that go to the speaker of the open earphone were soldered right down to the pins. Those that go to the other headphone and microphone were connected by soldering the wires one by one. For insulation, a paper strip was removed, which was already standing, covered with a sticky ball.

The photograph shows self-repaired CHP 510 headphones, which, I bet, will last for many more years
Repair of headphones with headbands and microphone Genius
The Genius headphones were repaired, in which there were ground darts and cracks in the fastening of the phones up to the head.

The headphones were not brought in for spare parts, but after assessing their technical state, they were repaired so that they could be repaired.
Repair of headphone mounting to headband
Before repairing the frayed parts, it was necessary to repair the mechanical damage from the headphone mounting assemblies to the headrest.

Roztin vuzlov showed that there were protrusions that served to fix the flat spring of the headband during the day. It looked like the headphones were letting in, and the flat spring was simply cutting them off.

You can secure the spring at the node using two screws, but for reliability you can choose the type of fastening - one screw and hot glue. For this purpose, a hole was drilled in one of the halves and an M3 screw was inserted into it.

Next, the hot melt glue strips were melted with an electric soldering iron, and until the glue had cooled and hardened, the head spring was installed and the nut was screwed onto the screw. Another university was repaired in the same way.

The thickness of the plastic assembly allowed the screw to be frozen from the end head, which was fused into the holes using a soldering iron. The screw head can be coated with black varnish.

As seen in the photograph, the external appearance of the headphones has not changed. The possibility of adjusting the headband has been preserved. Now the headphones are securely secured to the headband, and you can begin to repair the cord.
Repair of headphone wires
The headphones did not ring through the jack with a multimeter, so he had to pick up the phone. The analysis begins with the removal of the ear pads from the phones.

To do this, grab the edge of the ear pad and pull it with your hand. Next, twist the ear pad and carefully remove it from the seal with the headphone body.

To open the earphone, just unscrew three screws and the cover will open. Maybe one of the screws turns around, but sometimes it doesn’t turn around.

It turned out that one of the threaded posts had broken. I had a chance to use hot-melt adhesive to replace it by installing a metal stand with internal grooves.

On the wire of the headphone installations there is a volume control unit and a microphone connection. To determine with the help of a multimeter, where to conduct it in a steep direction, the unit has been turned off. For this, two screws are sufficient.

Calling with a multimeter showed that the speakers in the headphones are normal and small at 31 ohms. And the tension in the cord is small, both on the jack section - the tension regulator, and from the tension regulator to the headphones. I had to cut a section of the cord, like a headphone, from both sides of the tension regulator and re-soldering.

The movement of the cord on the headphone body was divided using additional tying at the headphone. This is a bad option, as fragments of the cord may move in the middle and wrap around, as a result the darts may become wrapped.

Therefore, the cord is secured with hot glue. Apply glue first to the cord, until the glue has not hardened, and be pulled into the sleeve. Then the cord was fixed with hot-melt glue to the top of the earphone.

If you don't need to solder the cord until you get the color marking, twist the earphone halves and put on the ear pad.

The time has come to repair the sound control unit and turn off the microphone. For this model of headphones, to remove the unit, it was enough to unscrew two screws.

The cords in the block were fixed behind the help of plastic bushings, and the cord could not be removed. The bushings were cut with a knife.

Next, sections of the cord were cut and the insulation was removed using a soldering iron. Please note that the components that send the sound signal to the headphones and microphones are isolated from one to the other to reduce mutual input.

To fix the sleeve on the cord, a drop of hot-melt adhesive is applied to the new barrel, you can apply instant glue. The hot-melt adhesive is catching on quickly.


It was lost to solder the horns to the contact tracks of the armature board and remove the regulation. It was easy to solder by hand, and pressed the board with pliers. At the same time, there will be a replacement of the oil and a thickness regulator.

Do-it-yourself repair of Genius headphones with microphone is completed. The check showed it to the correct robot. Now the headset, with careful care, will serve even more years.
Repair of droneless headphones Panasonic RP-WF83
We had a chance to repair Panasonic RP-WF83 drone-free headphones, which worked normally, but the batteries that were inserted into the headphones from the base did not charge.

It was necessary to pick them up and charge them from a nearby charging device, which made them inoperable.

In one of the bases from the transmission there were two spring contacts, through which the flow charge was transmitted to one of the headphones. Testing the voltage at these contacts with a multimeter turned on in constant voltage mode showed that the base charger circuit is OK.

Well, there is a problem with the earpiece itself. To remove the electronics, you need to remove the ear pad and unscrew the screws, as described in the article. As soon as I looked at the payment, the reason for the discovery immediately became clear.

The other tracks, to which the contacts for connection to the base were soldered, were removed from the board. Vrahovay, who had applied themselves to the pressure of the loose contacts of the base, Vidmova was rescued through a constructive failure. The contacts were sealed in such a way that when pressure was applied to them, the voltage was transferred to the winding tracks.

The torn hand-made maidans were glued to the Super-Moment board. Next, as shown in the photograph, cover the ball with solder.

Two small coils were cut from the brass plate, tinned with solder and soldered to the inside of the contacts. Cuts can be made from any metal, come and go, firebrand, so that the metal is tinned with solder.
Now all the force of the vice is applied not to the place of soldering the contacts to the hand board, but to the installation of the coils.

The tracks that were cracked were simply tinned and covered with a thick ball of solder. If the track is badly damaged, you can double it with copper wiring.

To check the charging of the batteries to the contacts, connect a dart and connect to a voltmeter, which shows a voltage of 2.61 V. This indicates that the batteries are charging, since their operating voltage cannot exceed 2.5 V .

The practice of using headphones has revealed a stable battery charge. Do-it-yourself repair of drone-free headphones is completed and now you can no longer smell the smell from a robot through broken contacts.
Other malfunctions of drone-free headphones
Droneless headphones, which always have a loose cord, rarely break. Sometimes they stop working because the batteries are discharged. It also happens that the battery contacts oxidize, in which case they need to be washed with alcohol or a torch.
If you are using your headphones unsteadily, you need to rinse it with a drop of alcohol and turn it on and turn it on. If we can’t help, we will have to replace it with help.
If, when adjusting the thickness, wheezing appears or the sound is intermittent, then immediately drop a drop of alcohol into the filling and, after turning the wheel a lot, add a drop of machine oil.